The WiFi Pineapple has become ubiquitous within the cyber security community and network industry professionals alike. The low price tag, easy to use PineAP GUI, and mobility have shown that Hak5 have made a product to genuinely assist with wireless security assessments. This post was originally used to reference the setup process or for those who have a dusty WiFi Pineapple sitting around, or anyone looking for help.
WiFi Pineapple Nano Setup for Windows
WiFi Pineapple Nano Setup for macOS
WiFi Pineapple Nano Setup for Linux
WiFi Pineapple Nano Setup for Android
WiFi Pineapple Nano Setup for Windows
This proof of concept was created using Windows 10
Straight To It
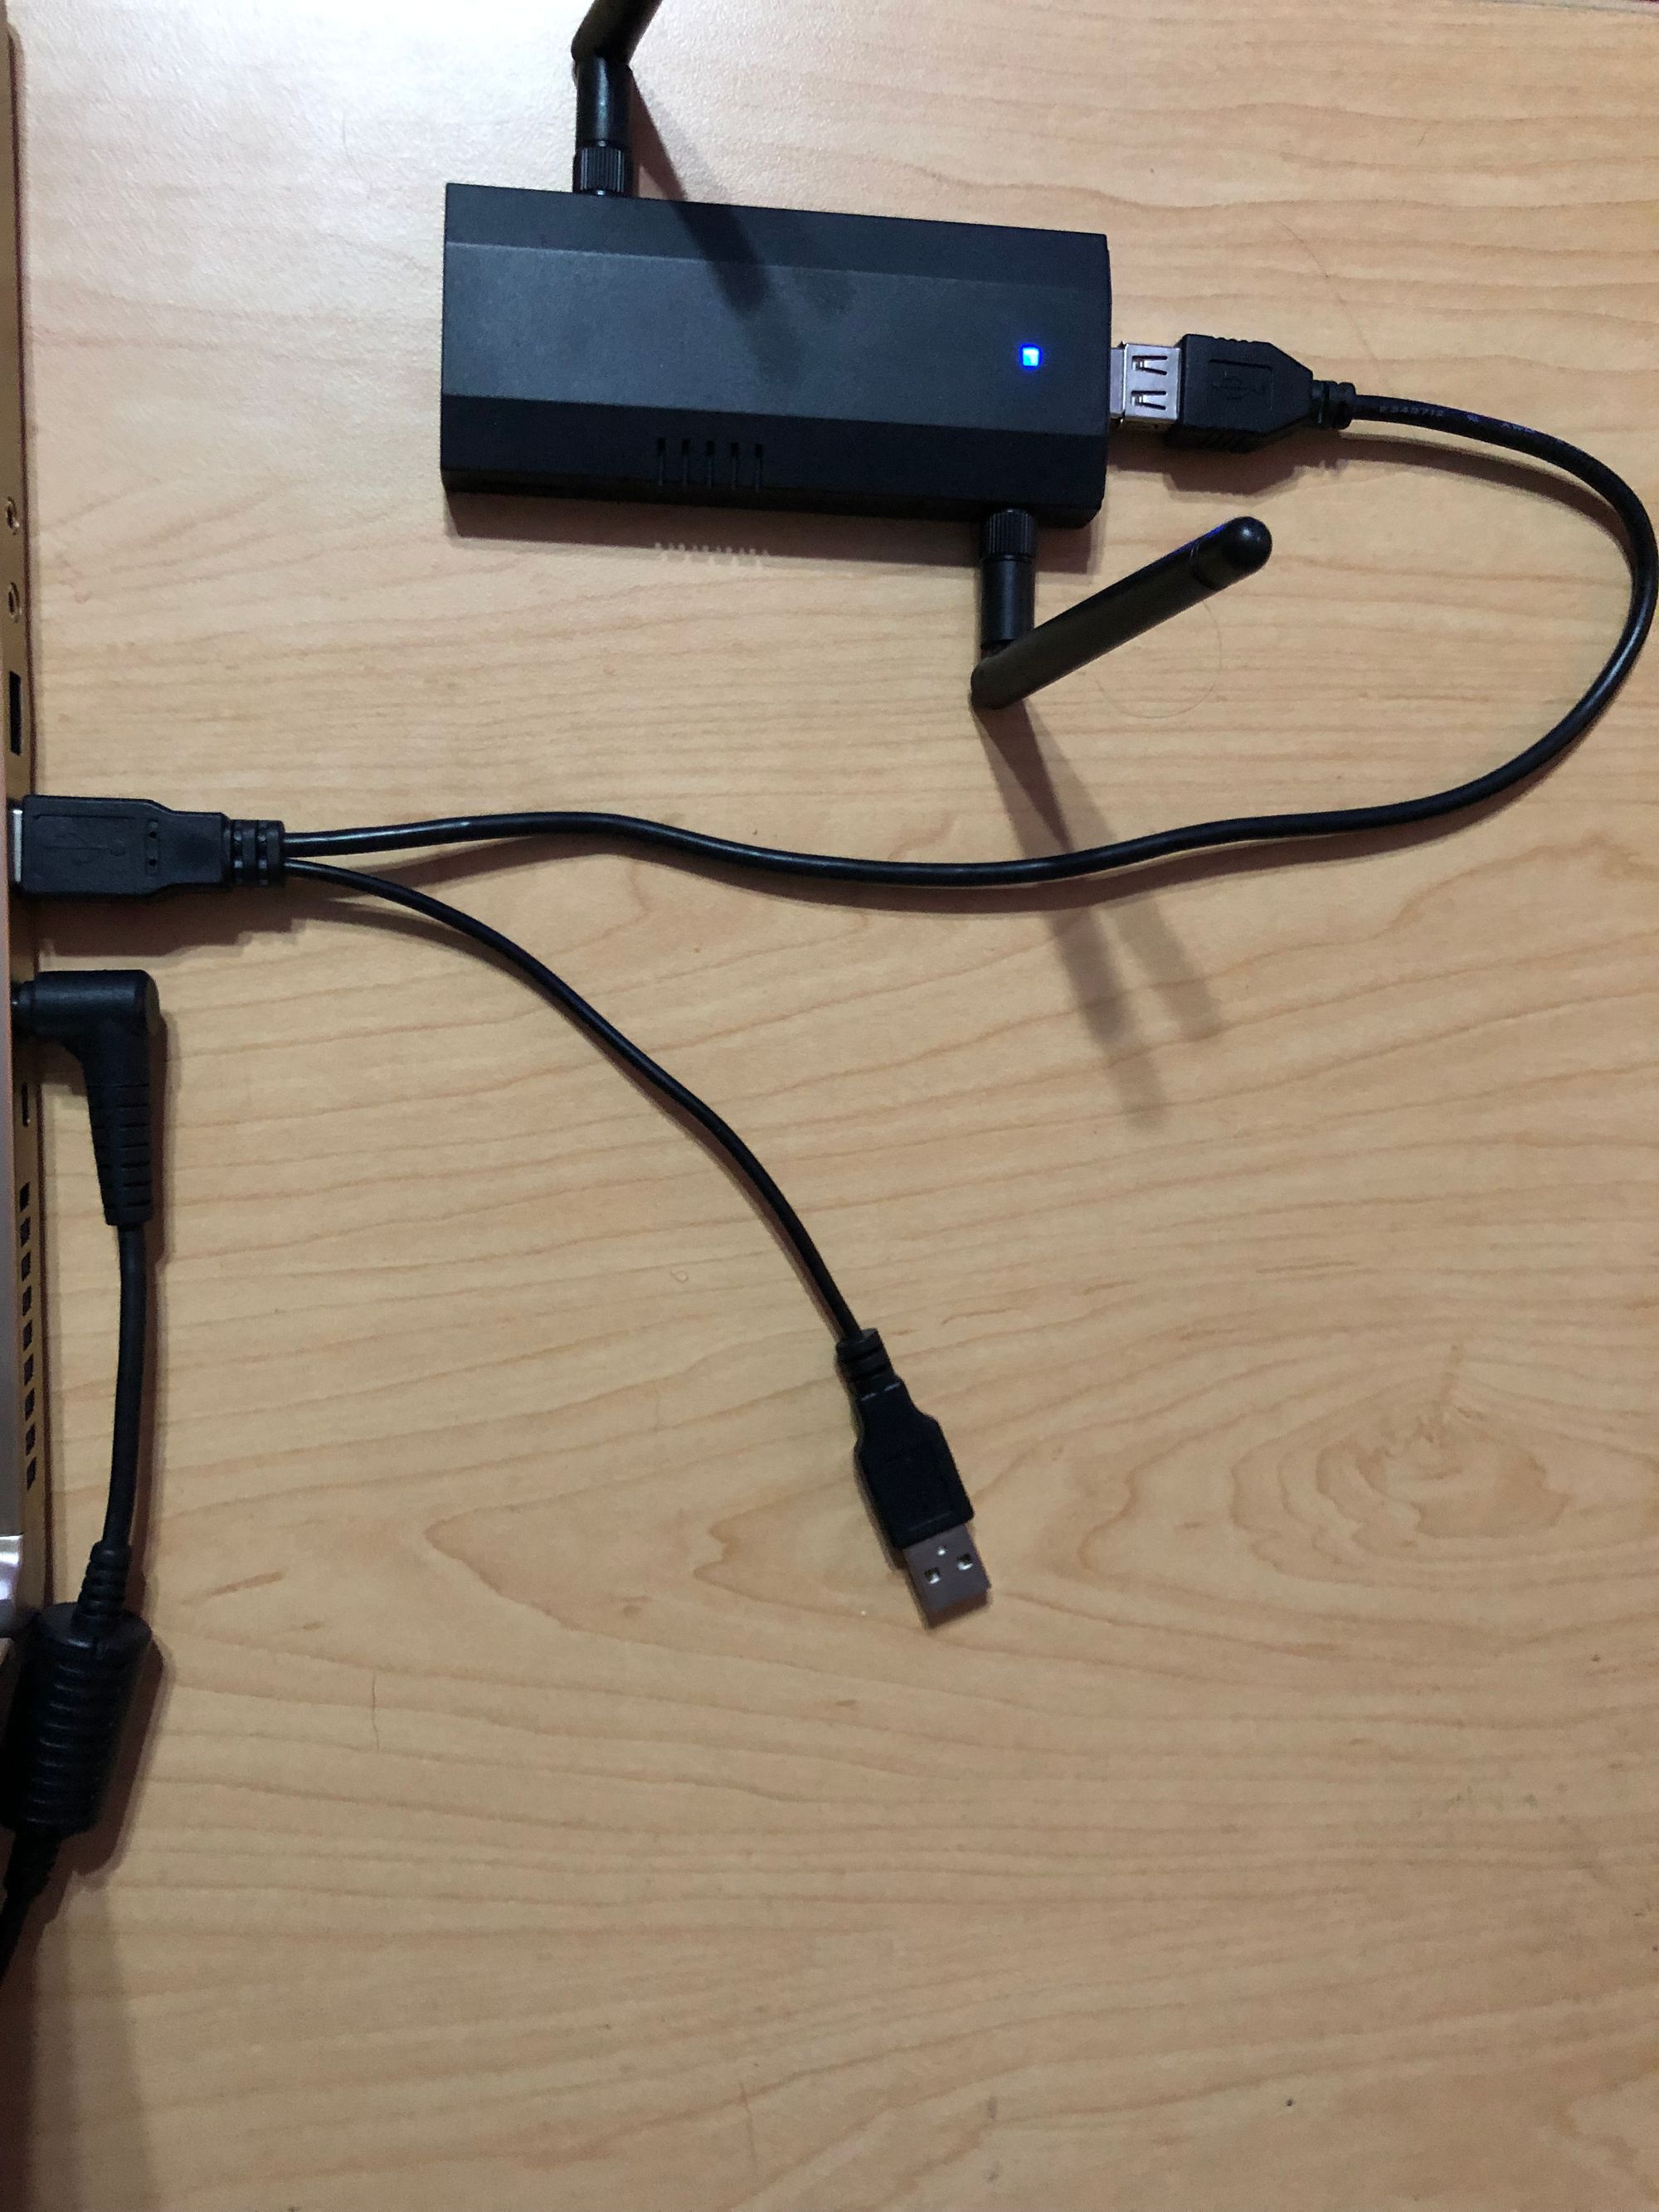
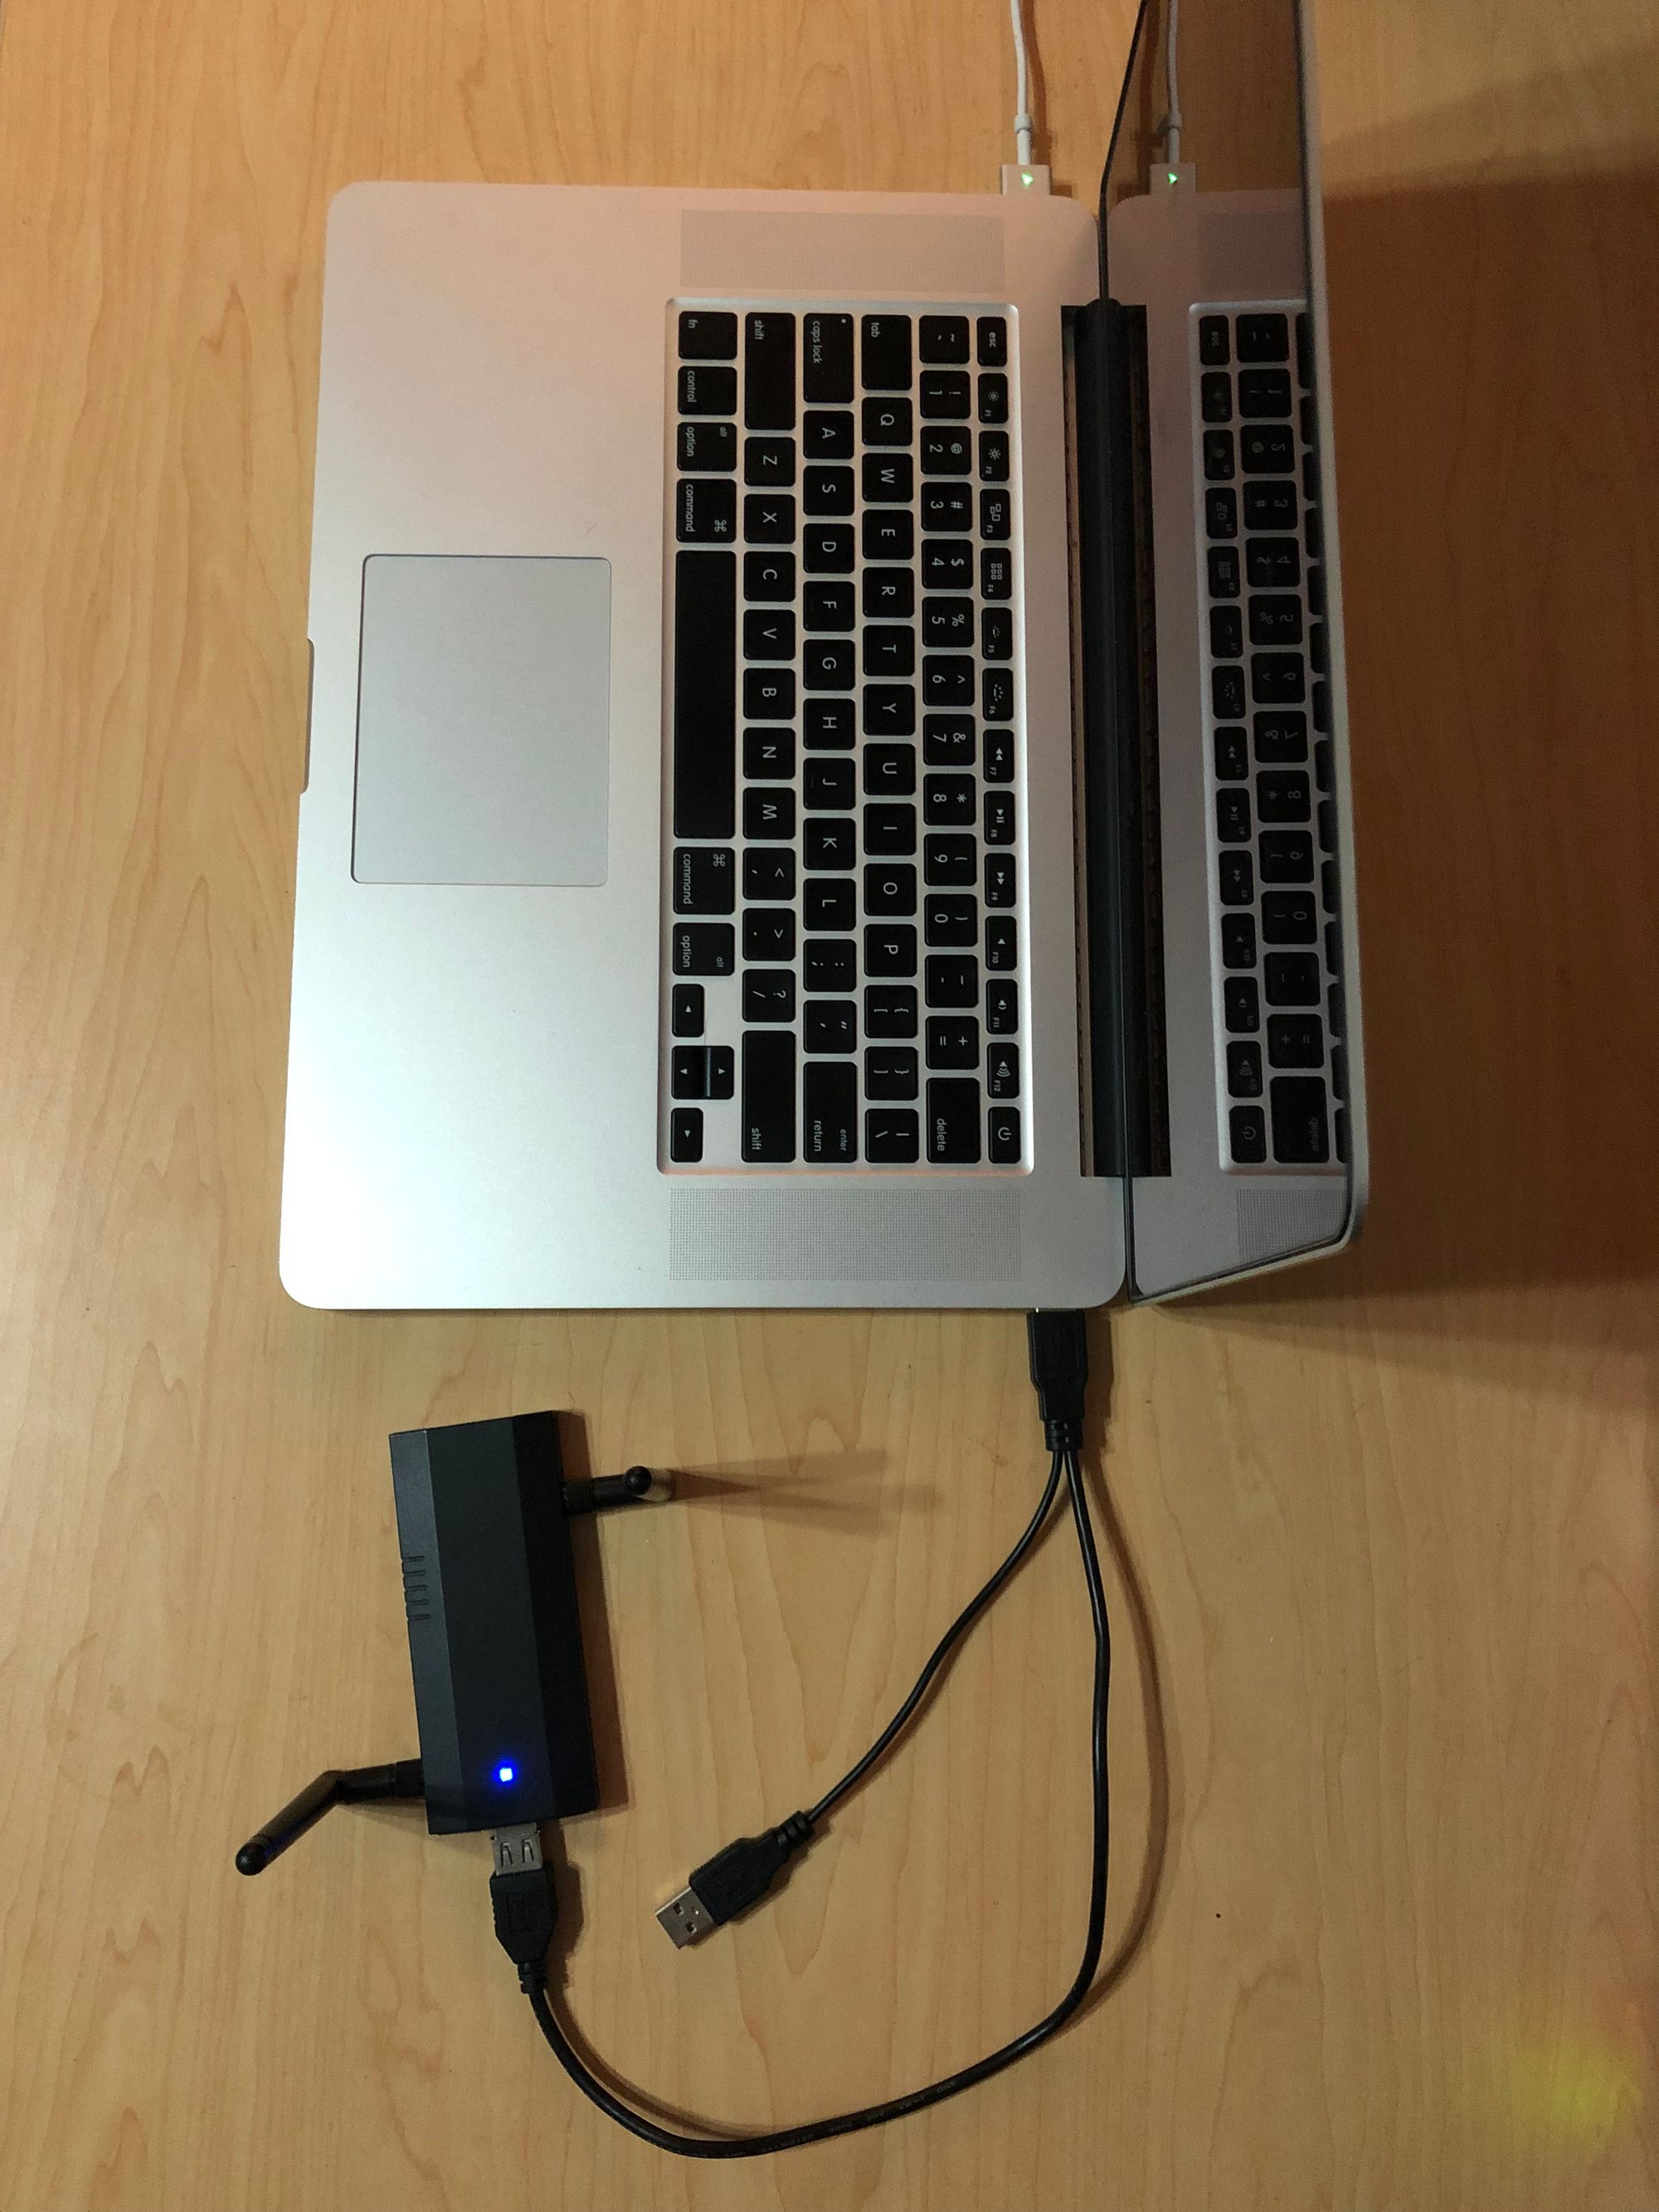
- Plug in the WiFi Pineapple into an available USB slot using the supplied USB Y Cable or any USB that meets the WiFi Pineapple power specifications
- Navigate to Control Panel -> Network and Internet -> Network and Sharing Center -> Change adapter settings
- Highlight the WiFi Pineapple Adapter and press F2 to change it to a name you can recognize (e.g. Pineapple)
Note: The WiFi Pineapple Nano Adapter will have an ASIX AX88772A USB2.0 to Fast Ethernet Adapter chipset description
- Right-click the WiFi Pineapple adapter and select Properties
- In the This connection uses the following items: scroll-menu, highlight the Internet Protocol Version 4 (TCP/IPv4) and press the Properties button
- Set a static IP address for the WiFi Pineapple by selecting the Use the following IP address radio button
- Set the IP address to 172.16.42.42 or any address that fits your network
- If you don’t know networking concepts comfortably, leave the Subnet mask: and Default gateway: fields alone; the default values are 255.255.255.0 for the Subnet mask: and leave Default gateway: blank. Click OK -> Close
- Next, right-click the adapter which currently has Internet access and select Properties. This will be the adapter you are using to bridge to your WiFi Pineapple, providing it with Internet access
- In the top of the modal the pops up, select the Sharing tab
- Checkmark the Allow other network users to connect through this computer’s Internet connection
- Select the adapter from the drop-down list which you named in step 3 and hit OK
- Navigate to 172.16.42.42:1471 or whatever IP address maps to the IP address you set in step 7, ensure the port is 1471
- Use the on-screen instructions to set up the WiFi Pineapple
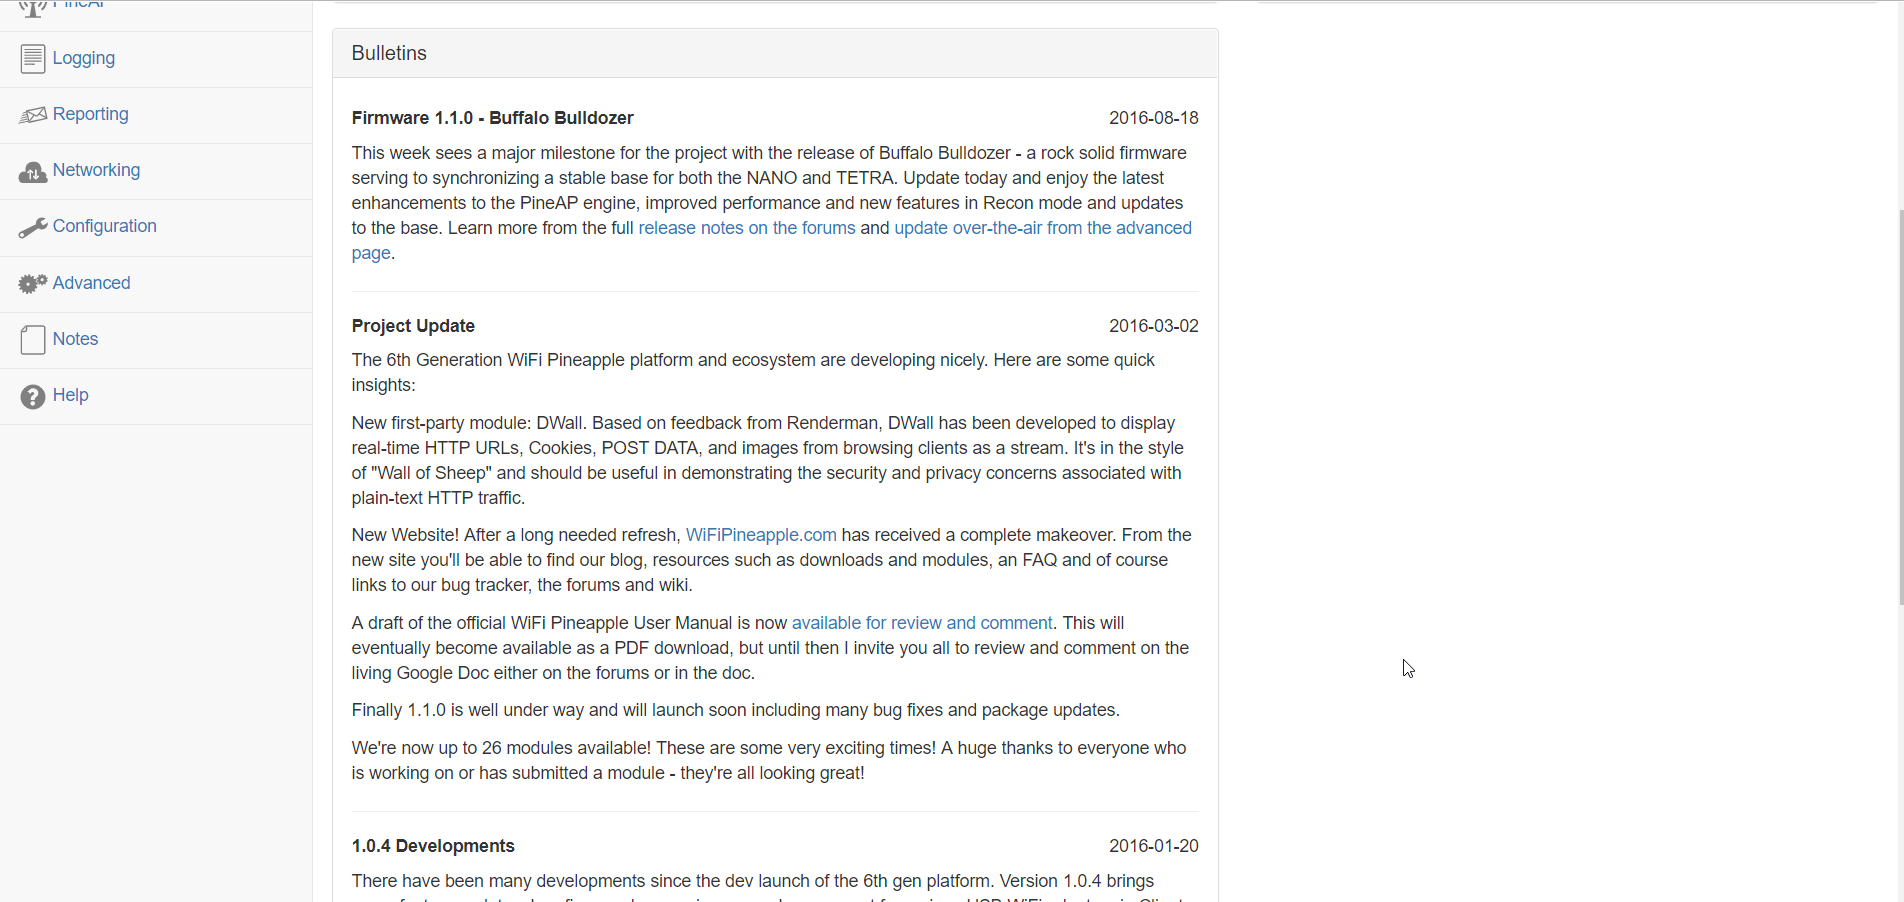
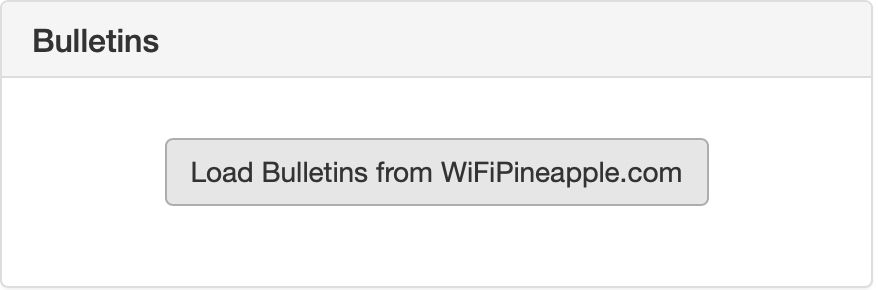
- Click the Load Bulletins from WiFiPineapple.com button on the Dashboard, if bulletins successfully load you’re all ready to go!
Visual Guide
- Plug in the WiFi Pineapple into an available USB slot using the supplied USB Y Cable or any USB that meets the WiFi Pineapple power specifications
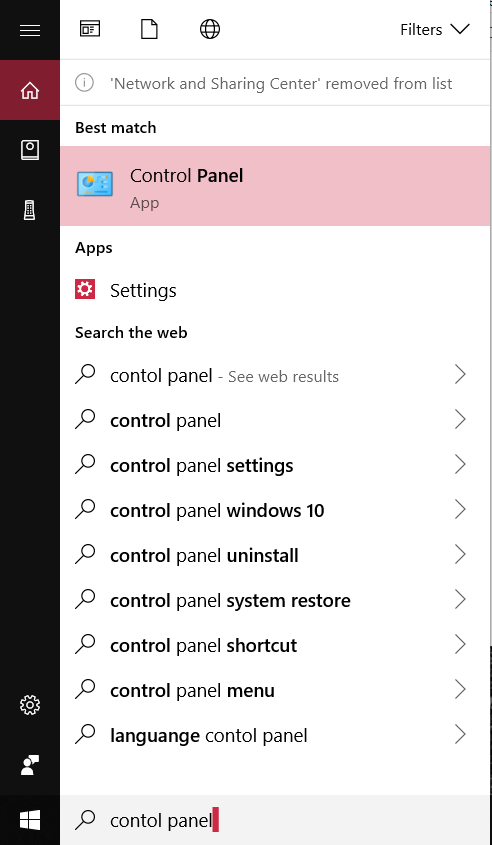
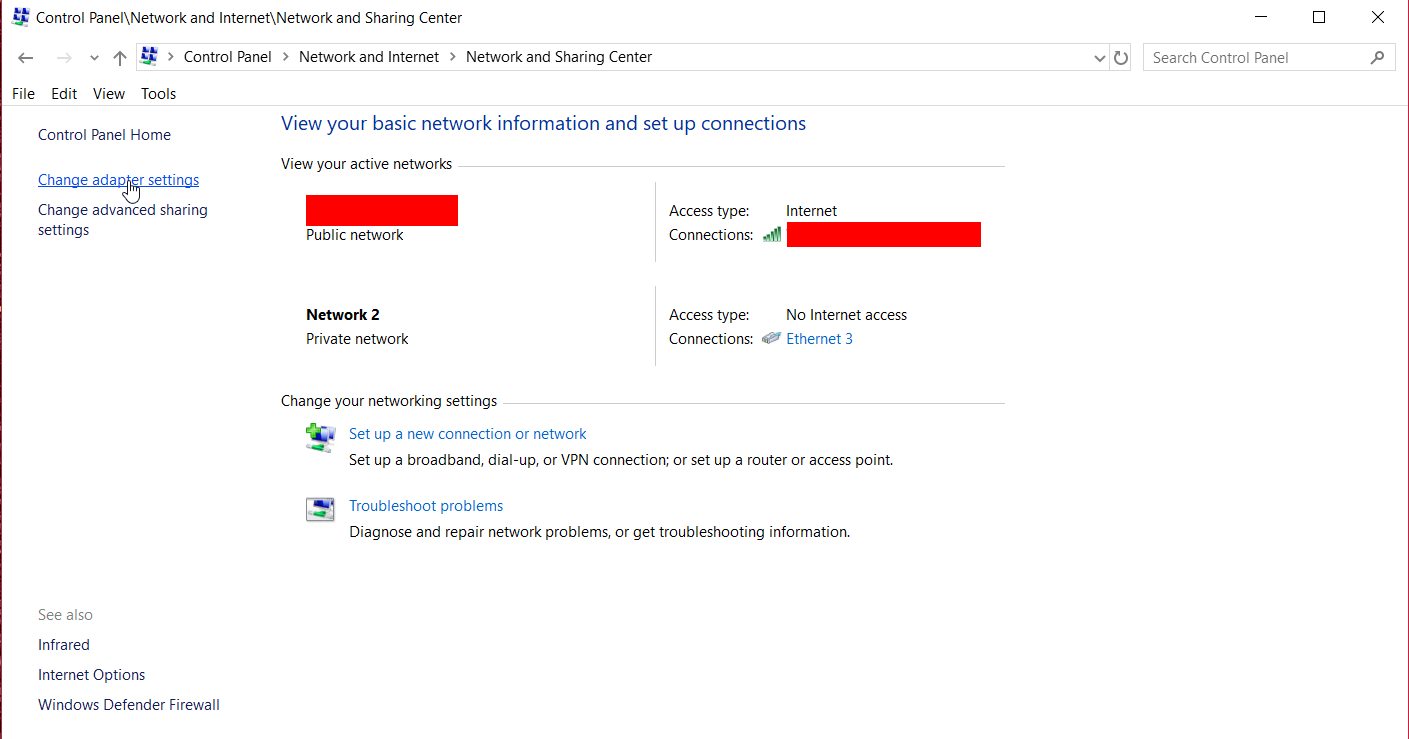
- In the bottom left of the Desktop, click the Type here to search text field and navigate to the Control Panel by searching for it.
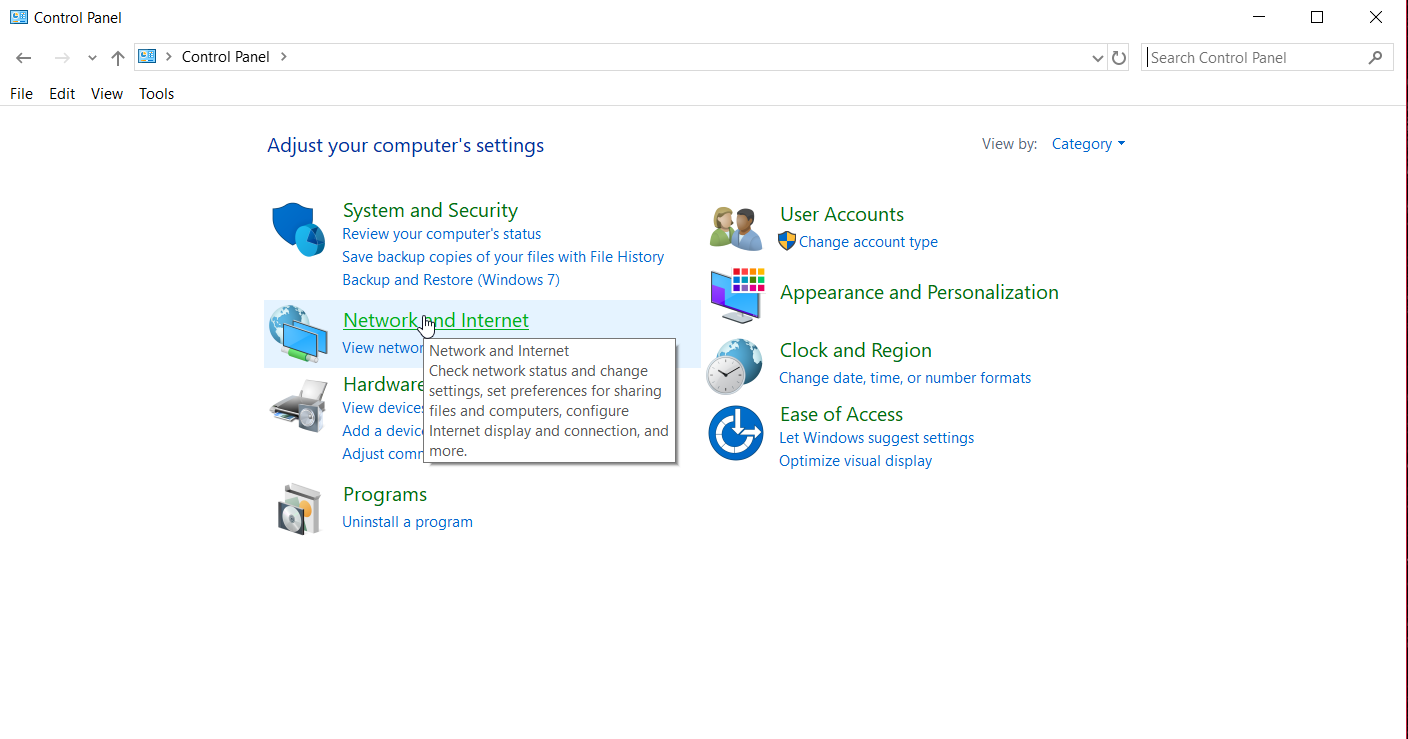
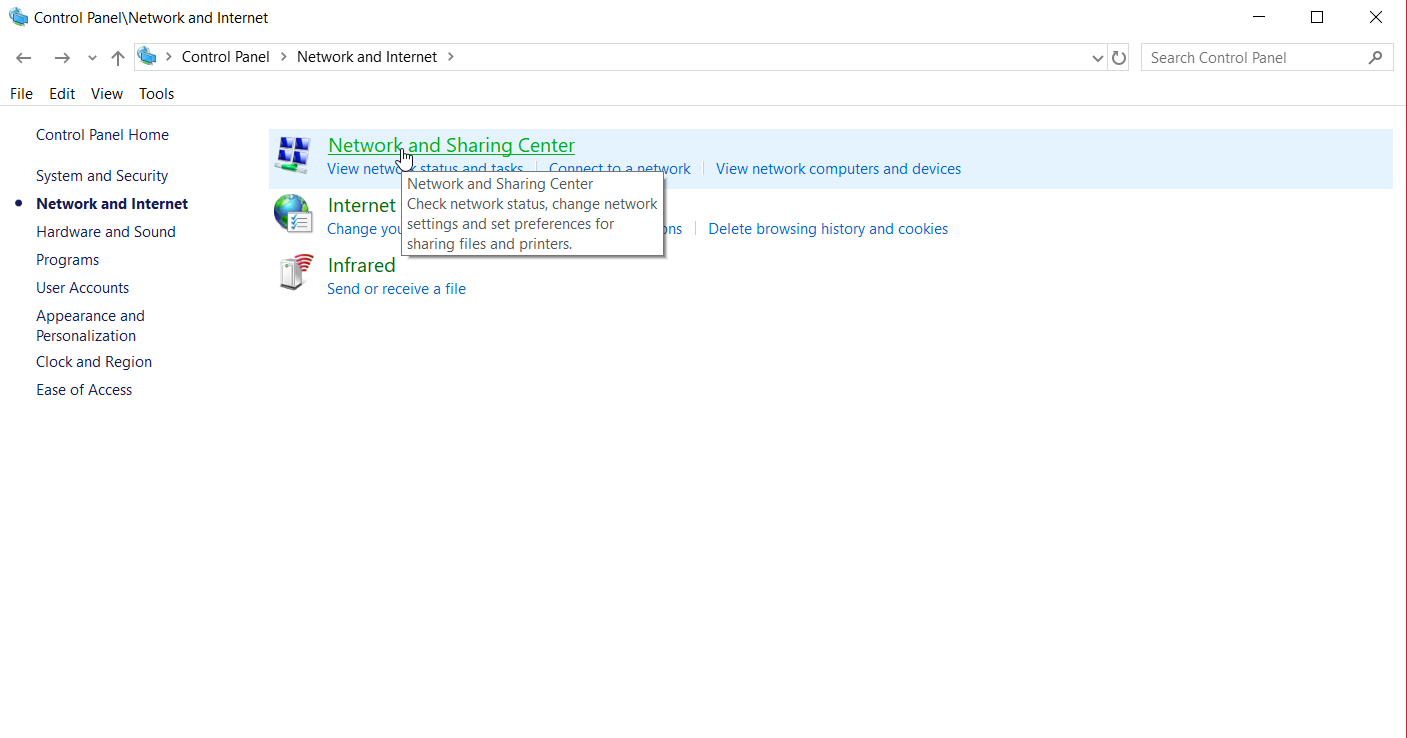
- Navigate to Network and Internet -> Network and Sharing Center -> Change adapter settings
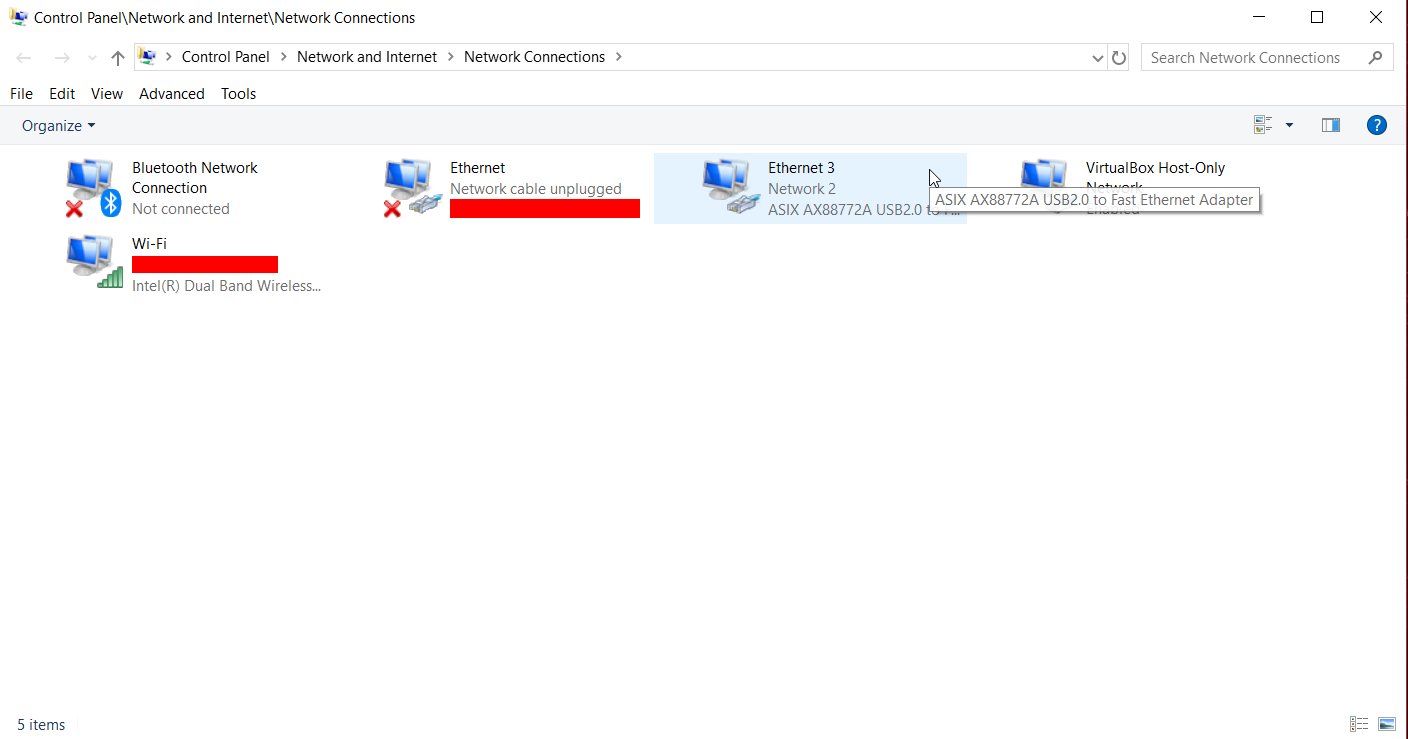
- Highlight the WiFi Pineapple Adapter and press F2 to change it to a name you can recognize and press Enter (e.g. Pineapple)
_Note: The WiFi Pineapple Nano Adapter will have an ASIX AX88772A USB2.0 to Fast Ethernet Adapter chipset description _
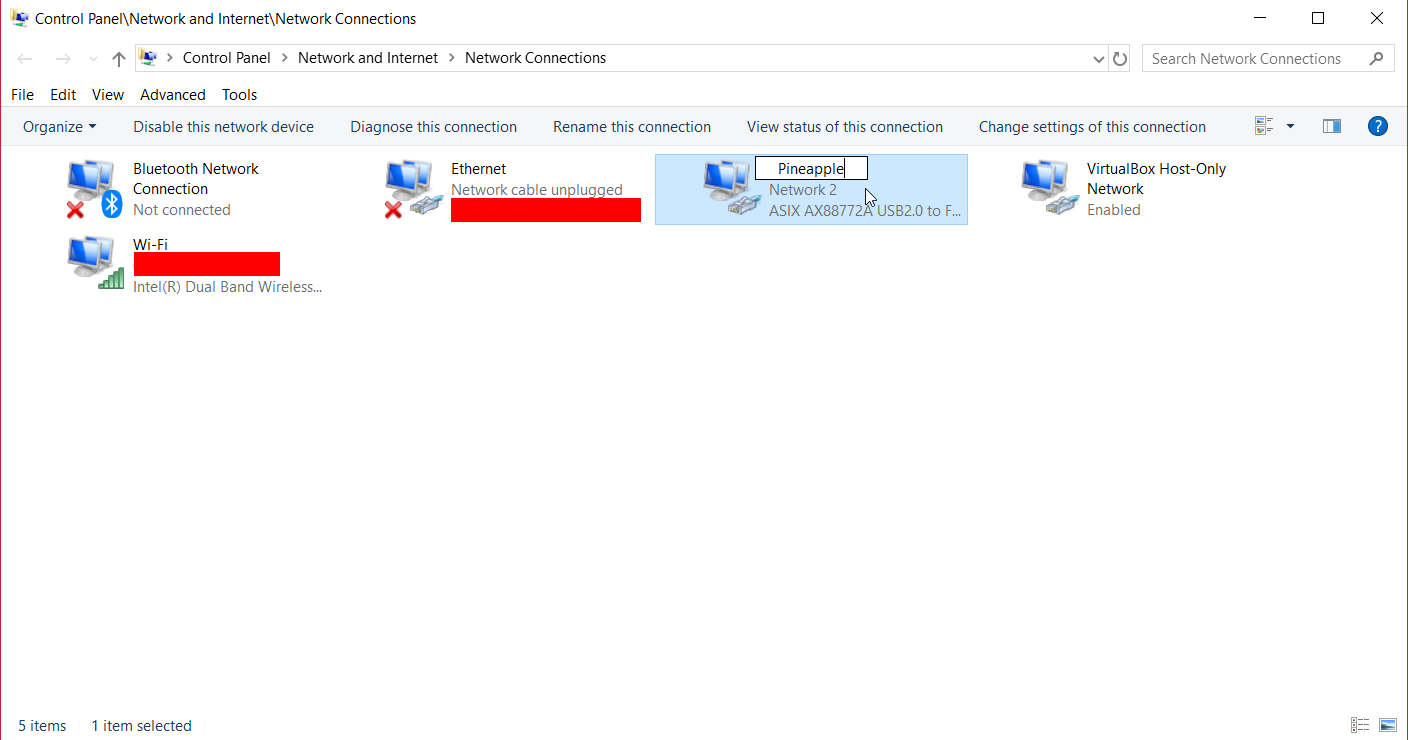
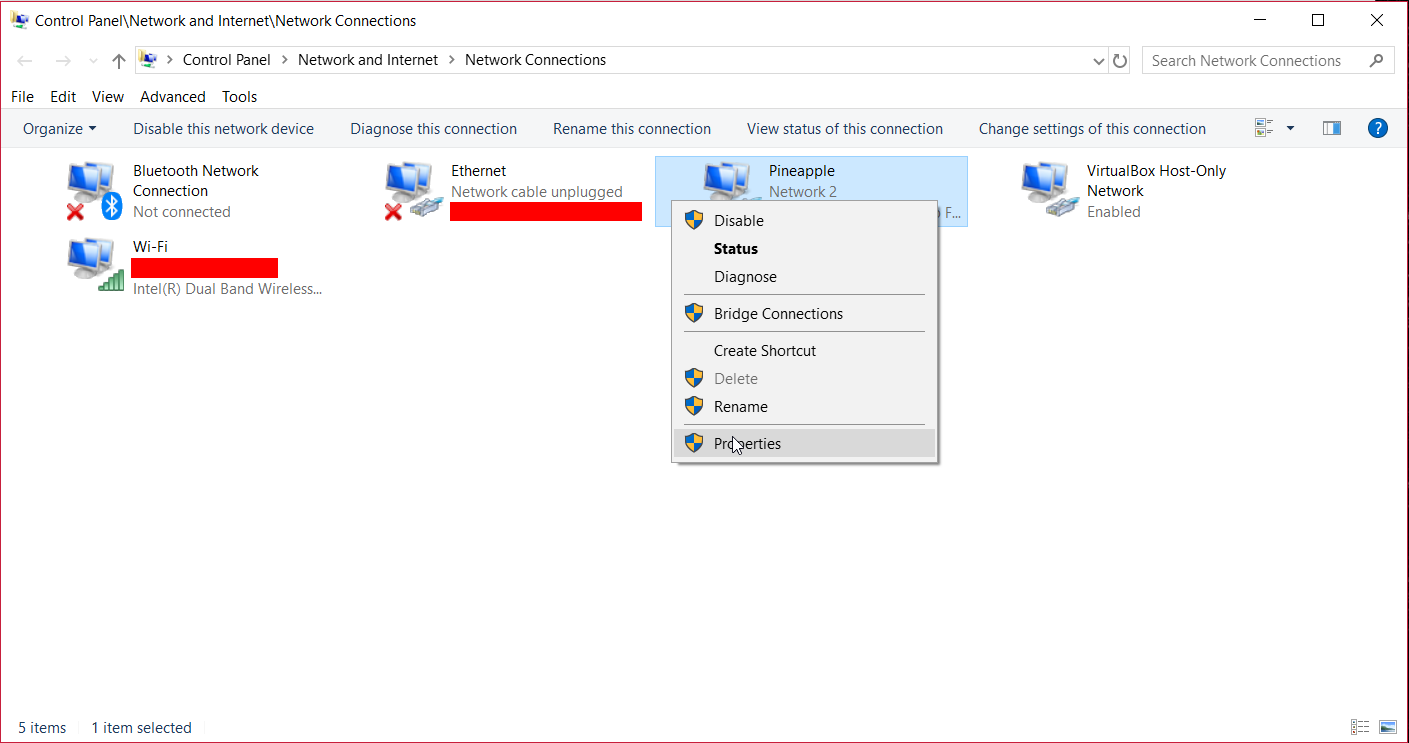
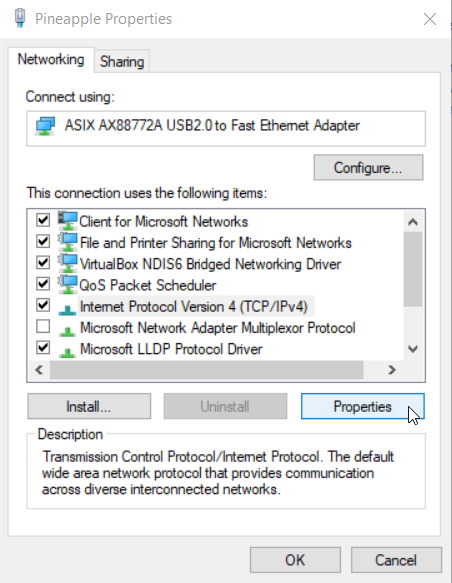
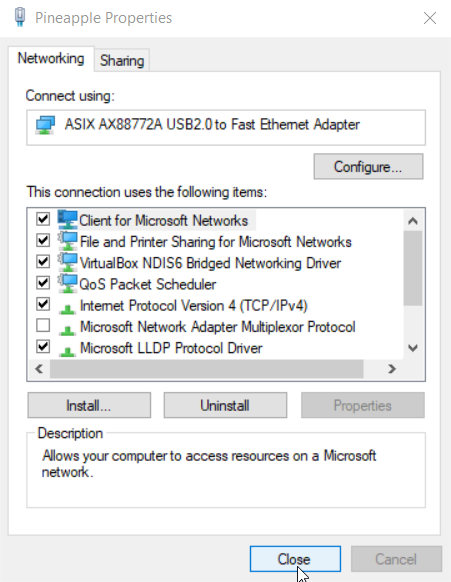
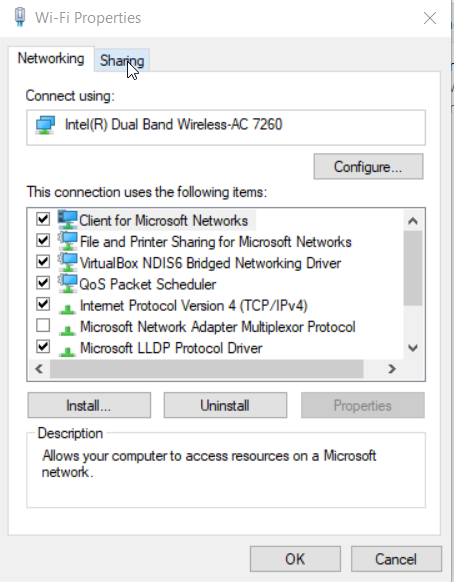
- Right-click the same Pineapple adapter and select Properties from the drop-down menu
- In the This connection uses the following items: scroll-menu, highlight the Internet Protocol Version 4 (TCP/IPv4) and press the Properties button
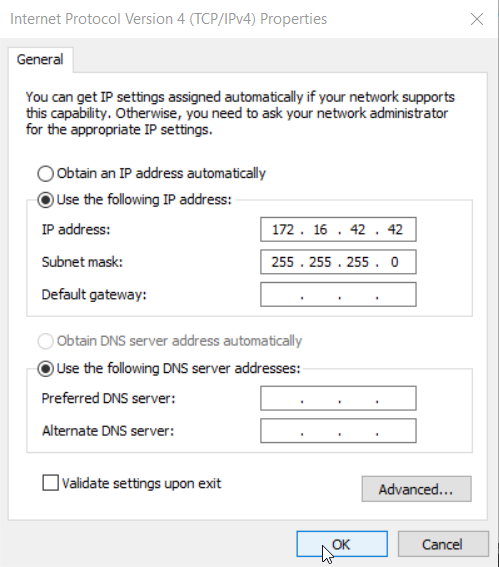
- Set a static IP address for the WiFi Pineapple by selecting the Use the following IP address: radio button. Set the IP address to 172.16.42.42 (or any address that fits your network). If you don’t know networking concepts comfortably, leave the Subnet mask: and Default gateway: fields alone; the default values are 255.255.255.0 for the Subnet mask: and leave Default gateway: blank. Click OK -> Close
- Now, right-click the adapter which powers your power supply and select Properties. In my case it is my WiFi internal WiFi adapter connected to my home WiFi. I’m going to bridge that connection to my Pineapple
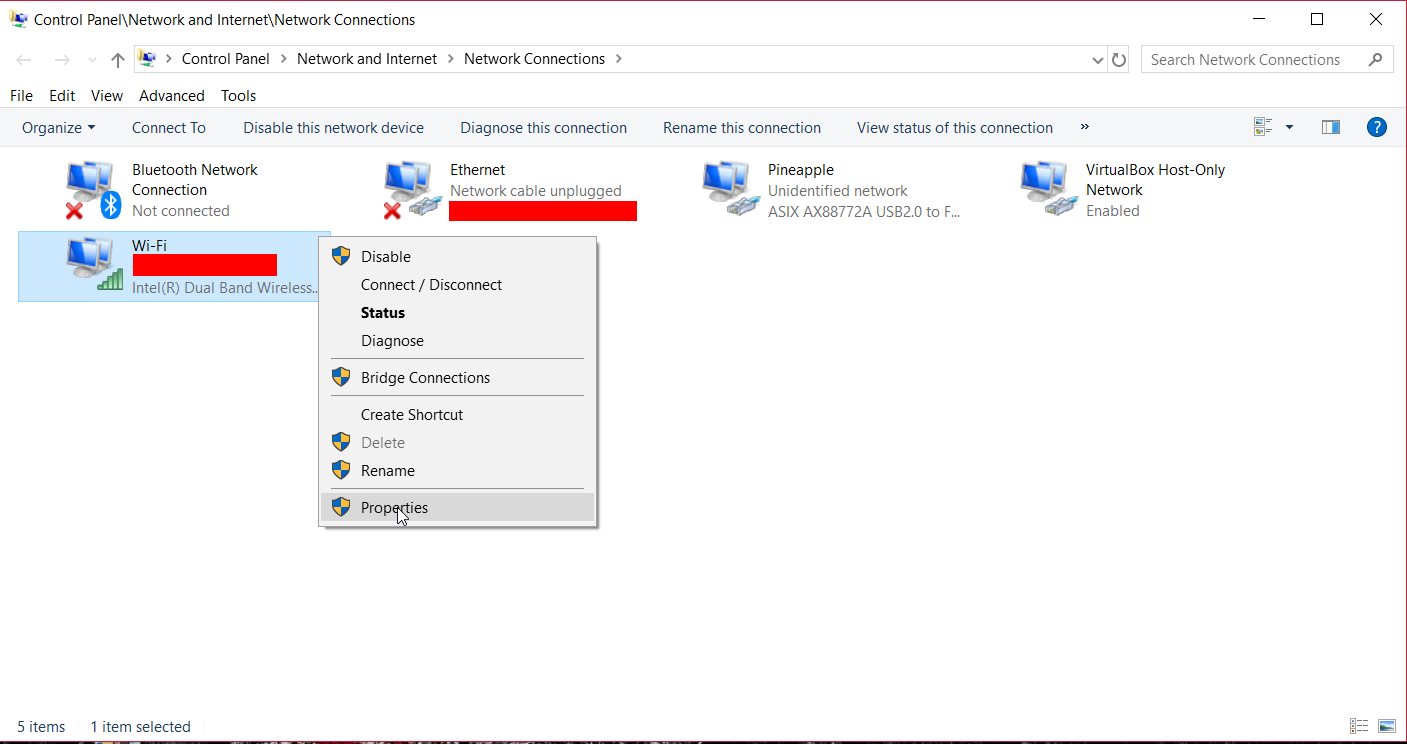
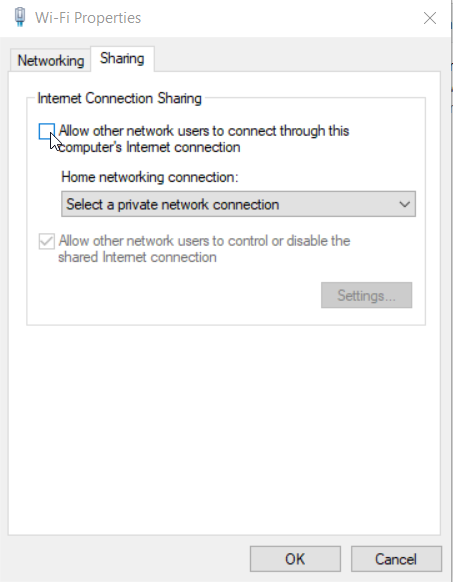
- In the top of the modal that appears, select the Sharing tab
- Checkmark the Allow other network users to connect through this computer’s Internet connection checkbox
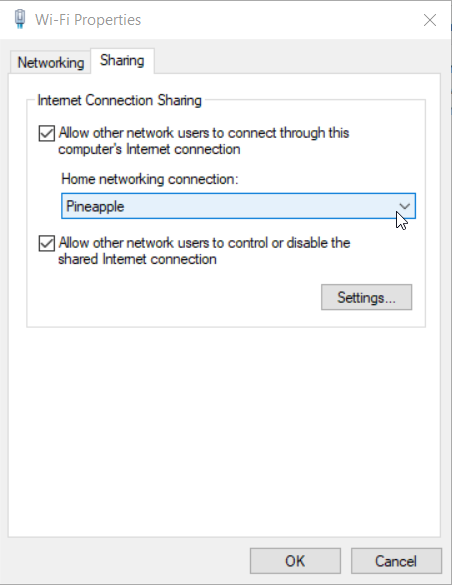
- Select the drop-down menu under Home networking connection: and select the name of the adapter that is tied to your pineapple. See step 4 for reference. In my case it is Pineapple. Select OK
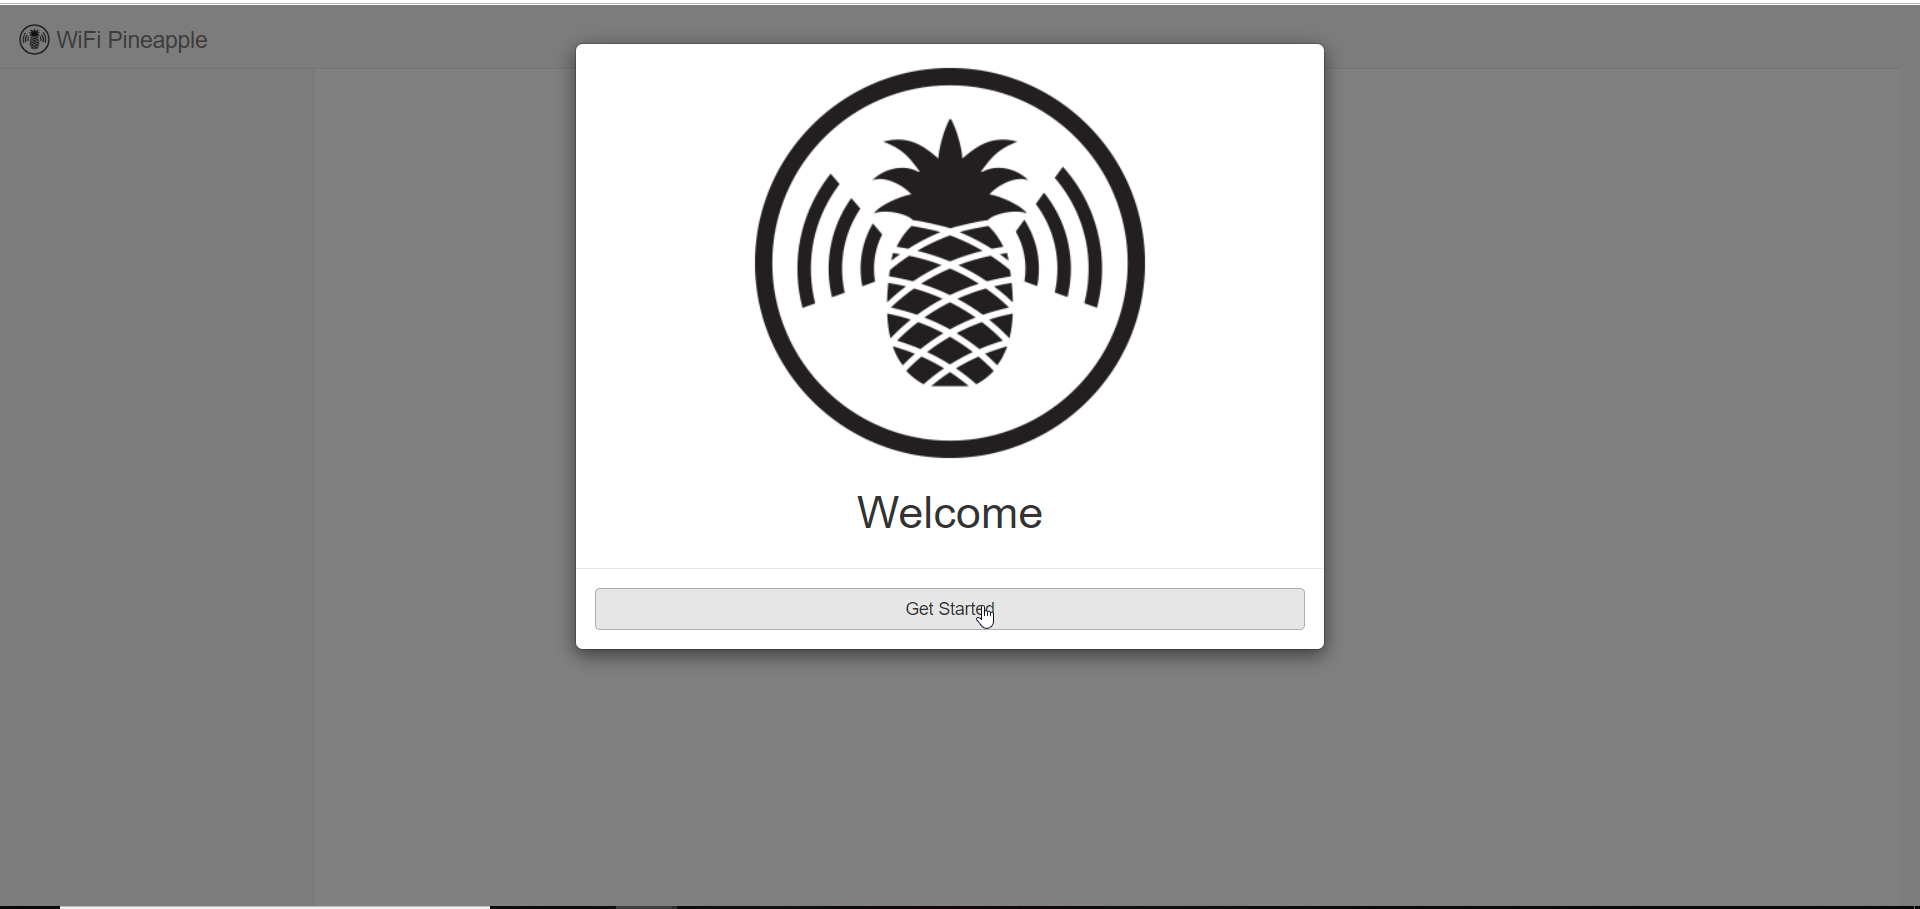
- Open a browser and navigate to 172.16.42.1:1471 (or whichever IP address fits your network) to navigate to the administrative login on your Pineapple.

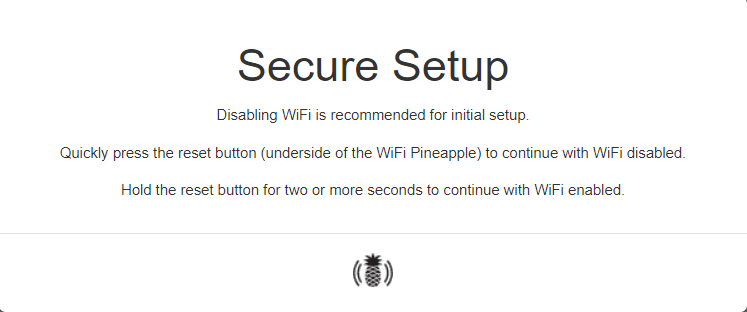
- A Welcome modal should appear in the browser. Press the Get Started button
- Upon setup, when this screen appears just tap the reset button on the bottom of your WiFi Pineapple to continue with WiFi disabled
- After successful setup, the main dashboard should appear similar to below
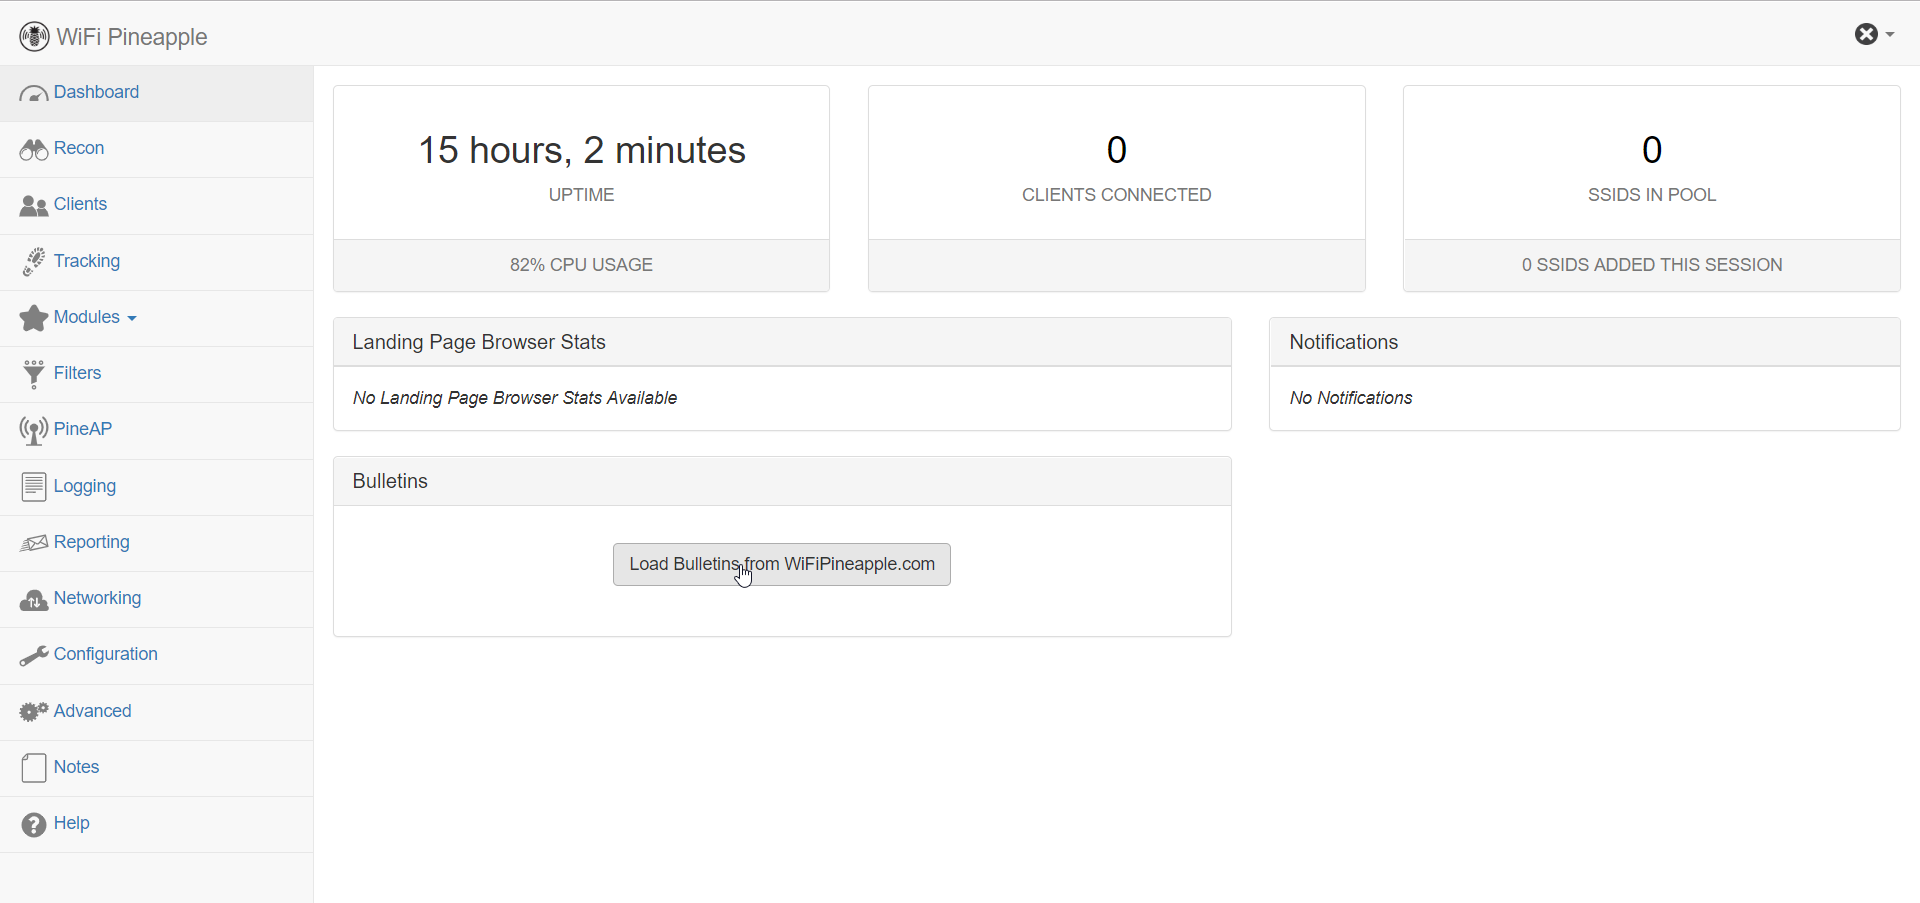
- Click the Load Bulletins from WiFiPineapple.com button on the Dashboard, if bulletins successfully load you’re all ready to go!
Try a simple MITM attack to get things started
If you aren’t seeing bulletins:
- Ensure you performed all steps correctly
- Use a search engine to find others with similar problems as yours
- Contact me via email with any concerns
-
- *
WiFi Pineapple Nano Setup for macOS
This proof of concept was created using macOS Mojave version 10.14.5
Straight To It
- Plug in the WiFi Pineapple into an available USB slot using the supplied USB Y Cable or any USB that meets the WiFi Pineapple power specifications
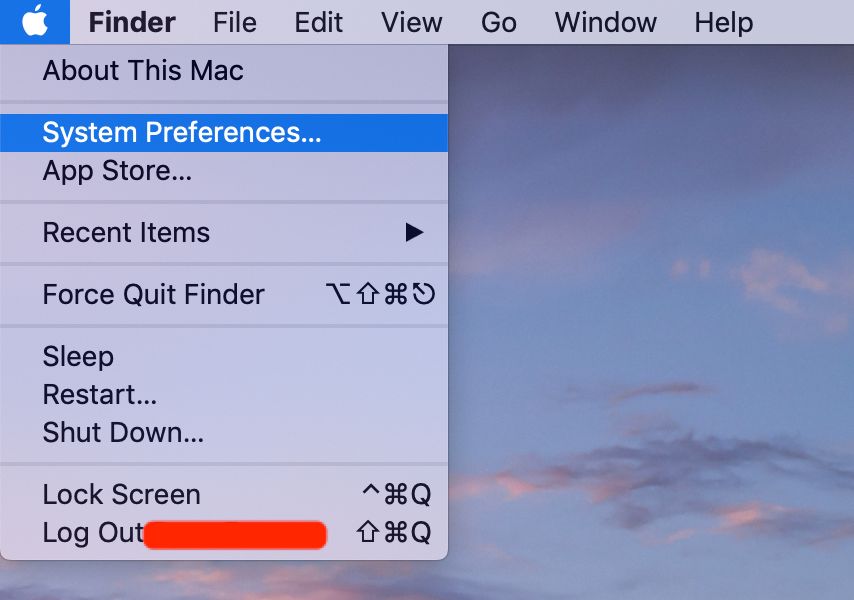
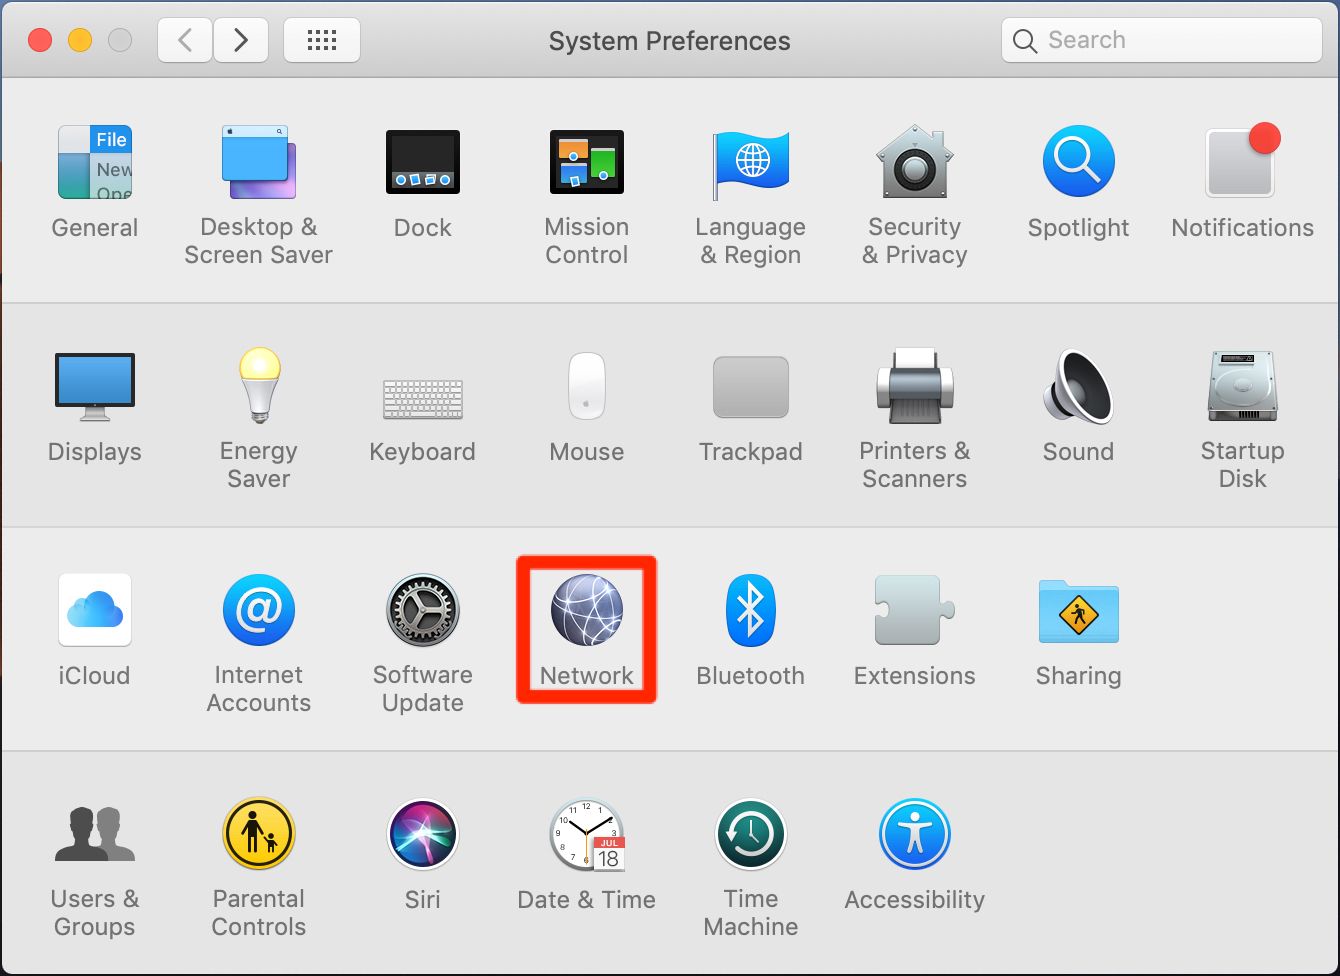
- Navigate to (Apple Menu) -> System Preferences -> Network
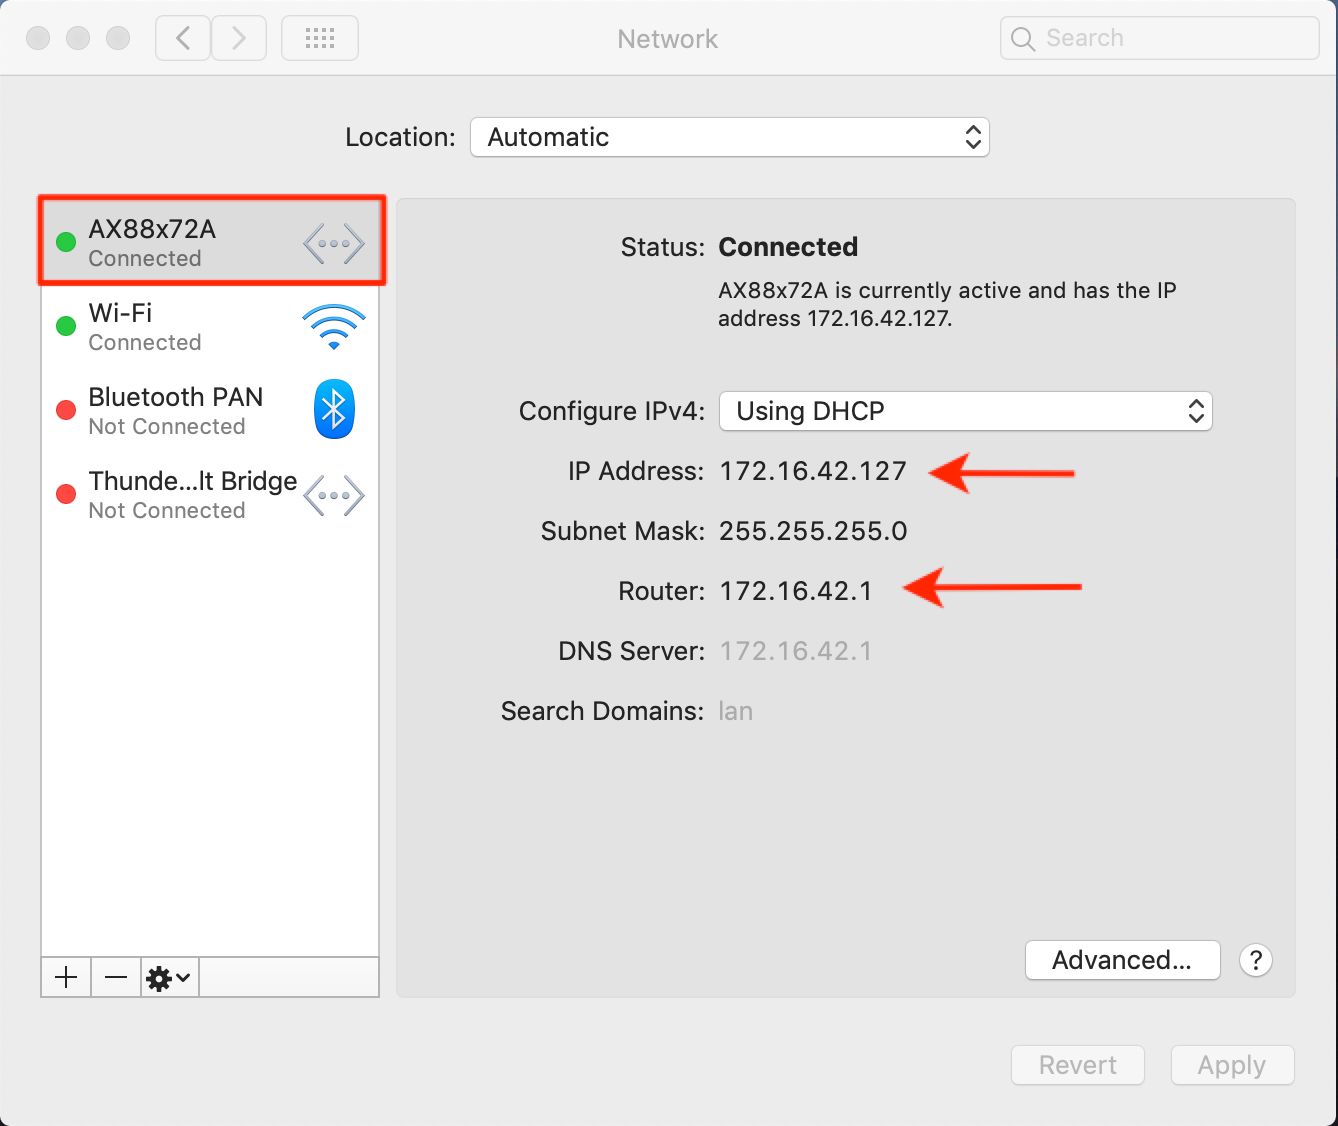
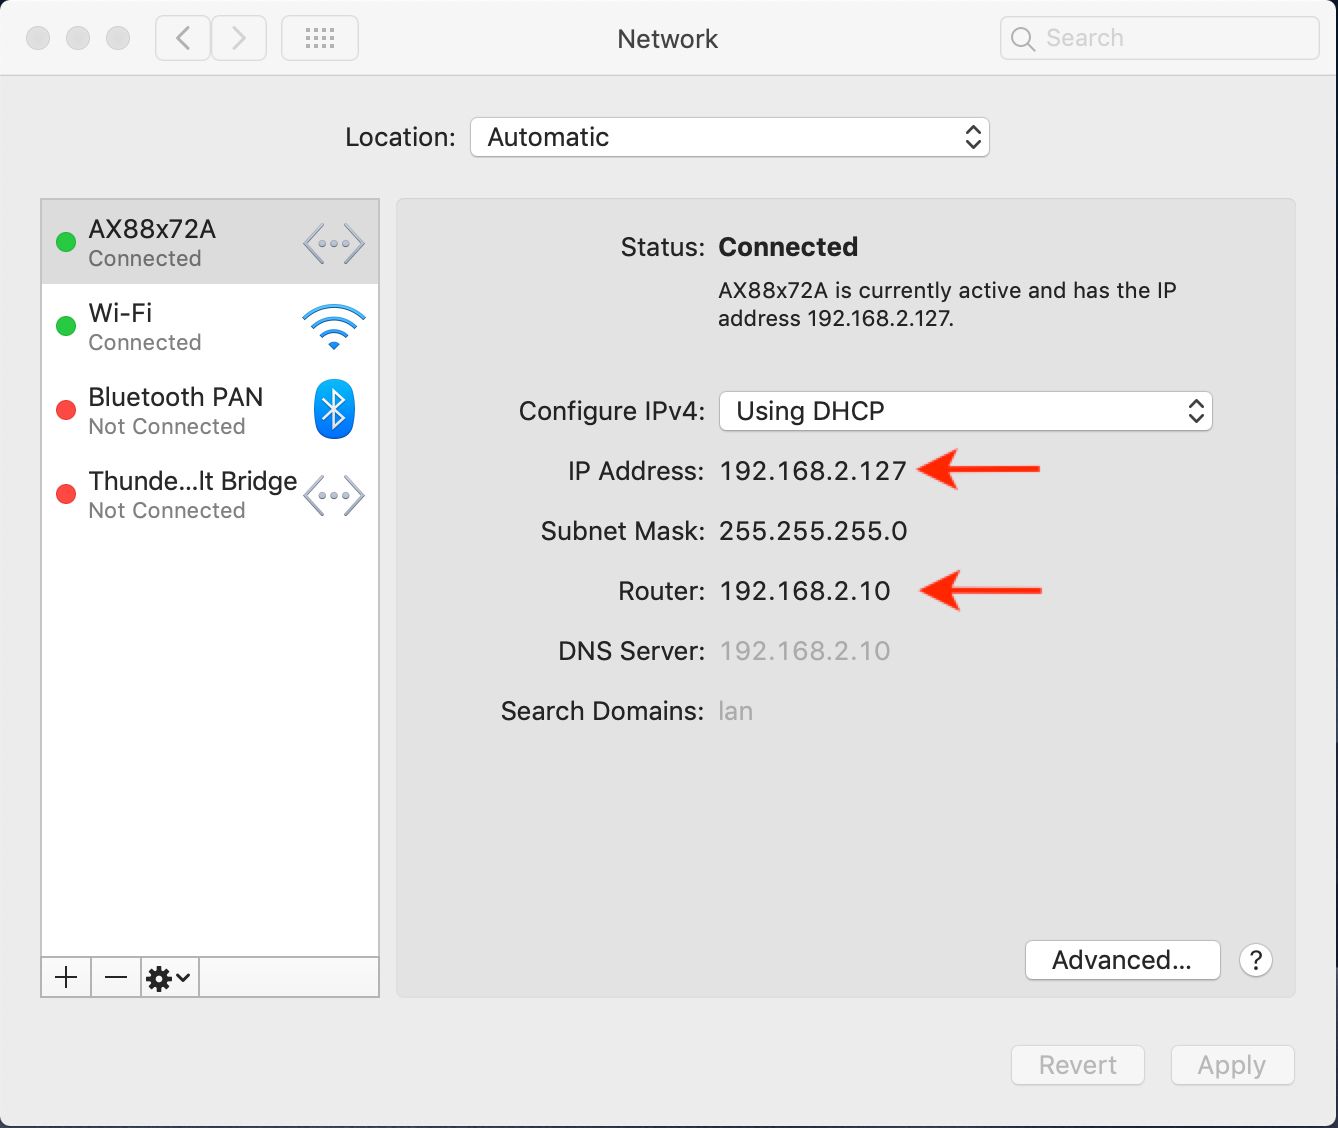
- Ensure the WiFi Pineapple is connected and DHCP has assigned the 172.16.42.x subnet by highlighting the adapter in the menu on the left-side of the menu. The IP Address should be 172.16.42.127 (or any number higher than 100) and the Router should have the default 172.16.42.1
Note: The WiFi Pineapple Nano Adapter will have an AX88x72A chipset description
- In order to allow for communication with the Wi-Fi Pineapple we must change the hardcoded DCHP subnet of the MAC to match the Wi-Fi Pineapple, or vice versa. To do this, open a Terminal window and ssh into the Wi-Fi Pineapple by typing:
ssh root@172.16.42.1
- A RSA fingerprint prompt should appear if this is the first connection, type yes and then enter your root password (The one that logs you into the Wi-Fi Pineapple in the Web GUI)
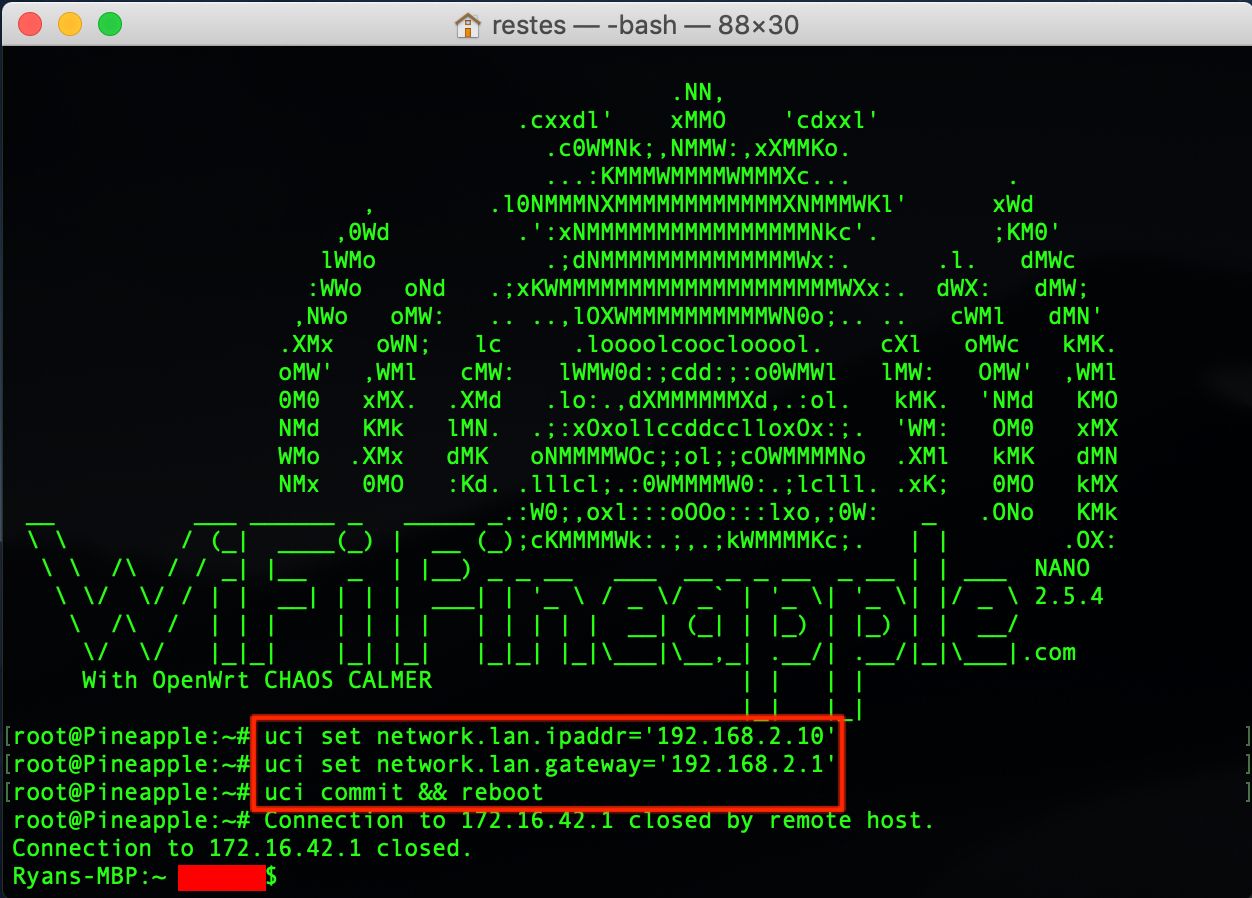
- To change the Wi-Fi Pineapple’s default IP address and gateway type the following commands in the Terminal:
uci set network.lan.ipaddr='192.168.2.10'
uci set network.lan.gateway='192.168.2.1'
uci commit && reboot
Kudos to the user audibleblink in the Hak5 forums
- The Wi-Fi Pineapple will reboot and you can now check the IP address and gateway were successfully changed in the Network menu again. If it’s the 192.168.2.x values, you should be able to continue to the Internet connection sharing portion
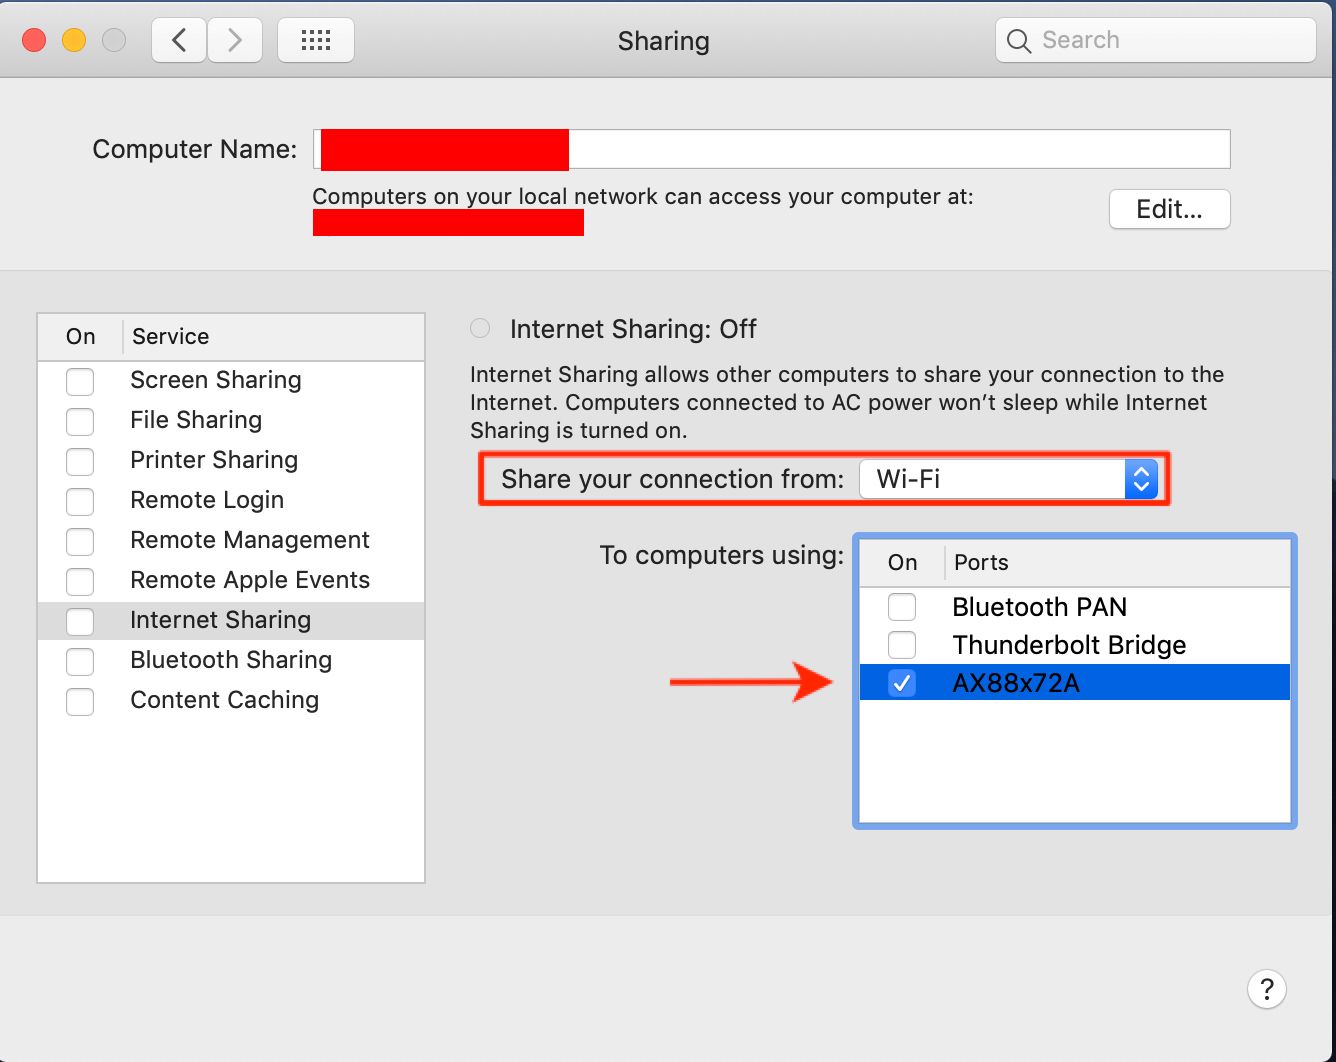
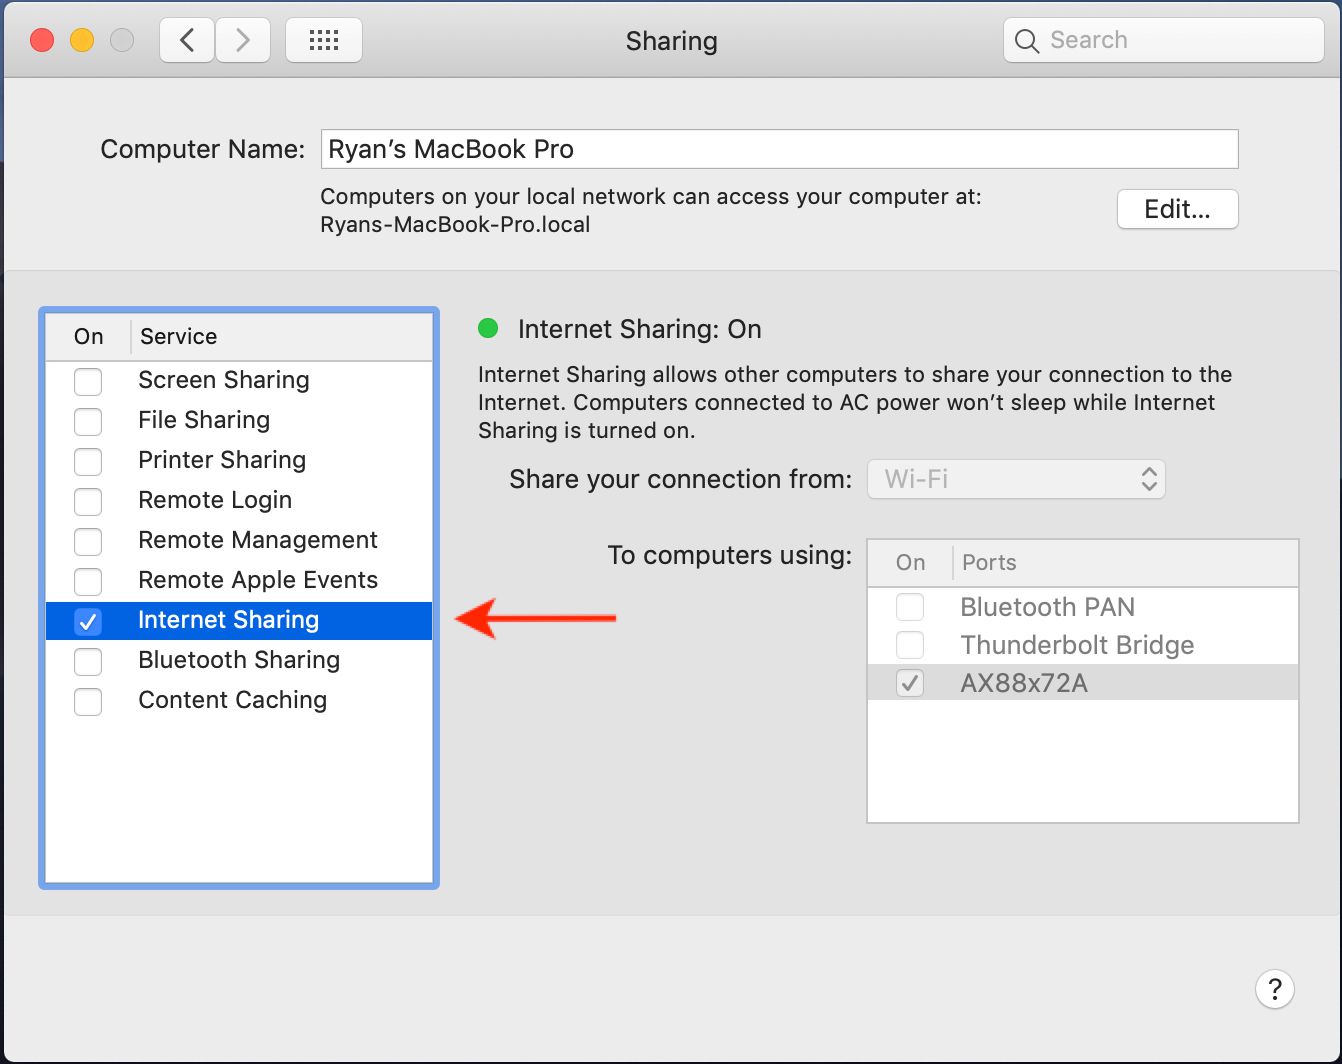
- Now, return to the System Preferences menu and select Sharing
- Highlight the Internet Sharing checkbox in the left menu and Internet sharing information should display to the right
- Select the Share your connection from: dropdown menu and select the adapter that is providing Internet access. In my case, Wi-Fi
- From the To computers using: menu, select the WiFi Pineapple adapter. In my case the adapter is named AX88x72A
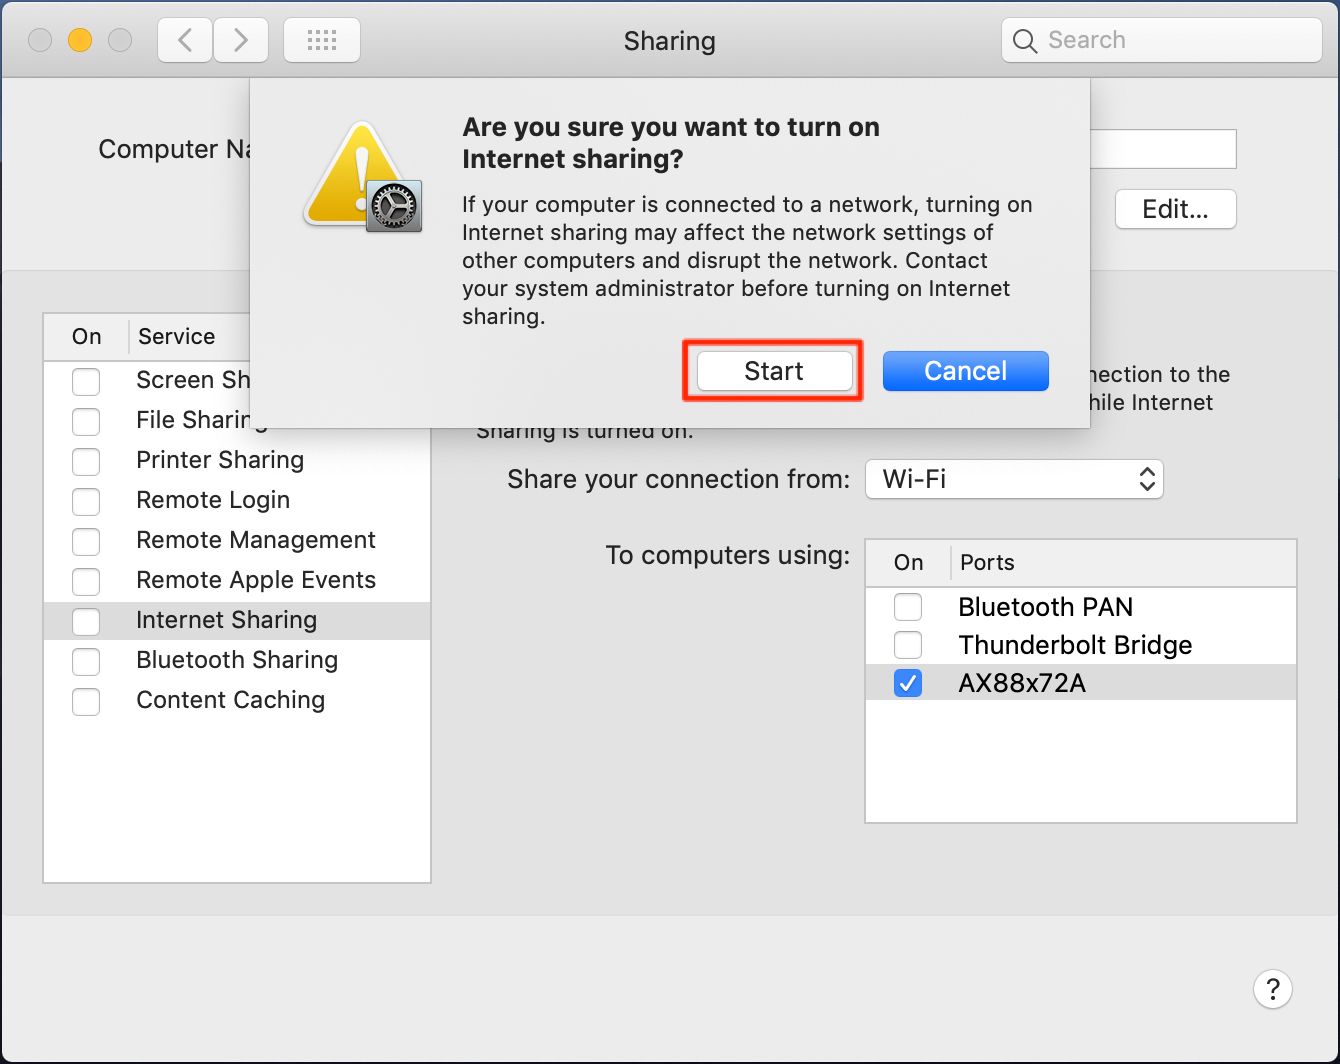
- Select the checkbox next to Internet Sharing in the left menu and select Start
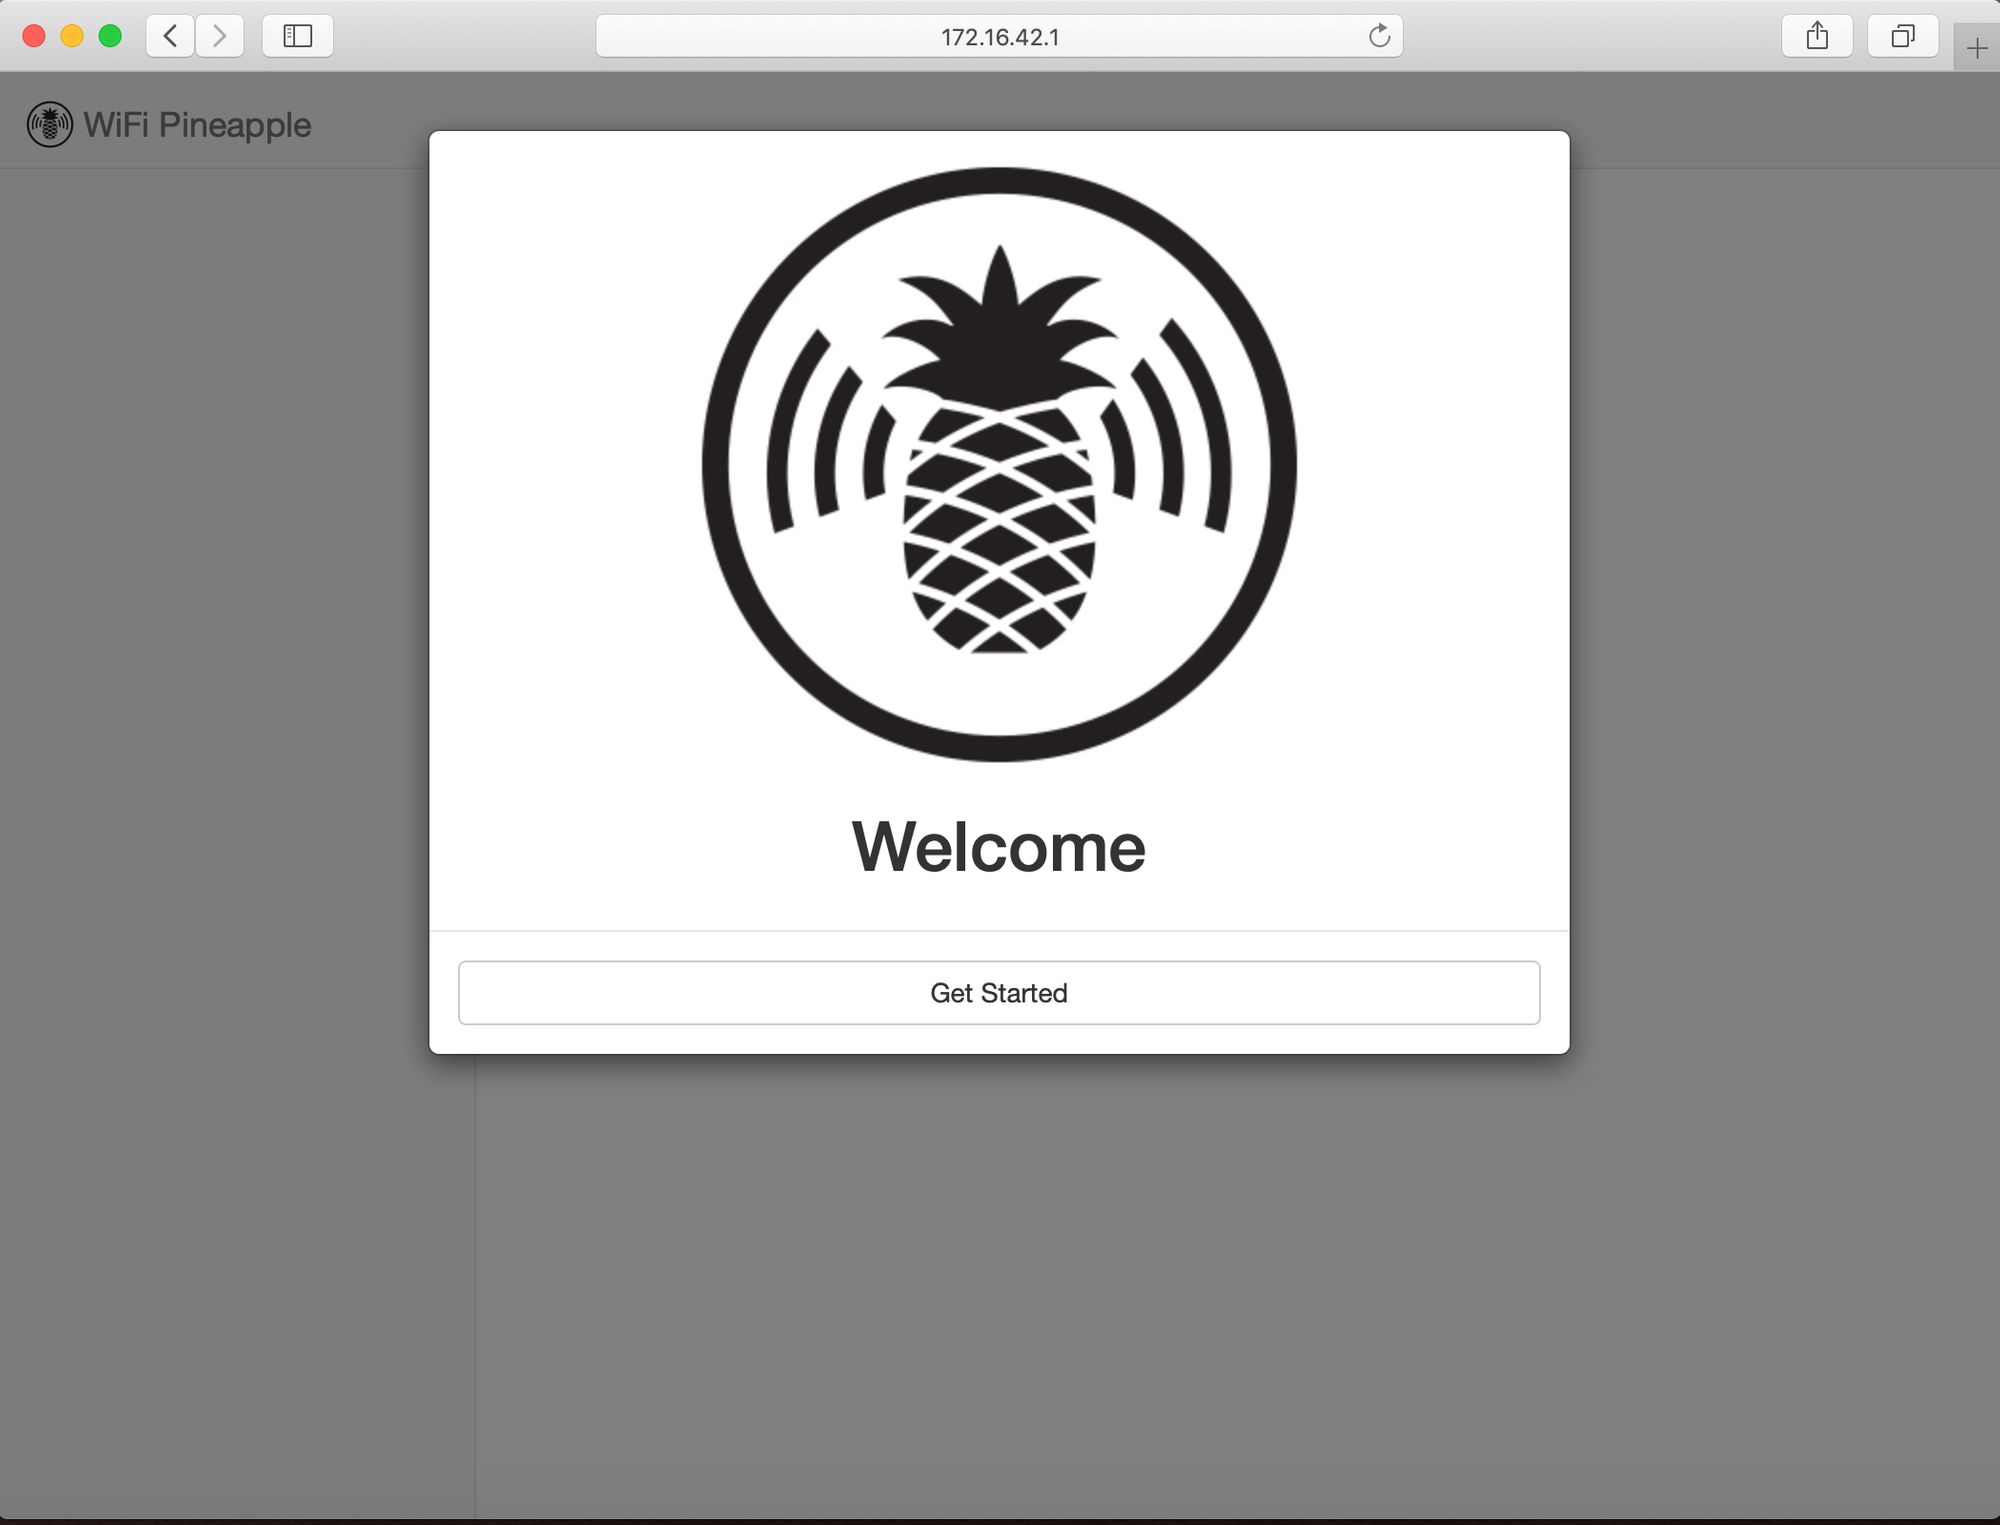
- Navigate to 192.168.2.10:1471 or whatever IP address maps to the IP address you set in step 6, ensure the port is 1471
- Use the on-screen instructions to set up the WiFi Pineapple
- Click the Load Bulletins from WiFiPineapple.com button on the Dashboard, if bulletins successfully load you’re all ready to go!
Visual Guide
- Plug in the WiFi Pineapple into an available USB slot using the supplied USB Y Cable or any USB that meets the WiFi Pineapple power specifications
- Navigate to (Apple Menu) -> System Preferences -> Network
- Ensure the WiFi Pineapple is connected and DHCP has assigned the 172.16.42.x subnet by highlighting the adapter in the menu on the left-side of the menu. The IP Address should be 172.16.42.127 (or any number higher than 100) and the Router should have the default 172.16.42.1
Note: The WiFi Pineapple Nano Adapter will have an AX88x72A chipset description
- In order to allow for communication with the Wi-Fi Pineapple we must change the hardcoded DCHP subnet of the MAC to match the Wi-Fi Pineapple, or vice versa. However, changing the WiFi Pineapple instead of the Apple device is the easier and preferred method. To do this, open a Terminal window and ssh into the Wi-Fi Pineapple by typing:
ssh root@172.16.42.1
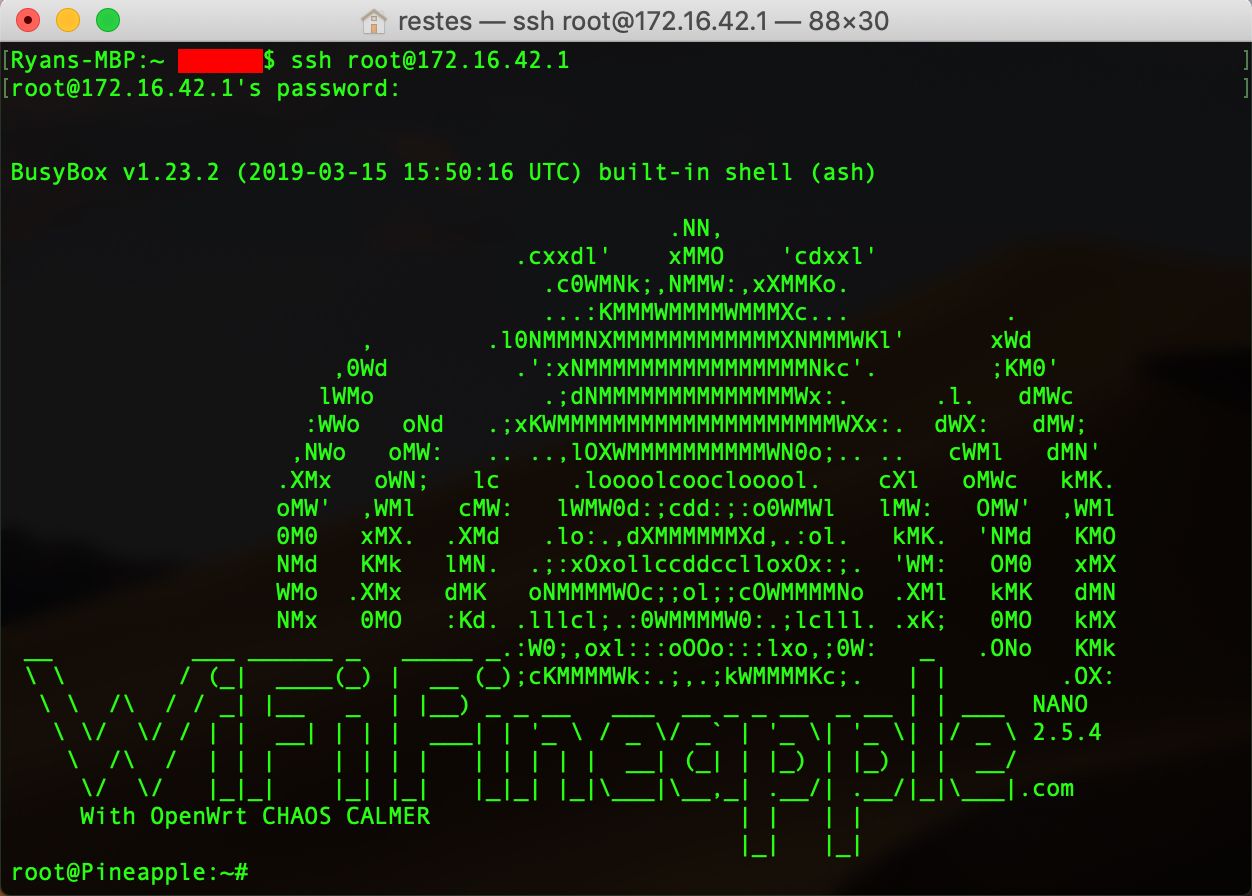
Note: An RSA fingerprint prompt should appear if this is the first connection, type yes and then enter your root password (The one that logs you into the Wi-Fi Pineapple in the Web GUI)
- To change the Wi-Fi Pineapple’s default IP address and gateway type the following commands in the Terminal:
uci set network.lan.ipaddr='192.168.2.10'
uci set network.lan.gateway='192.168.2.1'
uci commit && reboot
Kudos to the user audibleblink in the Hak5 forums
- The Wi-Fi Pineapple will reboot and you can now check the IP address and gateway were successfully changed in the Network menu again. If it’s the 192.168.2.x values, you should be able to continue to the Internet connection sharing portion
- Now, return to the System Preferences menu and select Sharing
- Highlight the Internet Sharing checkbox in the left menu and Internet sharing information should display to the right. Select the Share your connection from: dropdown menu and select the adapter that is providing Internet access. In my case, Wi-Fi. From the To computers using: menu, select the WiFi Pineapple adapter. In my case the adapter is named AX88x72A
- Select the checkbox next to Internet Sharing in the left menu and select Start and ensure it remains checked after clicking Start.
- Navigate to 192.168.2.10:1471 or whatever IP address maps to the IP address you set in step 6, ensure the port is 1471 and you will be met with the Welcome screen. Use the on-screen instructions to set up the WiFi Pineapple
- Click the Load Bulletins from WiFiPineapple.com button on the Dashboard, if bulletins successfully load you’re all ready to go!
Try a simple MITM attack to get things started
If you aren’t seeing bulletins:
- Ensure you performed all steps correctly
- Use a search engine to find others with similar problems as yours
- Contact me via email with any concerns
-
- *
WiFi Pineapple Nano Setup for Linux
- *
under construction
WiFi Pineapple Nano Setup for Android
This proof of concept was created using a Nokia 6.1 running Android 9 “Pie” (Android One)
Straight To It
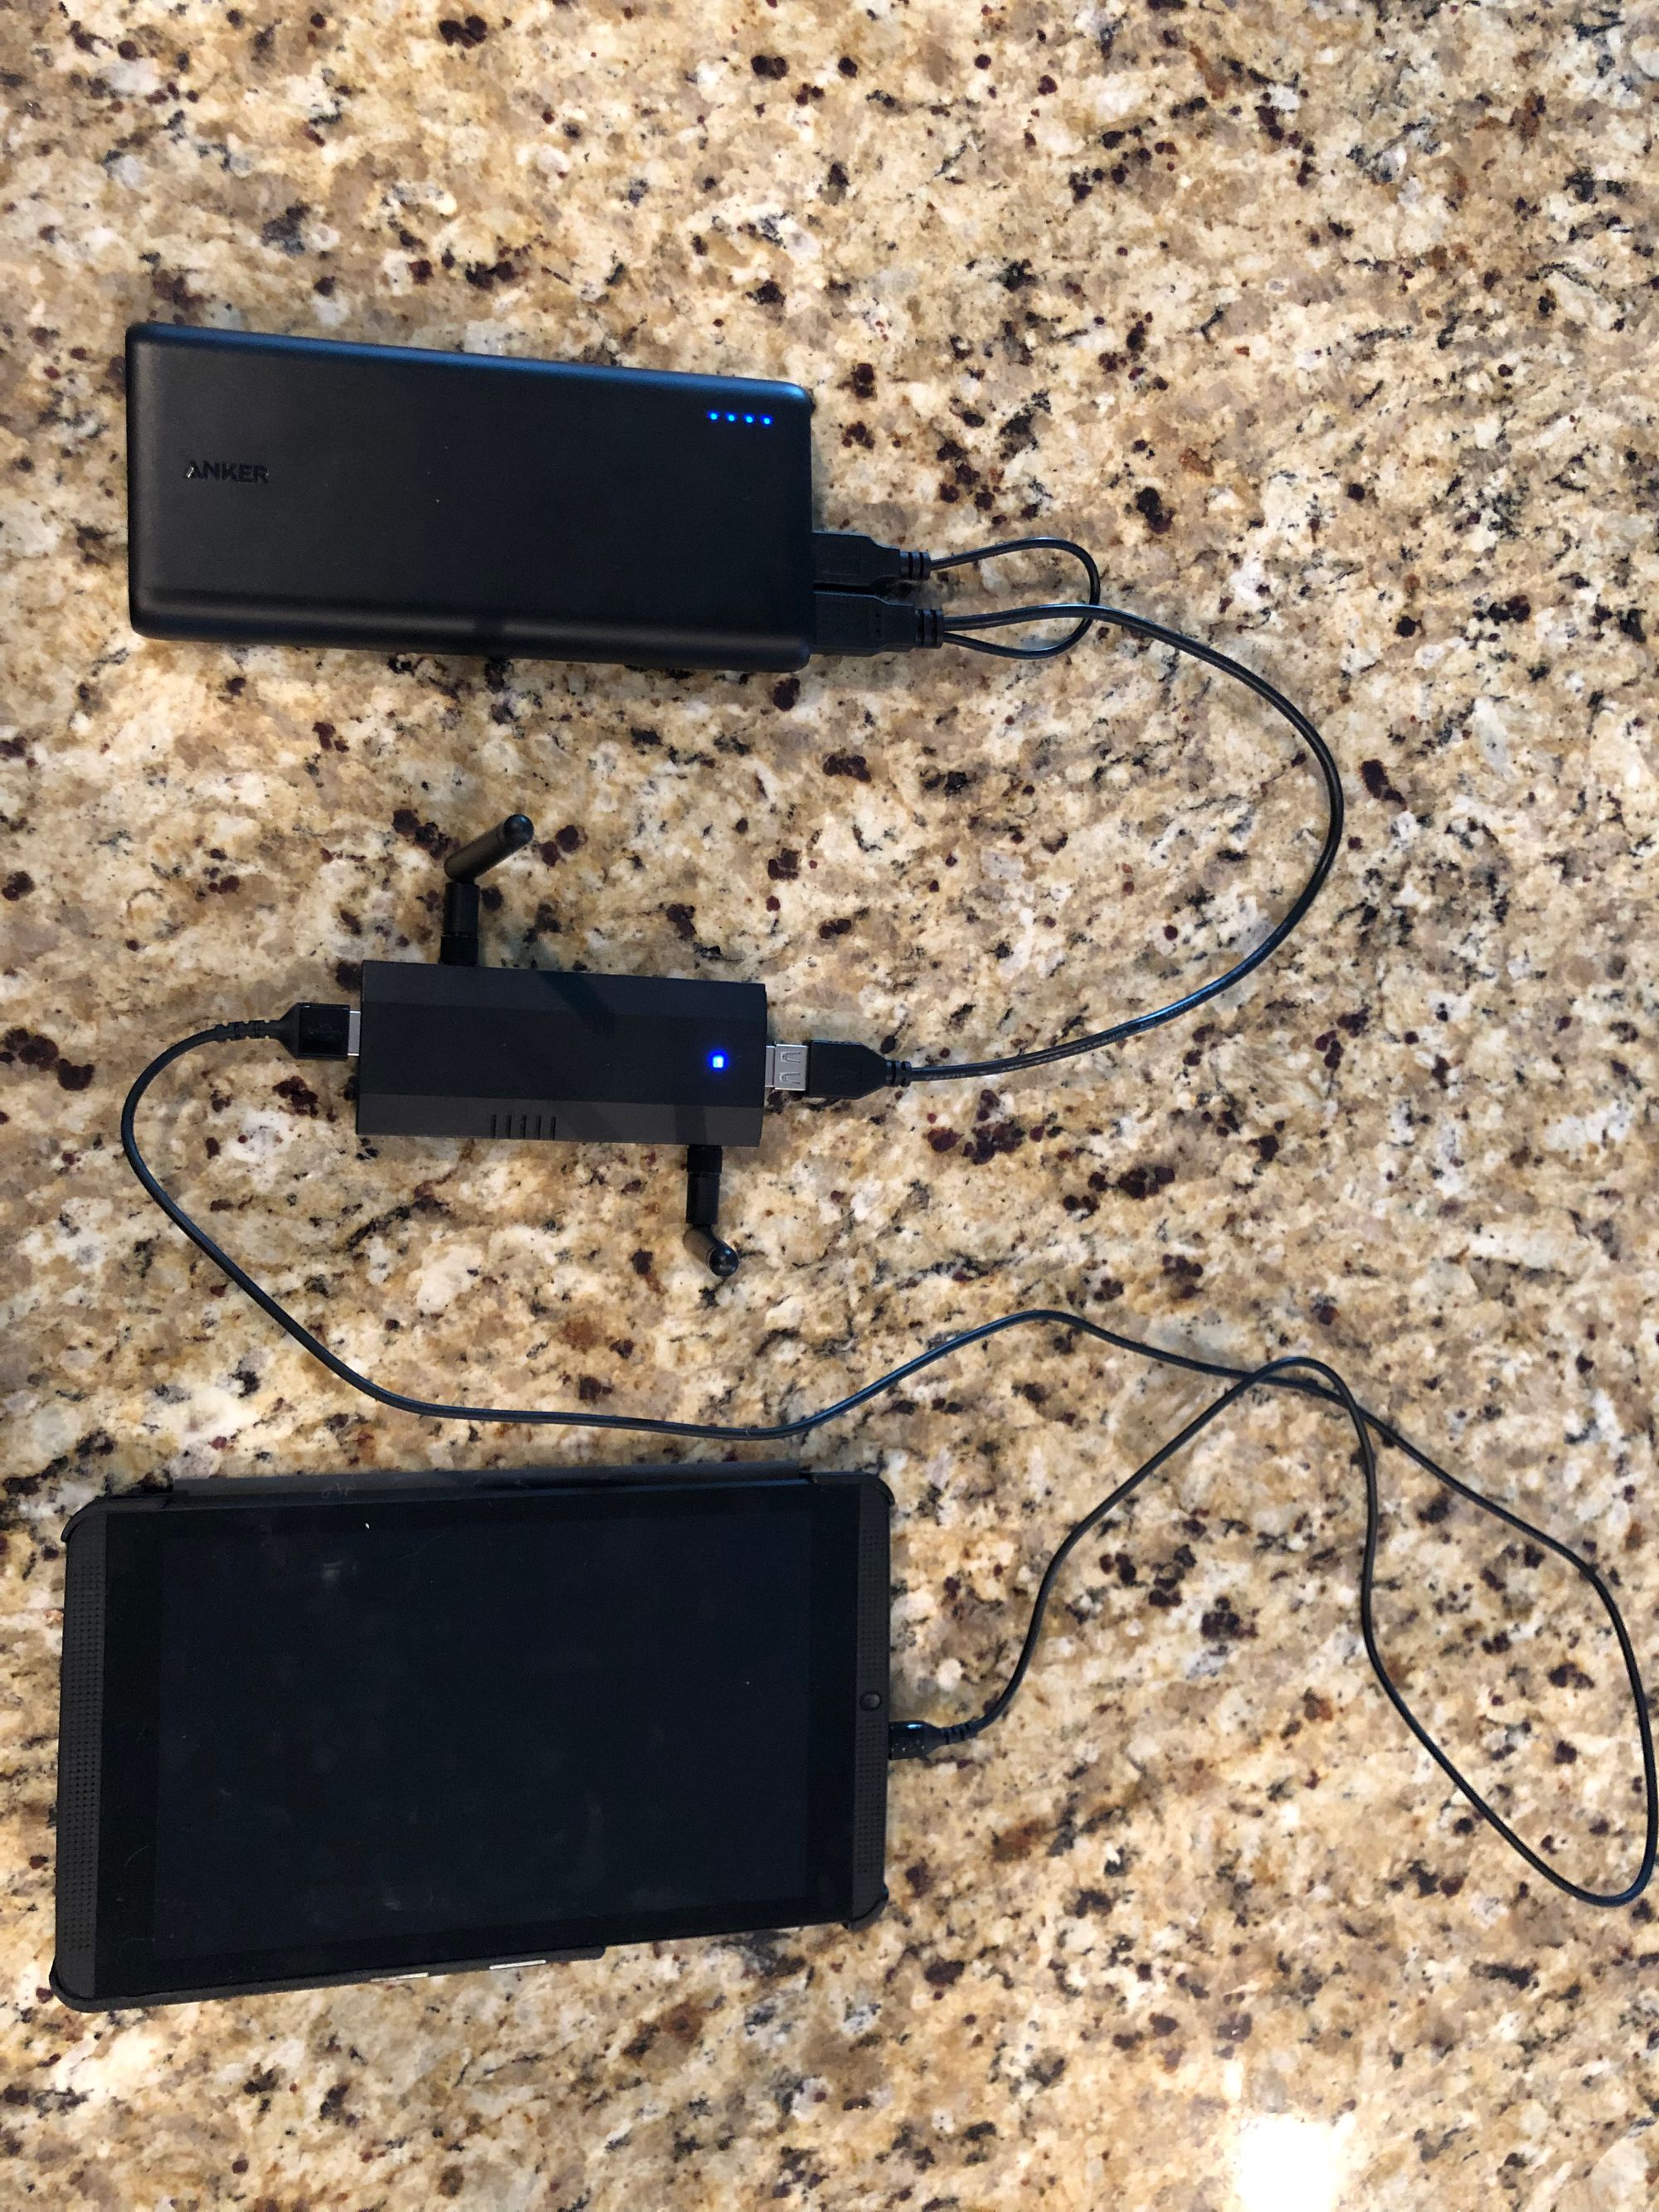
- Connect the charging cord to your Android device and plug the USB end into the female USB insertion on the WiFi Pineapple. Then, Plug the female USB of the y-cord into the WiFi Pineapple and plug either male USB into a power source such as a computer, battery, or wall outlet
- On your Android device, go the Play Store
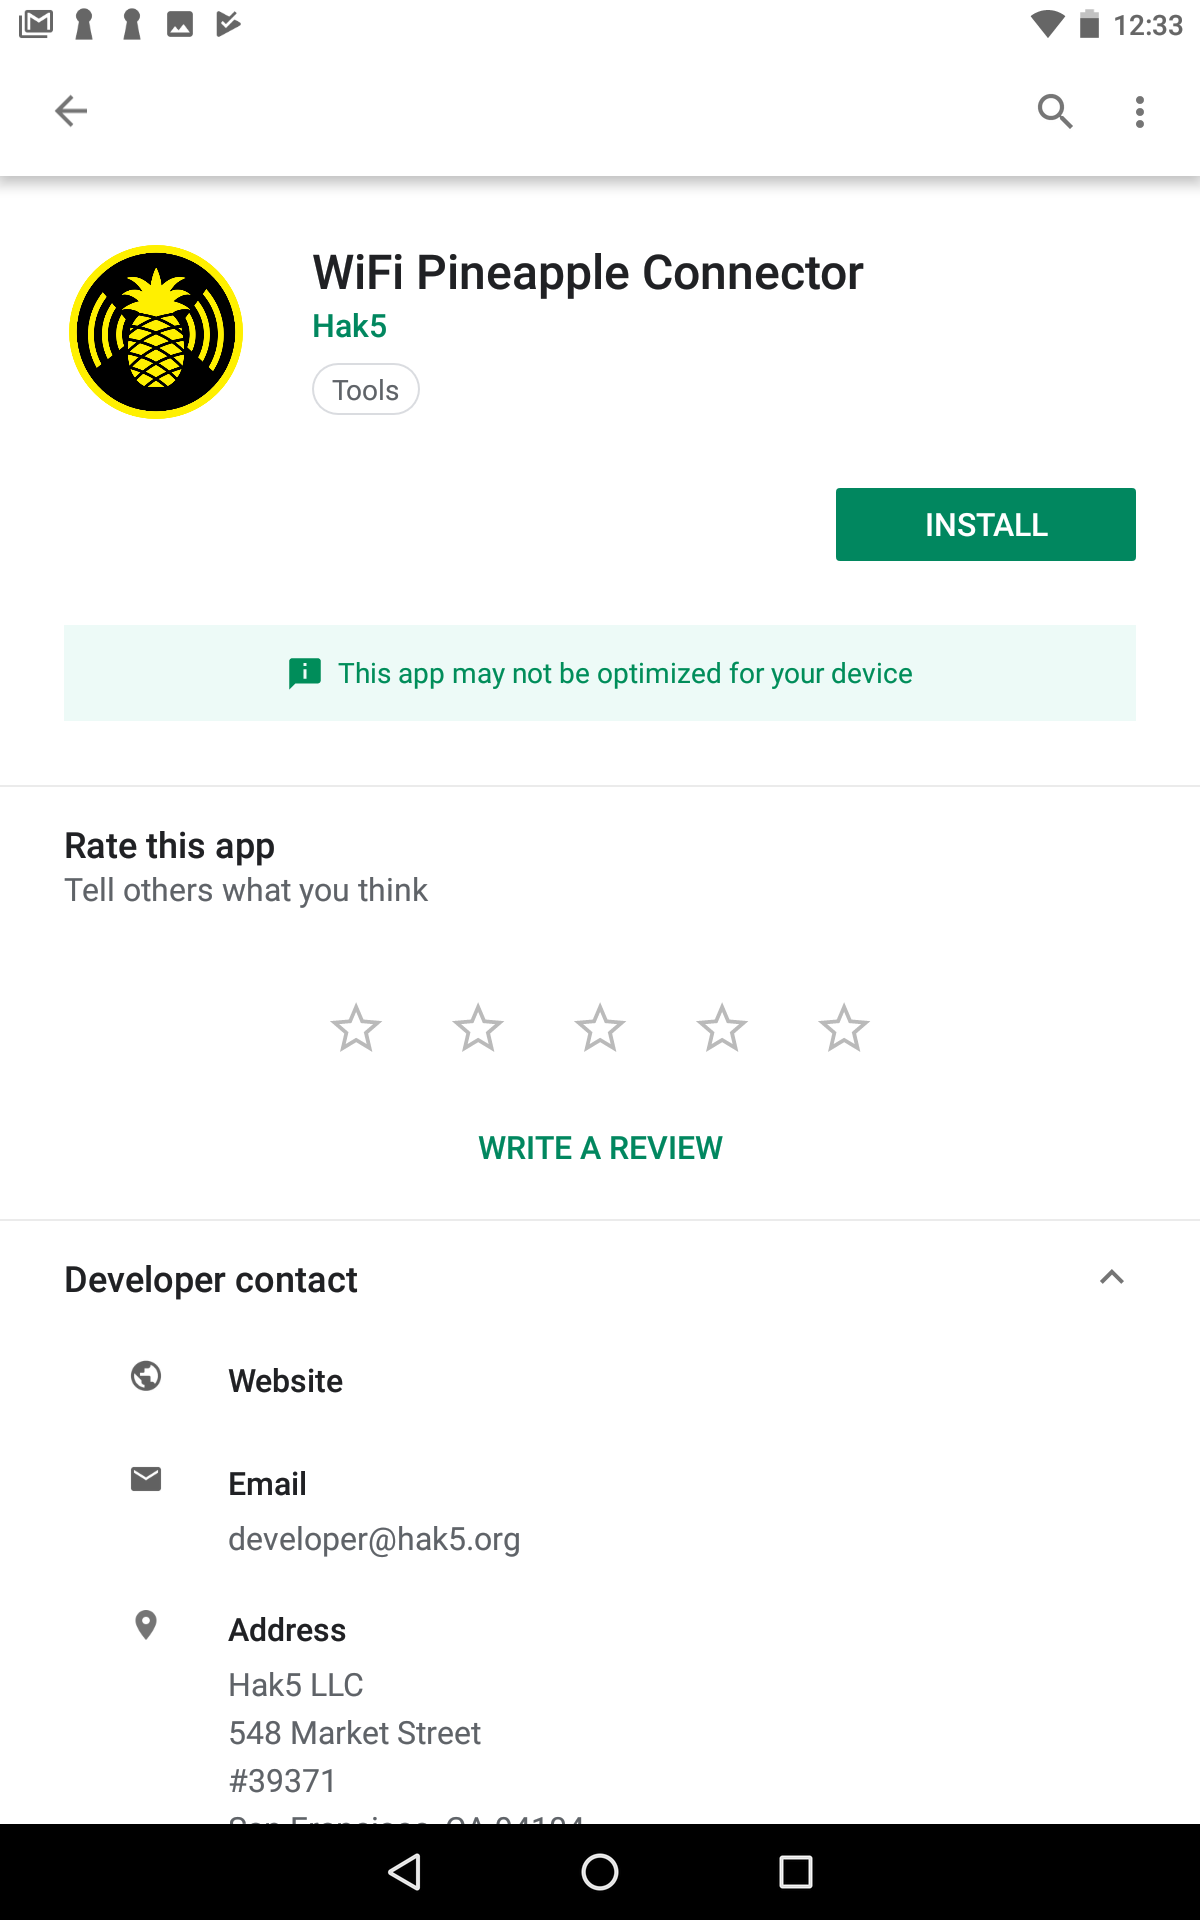
- Search for WiFi Pineapple and download the WiFi Pineapple Connector App
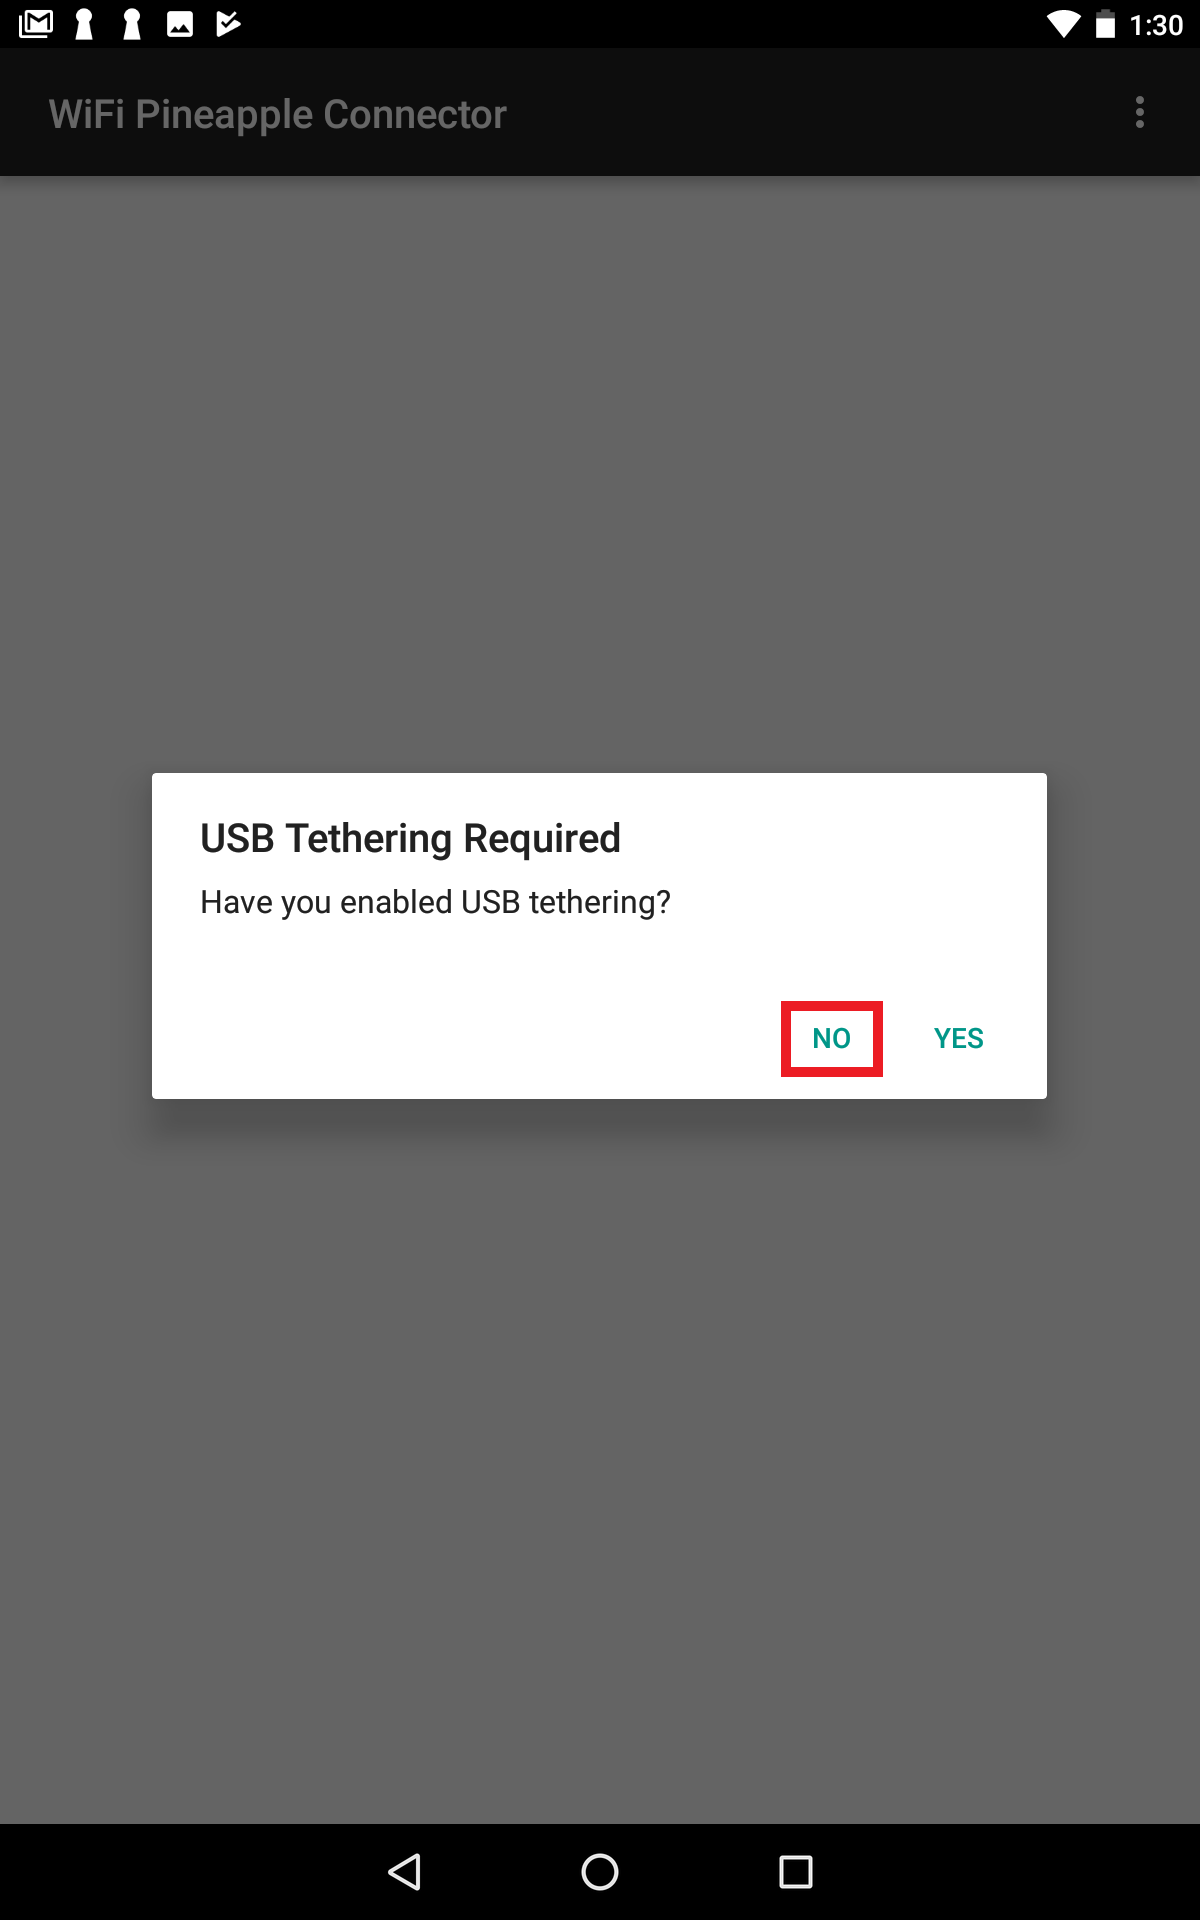
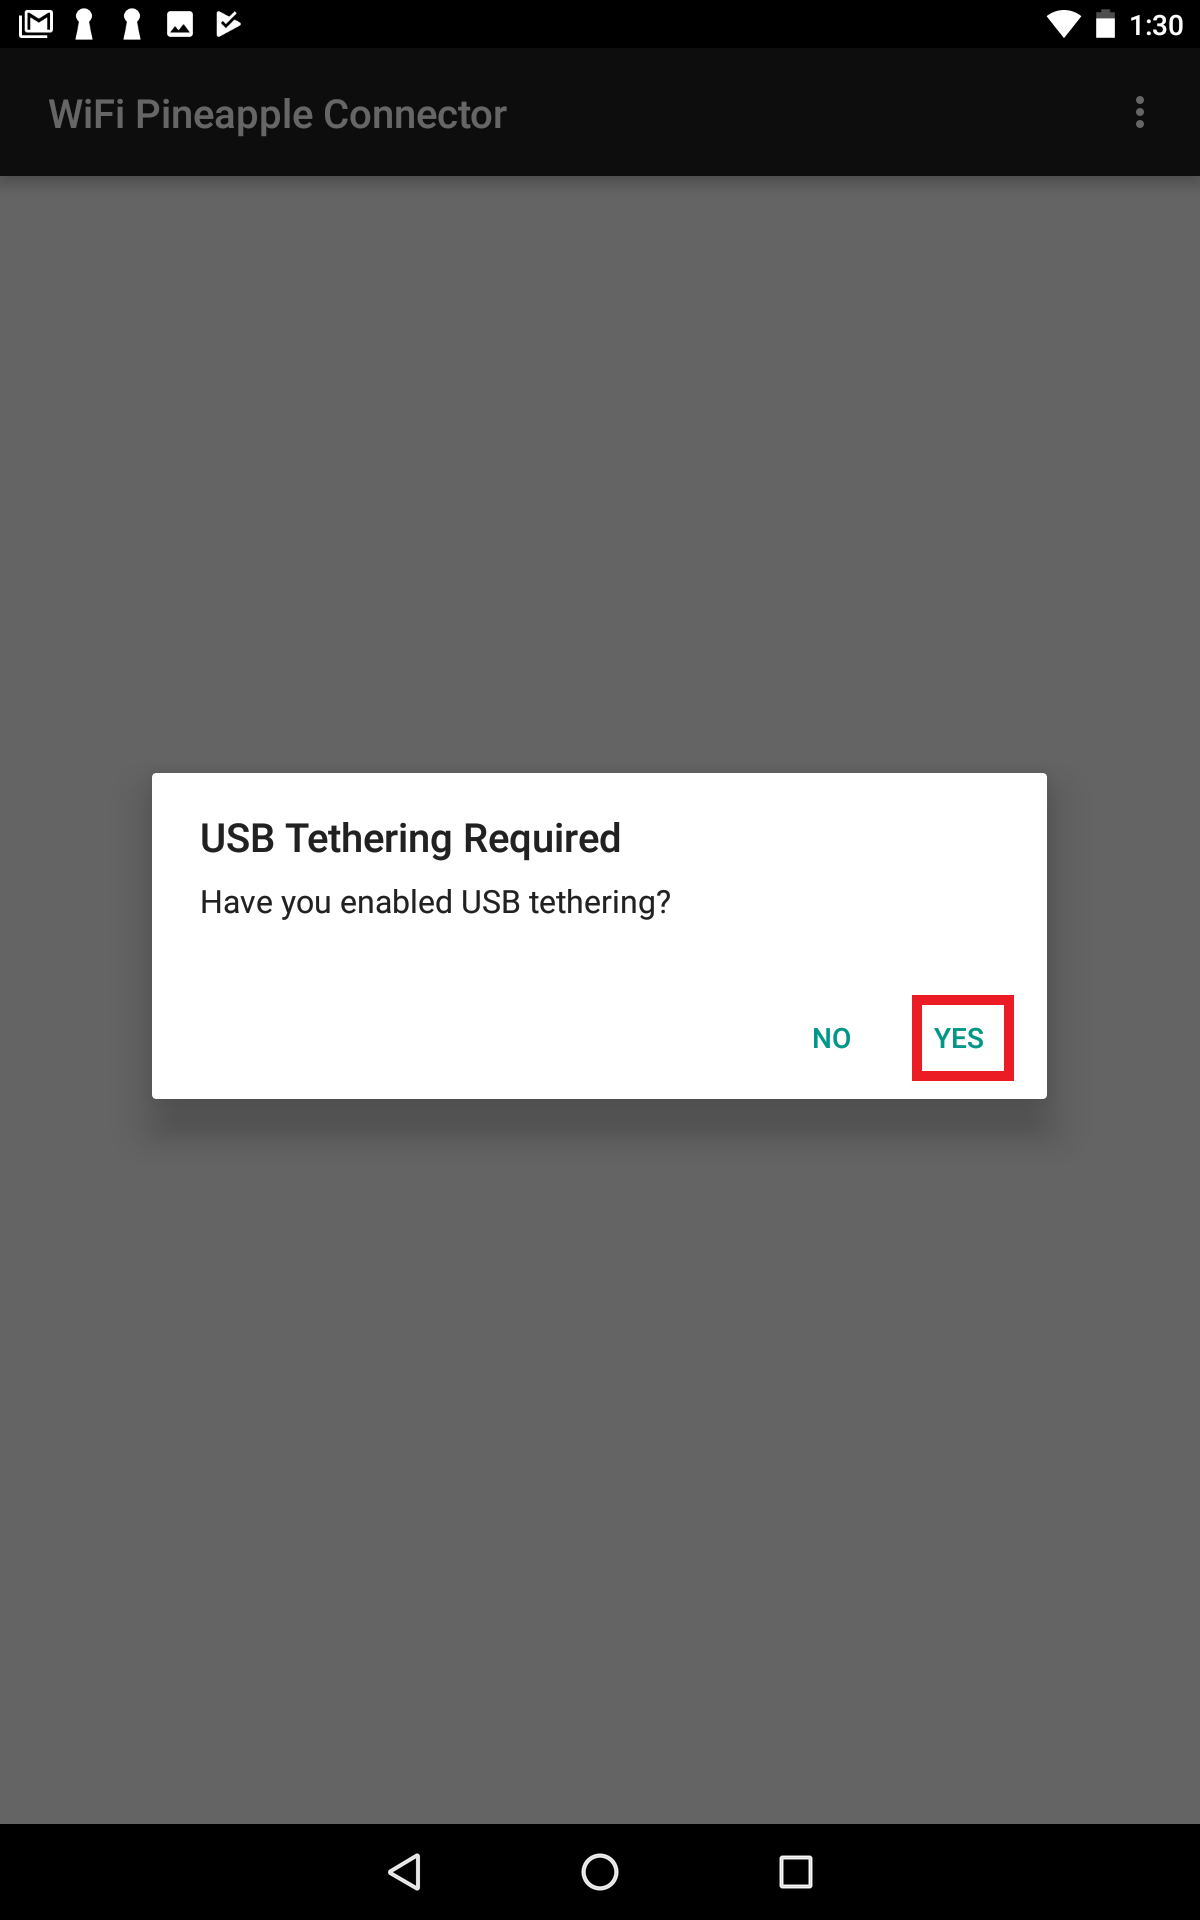
- Open the WiFi Pineapple Connector App and a modal should appear prompting for USB Tethering Required. Click No *, that you don’t have it required (If you do already click Yes )
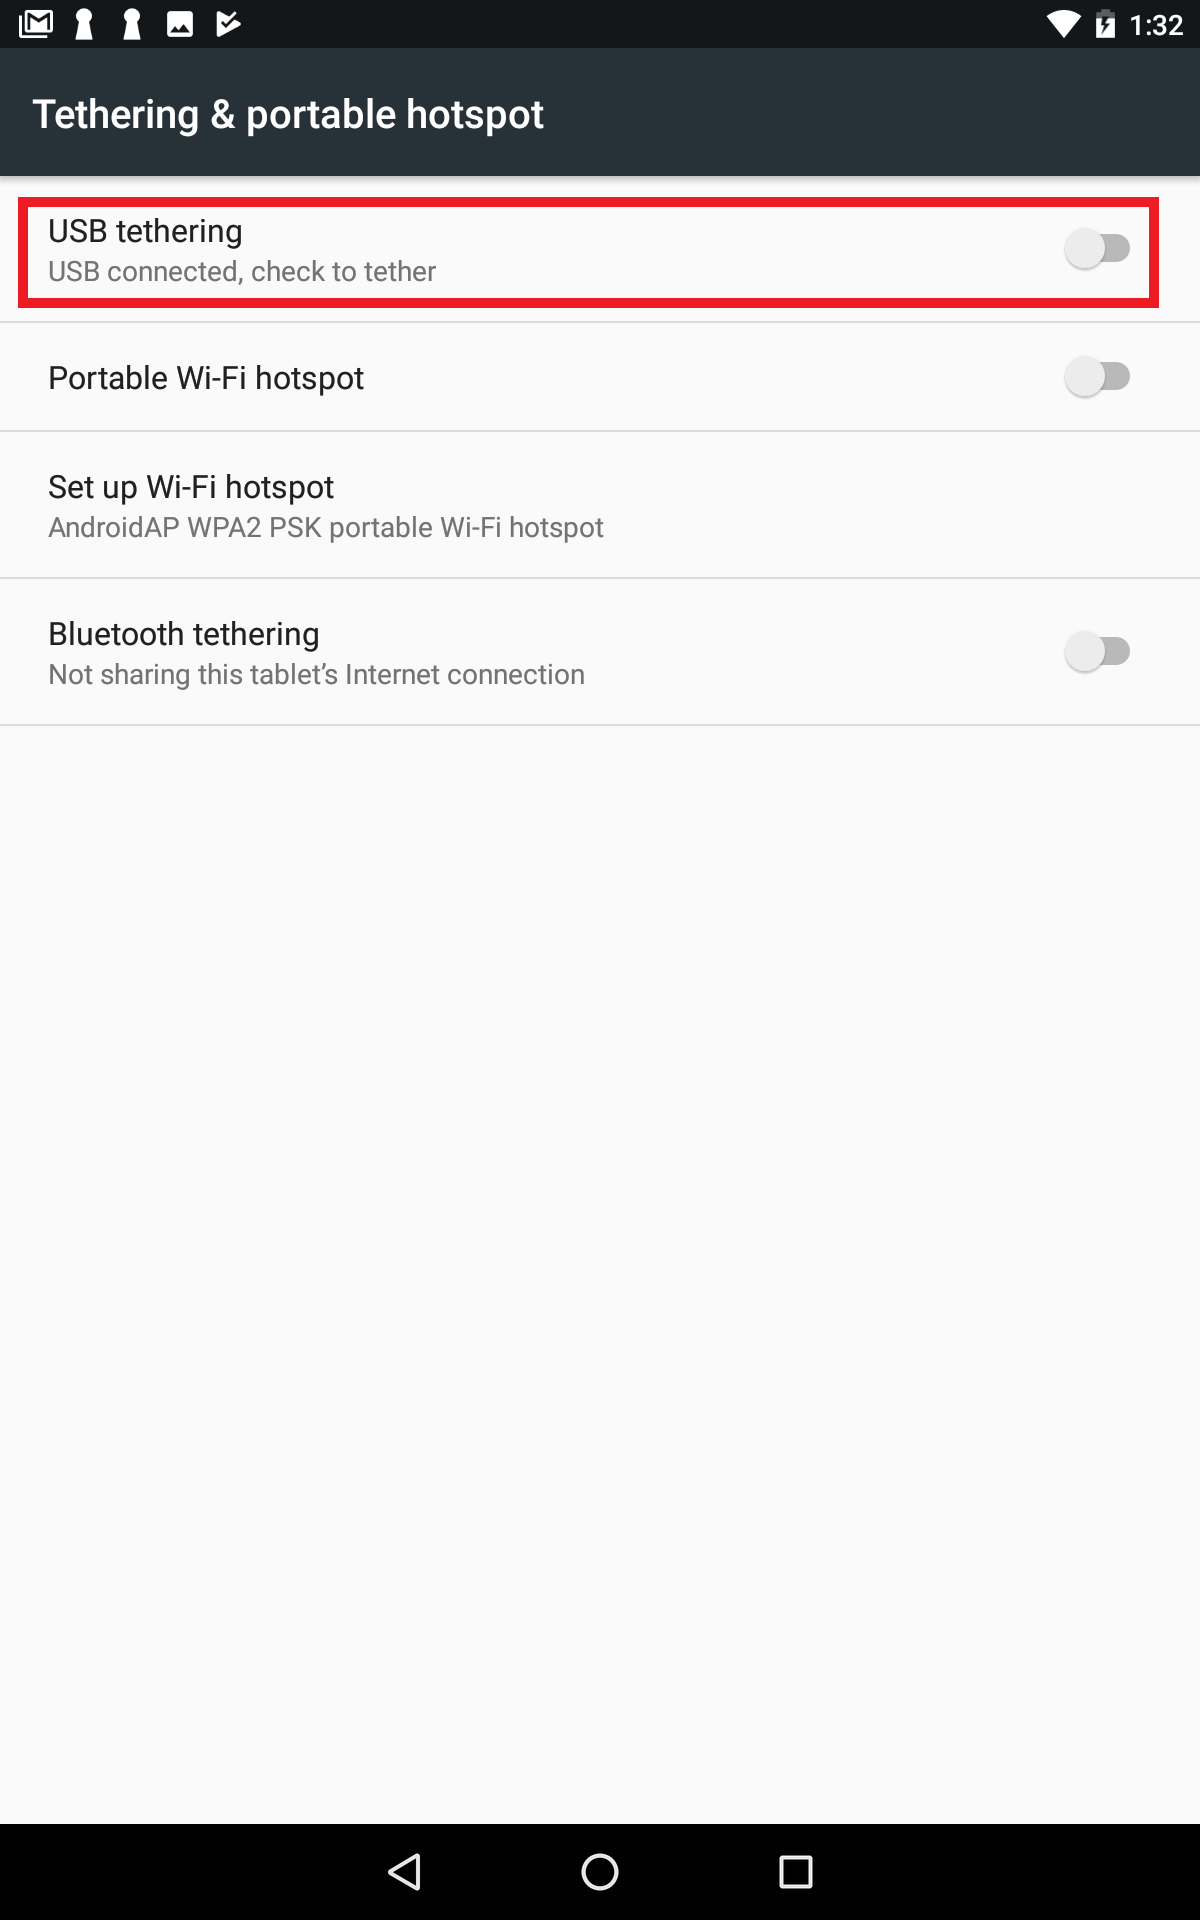
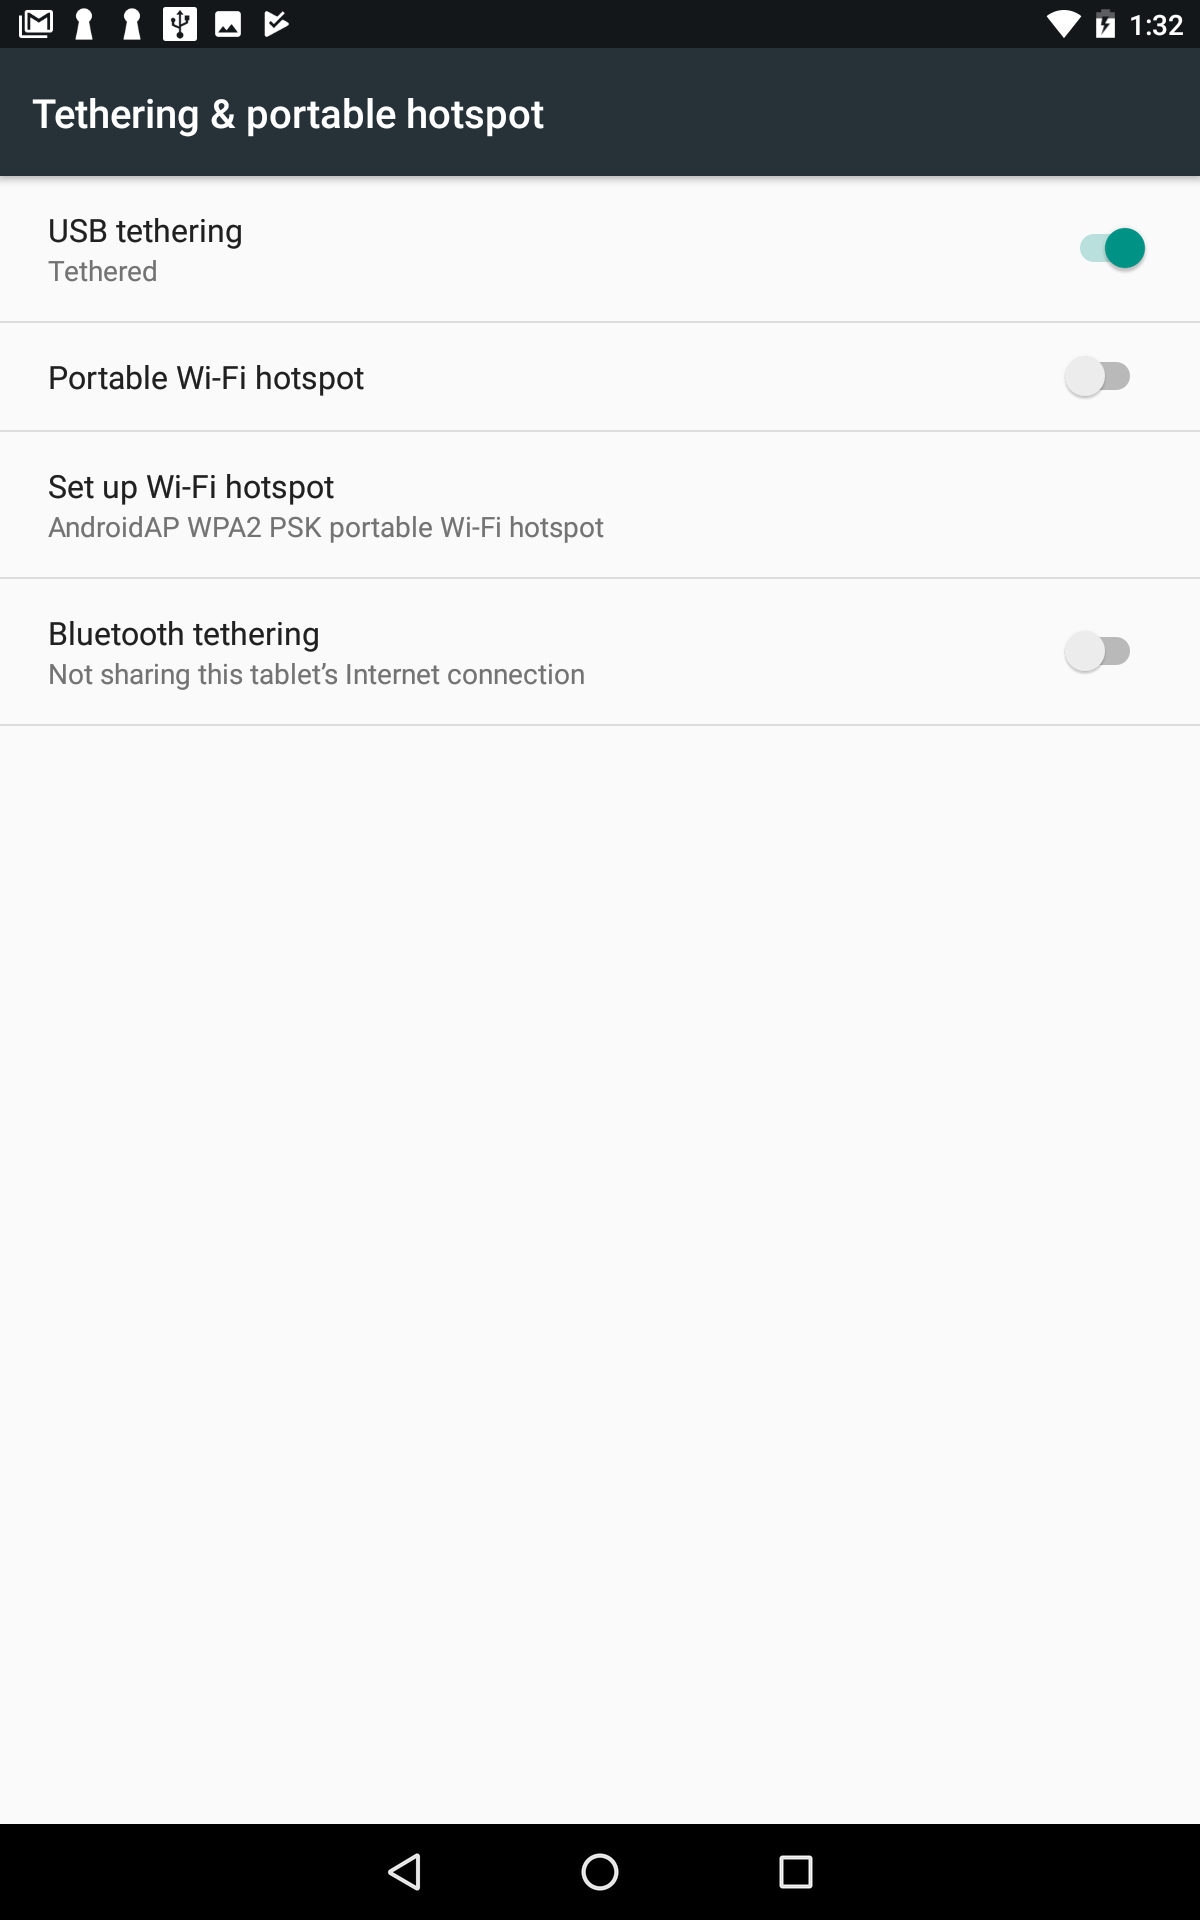
- The Tethering & portable hotspot menu should appear. Click the slider on the right next to the USB tethering option to enable USB tethering to the WiFi Pineapple
- Click the Back button on the Android device to return to the WiFi Pineapple Connector App. Now click Yes that you have now enabled USB tethering
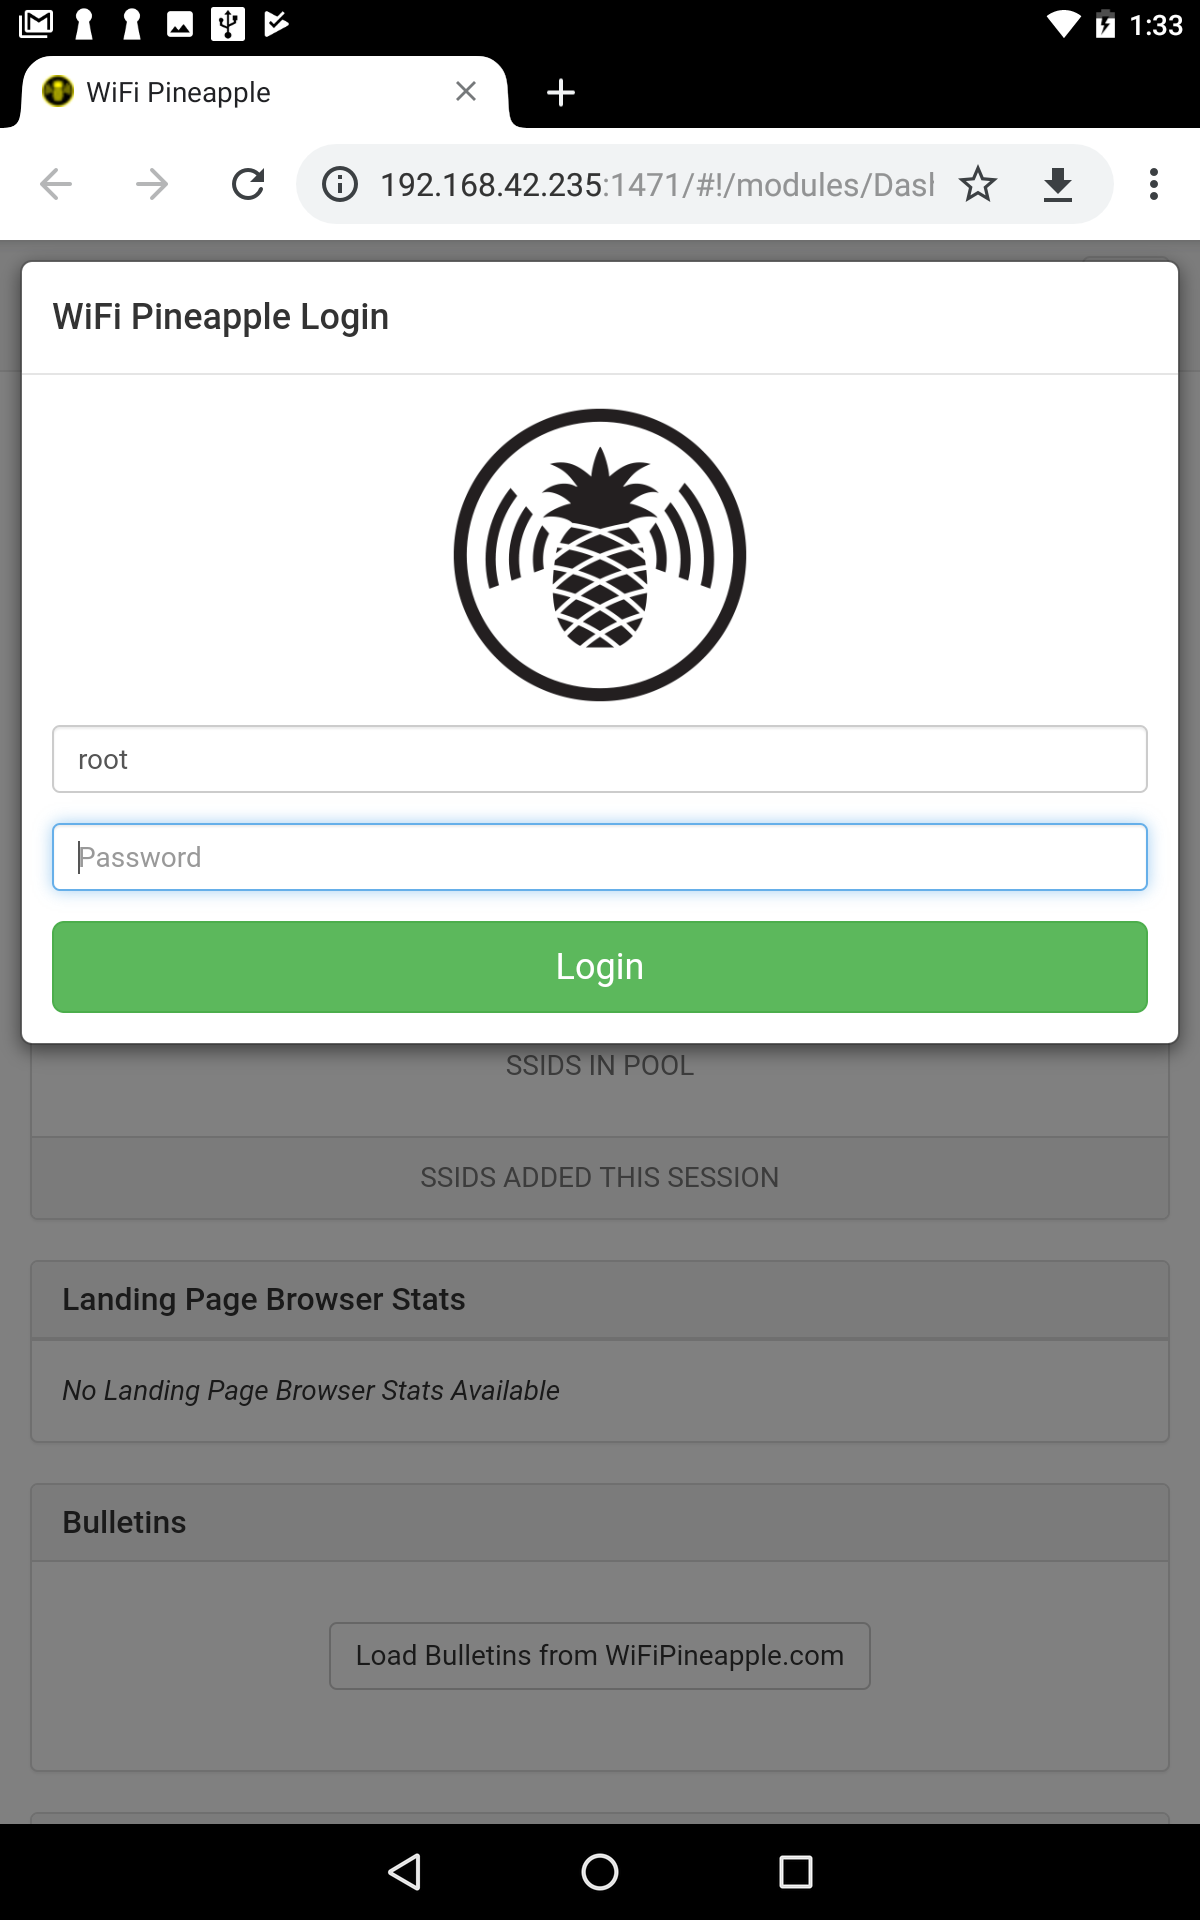
- After a few seconds of detecting the WiFi Pineapple, the app should open a web browser and navigate to whatever IP address the DHCP provided on your internal network with the port of 1471. In my case this was 192.168.42.235:1471
- Follow the on screen instructions to set up the WiFi Pineapple completely, otherwise, login!
- If your android device is connected to the Internet you should be able to immediately load bulletins and be ready to go
Visual Guide
- Plug in the WiFi Pineapple into an available USB slot using the supplied USB Y Cable or any USB that meets the WiFi Pineapple power specifications. Connect the charging cord to your Android device and plug the USB end into the female USB insertion on the WiFi Pineapple
- On your Android device, go the Play Store and search for WiFi Pineapple Connector and download the WiFi Pineapple Connector App

- Open the WiFi Pineapple Connector App and a modal should appear prompting for USB Tethering Required. Click No , that you don’t have it enabled (If you do already click Yes )
- The Tethering & portable hotspot menu should appear. Click the slider on the right, next to the USB tethering option to enable USB tethering to the WiFi Pineapple
- Click the Back button on the Android device to return to the WiFi Pineapple Connector App. Now click Yes that you have now enabled USB tethering
- After a few seconds of detecting the WiFi Pineapple, the app should open a web browser and navigate to whatever IP address the DHCP provided on your internal network with the port of 1471. In my case this was 192.168.42.235:1471. Follow the on screen instructions to set up the WiFi Pineapple completely, otherwise, login!
- If your android device is connected to the Internet you should be able to immediately load bulletins and be ready to go

Try a simple MITM attack to get things started
If you aren’t seeing bulletins:
- Ensure you performed all steps correctly
- Use a search engine to find others with similar problems as yours
- Contact me via email with any concerns
-
- *